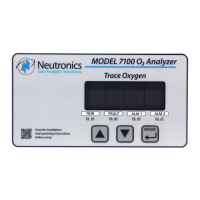
3.2 Starting up and Commissioning the System
The Model 7100E is shipped ready to use. Factory default configuration settings are listed in Appendix C.
Those settings will be suitable for most applications. Review the factory default configuration settings
before commissioning your system. If you wish to change any of the factory default settings, refer to
sections 4.1.1 and 4.1.2.
POWER UP CHECK LIST:
Mounted the analyzer and sensor in areas where there are no flammable vapors
Mounted the system away from exposure to rain, dripping water, or hose down
Correctly installed all of the wiring
Connected the sensor interface cable at both the sensor and analyzer
Ensured gas tight plumbing at the sensor flow-through head
Regulated the sample pressure as instructed in section 2.1.2.4
Reviewed and read this manual in its entirety
STEP 1 – Power Up the unit
When the Model 7100E is powered-up, it will go through a 5-second self-test. The 7-segment
alphanumeric display will show “8.8.8.8.”, then XXXX (software build). The Run, Alarm-1, Alarm-2 and
Fault LED indicators will go through a display test sequence (Lamp Test). The unit will then begin a 60-
second warm-up period for the heated Zirconium Oxide oxygen sensor. The 7-segment alphanumeric
display will show alternately XX.X (the timer count-down in seconds), and “nr”.
When the warm-up period is complete, the Model 7100E will check the sensor signal, update the display
and status LED’s, and enter into the appropriate system mode according to programmed parameters
(Appendix C – system configuration). Once the analyzer reading has stabilized, the user may apply a
PPM test gas to the sensor to check the system. Allow the new reading to stabilize. It should take about
5-minutes for the gas to sweep out the sample lines, depending on the length.