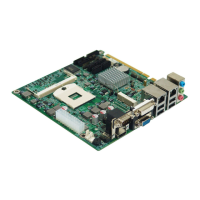
MITX-6922 Mini-ITX Motherboard Based on Intel QM67/QM77 Chipset
5
2.Install Memory;
3.Install other expansion cards;
4.Connect all signal lines, cables, control panel circuit and power supply unit;
5.Start the computer and complete BIOS Settings
Key components of this motherboard are Integrated circuit and these components
could be easily damaged by electrostatic influence. So, before installing this unit, please
always keep the following precautions in mind:
1.Hold the board by edges and don’t touch any components, plugs or socket pins;
2.Wear anti-static gloves/wrist strap while touching the integrated circuit components, such as
CPU, RAM, etc;
3.Put those unused or uninstalled components in static shielding bags or trays;
4.Please first check the power switch is off before connecting the power plug.
2.3 Memory Installation
Board with 2xDDRⅢslot. Please pay attention to following two points when installing the
memory bank:
1.Align the notch of the DIMM memory bank with that of the socket. Insert the memory bank
into the socket and press the memory bank vertically and evenly on both sides until the
memory bank enters into the slot.
2.Select the memory bank that matches your motherboard.
2.4 Jumper Settings
Please refer to following instructions to do jumper settings before installing your hardware
devices.
Remark: How to identify the PIN1 of all jumpers and interfaces: Please observe the word
mark on the side of the plug socket, which will be a “1” or bold line or triangular symbol; And
please look at the back of PCB, each with a square shape will be the PIN 1; and all the jumpers’
PIN1 have a white arrow on the side.
2.4.1 CMOS Clear/Hold Jumper Setting(JCC)
CMOS is powered by the onboard button cell. Clear CMOS will lead to permanent
elimination of previous system settings(factory default).
Steps:(1)Turn off the computer, disconnect power supply;
 Loading...