www.linearcorp.com 17 e3 eMerge Installation Instructions
7.0 Network Connection
e controllers must be located in a trusted network environment where a protected network
security system ( rewall, etc.) is installed and maintained. Obtain the following information from
your network administrator before con guring the controller:
♦ IP address
♦ Subnet Mask
♦ Gateway
♦ DNS 1 and 2
7.1 Preparing for the Network
To allow for the system to be recognized on the local network, it is necessary to change the
controller’s IP address as follows:
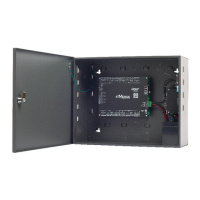
1. Connect your programming computer directly to the Ethernet port of the controller as
shown in Figure 7.1. A standard Ethernet may be used for the direct connection - crossover
is not required. (You may also connect the computer and controller to an Ethernet Switch.)
A standard Ethernet may be used for the direct connection - crossover is not required.
Figure 7.1. Connecting to the Control Panel
2. Assign a static IP address of 192.168.0.149 to the computer. (For instructions on how to
change the static IP address of a Windows computer, please visit: http://technet.microsoft.
com/en-us/library/ 710457).
3. After assigning the static IP address,
open a web browser and
enter the IP address of the
controller (Default = 192.168.0.250).
4. e controller presents the e3 page as shown in Figure 7.2. To log on, enter the default user
ID and password (admin/admin).
Figure 7.2. Login Page
Note: For UL
installations, the
maximum Ethernet cable
length is 30m (98.5 FT.).
ETHERNET
LAN LED
Note: If a DHCP server
is present, IP Addresses
are dynamically
assigned. A static IP
address is strongly
recommended for the
controller because a
DHCP Server may assign
a new IP Address.
Caution: The system is
exposed to potential risks
if installed on a network
without proper security
precautions. Consult the
appropriate on-site IT
administrator.
 Loading...