www.linearcorp.com 7 e3 eMerge Installation Instructions
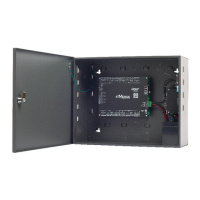
3.2 Mounting the Metal Enclosure
e metal enclosure is designed to accommodate one or two 12VDC 7Ah backup batteries and
the necessary wiring connections for most installations. Conduit knock-outs are provided on all
sides of the enclosure. e enclosure should be mounted vertically on a wall in a secure location
within normal temperature levels. A minimum of 12 inches of space around all sides of the
enclosure is recommended.
Installing the Panel
1. Run all necessary wires to the panel location.
2. Remove the enclosure’s cover by unlocking the door and disconnecting the ground wire. e
door may be lifted out of the hinge slots.
3. Remove the metal cabinet knock-outs required for wire entry and install bushing or conduit
connectors as needed to protect wires from damage.
4. Level the enclosure on a sturdy wall. Mark the mounting holes with a pencil. ( e cabinet
can be vertically or horizontally mounted depending on space requirements.)
5. Partially insert screws into the top two mounting holes and hang the enclosure on the screws.
6. Pull all wires through the knock-out holes in the enclosure. Label each wire according to its use.
7. Recheck for level, insert the two lower screws, and tighten all four mounting screws.
8. Re-install the door and connect the ground wire to the door.
Figure 3.3. Metal Enclosure
Note: Choose a centrally
located, secure, clean
and dry area near an
AC power source. Avoid
mounting the panel within
6 feet of any equipment
that generates electrical
interference.
Caution: This equipment
includes electronic
components that are
highly sensitive to
static electricity. Please
discharge by touching
an earth ground before
installing or handling this
equipment.
Note: Tie down loops are
located in the enclosure
and used to provide
strain relief for fi eld
connections.
WireTie Down Loops
Mounting holes
Cabinet knockouts
Power Supervision
& Battery Charger
Module
Cover Tamper
EARTH
GROUND
& READER
SHIELD LEAD
 Loading...