16 | nVent.com
WARNING:
Electrical Hazard
Always verify all wiring connections before applying power to the card rack or any heating
circuit. To avoid injury or equipment damage, do not install or remove wiring while power is on.
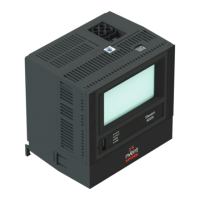
Both types of CR 2000 and CR 2000+ card racks are designed to be mounted to a swing out
door of a panel using four card rack mounting brackets (see Appendix D for panel cutout and
dimensions). Remove all wires connected to the terminal blocks on the back of the card rack
by inserting a small bladed screw driver in the terminal block slot and pulling the wires out
of the terminal block. Pay particular attention to the location of each wire, as all wires must
be terminated properly upon replacement for proper operation. Incorrect terminations may
damage a control module or the alarm/communications interface card.
To remove the card rack from the panel, loosen the mounting screw on each of the four
mounting brackets located on both the top and bottom sides of the card rack. Once loose, the
mounting bracket may be removed from the card rack by sliding it forward and lifting vertically
from the card rack.
Install in the reverse order.
2.5.2 CONTROL MODULE REMOVAL AND INSTALLATION
WARNING:
Shock Hazard
Always ensure that all power to the individual control modules is turned off during installation
or removal to avoid the risk of injury to personnel and damage to the control modules.
WARNING:
Hazardous Area Explosion Hazard
Do not install or remove the control module while the unit is powered.
To remove a control module from any of the ten right-most slots of the card rack, loosen the
screw on the top front edge of the control module faceplate. However, do not remove it! Once
the screw has been loosened approximately 1/4”, grasp the screw and pull firmly straight
out, away from the card rack. If the screw is still engaged, slowly loosen it by hand continuing
to pull away from the card rack. When the mounting screw is free of the card rack, slide the
control module out of the card rack by grasping the faceplate. Do not handle the control
module by the PC board. Store immediately in the anti-static bag provided.
Install in the reverse order.
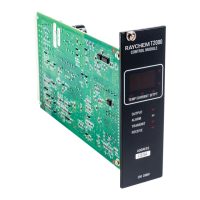
2.5.3 ALARM/COMMUNICATION INTERFACE CARD REMOVAL AND INSTALLATION
WARNING:
Always ensure that all power to the alarm/communications interface card is turned off during
installation or removal to avoid the risk of injury to personnel and damage to the card.
WARNING:
Hazardous Area Explosion Hazard
Do not install or remove the alarm/communications interface card while the unit is powered.
To remove an Alarm/communications Interface card from the left-most slot of the card rack,
loosen the screw on the top front edge of the card’s faceplate. However, do not remove it!
Once the screw has been loosened approximately 1/4”, grasp the screw and pull firmly straight
out, away from the card rack. If the screw is still engaged, slowly loosen it by hand continuing
to pull away from the card rack. When the mounting screw is free of the card rack, slide the
interface card out of the card rack by grasping the faceplate. Do not handle the interface card
by the PC board. Store immediately in the anti-static bag provided.
Install in the reverse order.
IMPORTANT:
• When using an AC 2000 with a CR 2000+ or a CR 2000-CPS+ card rack, the dry contact alarm
relay connections are not available.
 Loading...