21
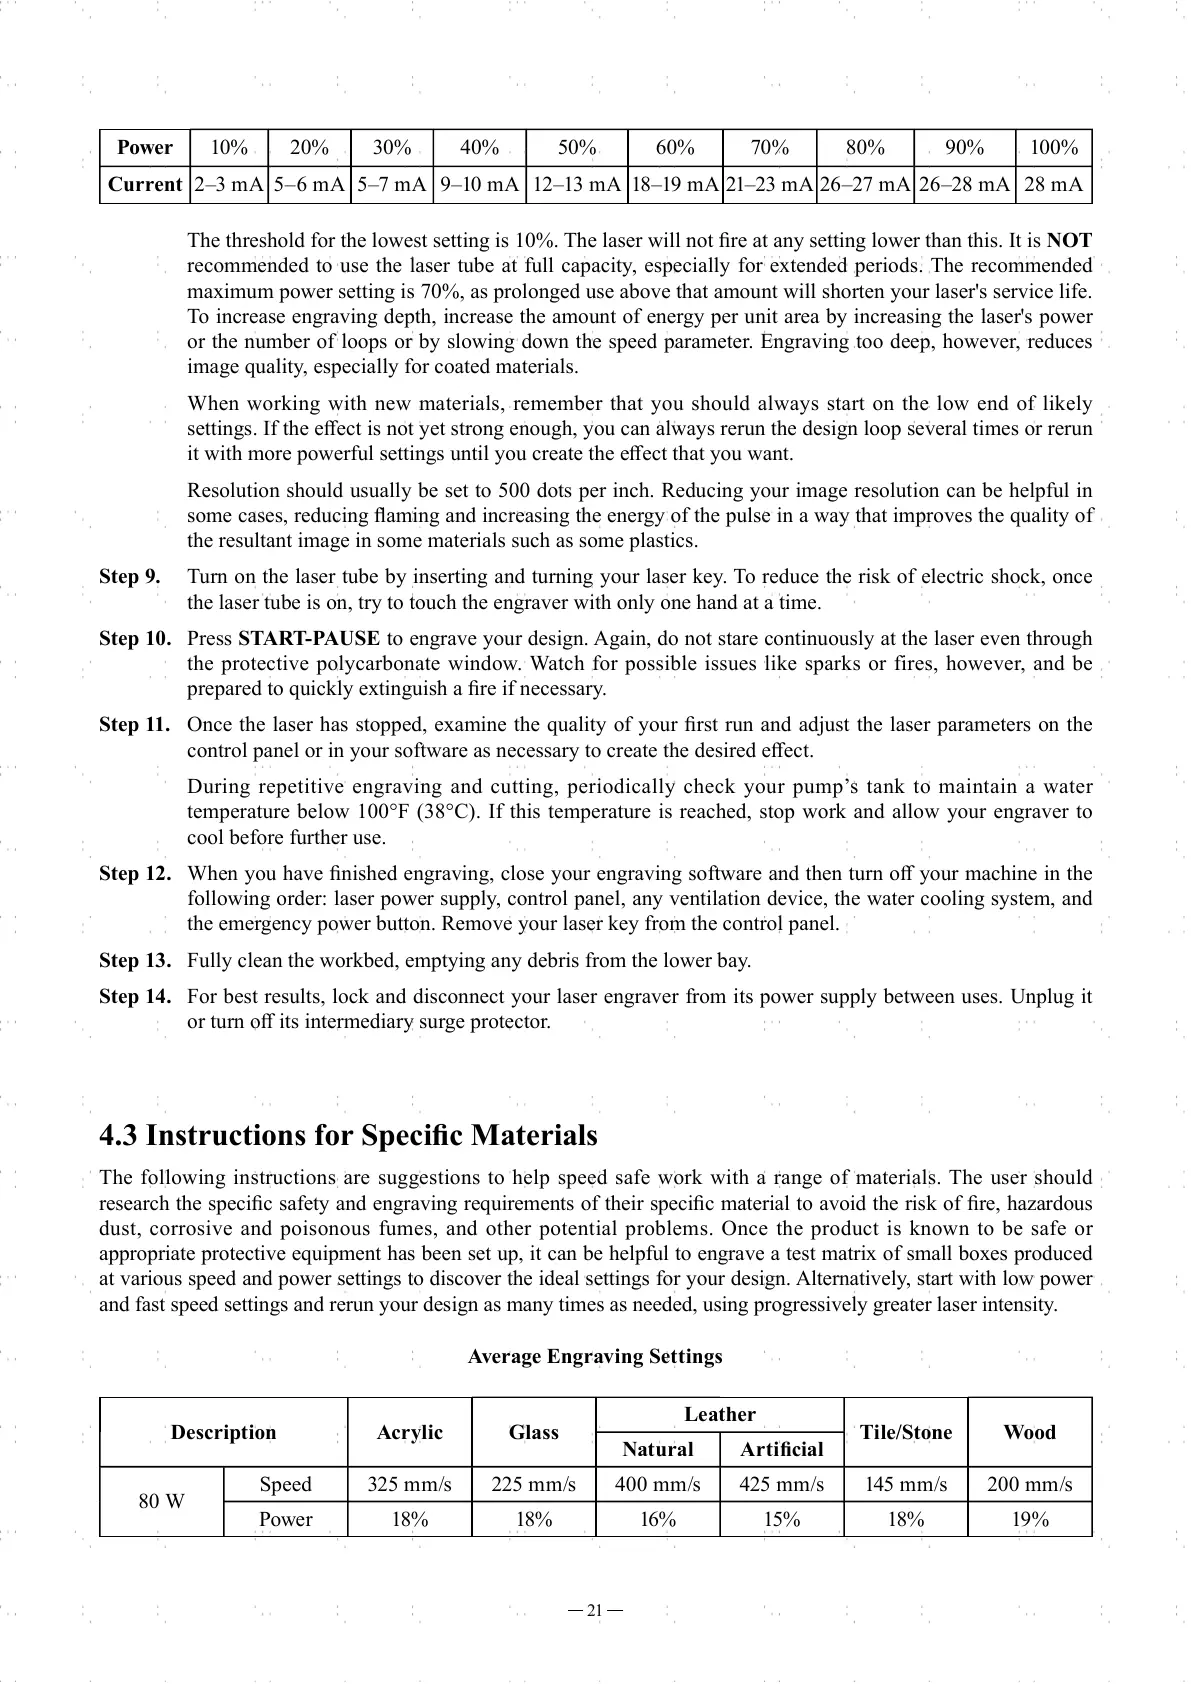
The threshold for the lowest setting is 10%. The laser will not fi re at any setting lower than this. It is NOT
recommended to use the laser tube at full capacity, especially for extended periods. The recommended
maximum power setting is 70%, as prolonged use above that amount will shorten your laser's service life.
To increase engraving depth, increase the amount of energy per unit area by increasing the laser's power
or the number of loops or by slowing down the speed parameter. Engraving too deep, however, reduces
image quality, especially for coated materials.
When working with new materials, remember that you should always start on the low end of likely
settings. If the eff ect is not yet strong enough, you can always rerun the design loop several times or rerun
it with more powerful settings until you create the eff ect that you want.
Resolution should usually be set to 500 dots per inch. Reducing your image resolution can be helpful in
some cases, reducing fl aming and increasing the energy of the pulse in a way that improves the quality of
the resultant image in some materials such as some plastics.
Step 9. Turn on the laser tube by inserting and turning your laser key. To reduce the risk of electric shock, once
the laser tube is on, try to touch the engraver with only one hand at a time.
Step 10. Press START-PAUSE to engrave your design. Again, do not stare continuously at the laser even through
the protective polycarbonate window. Watch for possible issues like sparks or fires, however, and be
prepared to quickly extinguish a fi re if necessary.
Step 11. Once the laser has stopped, examine the quality of your fi rst run and adjust the laser parameters on the
control panel or in your software as necessary to create the desired eff ect.
During repetitive engraving and cutting, periodically check your pump’s tank to maintain a water
temperature below 100°F (38°C). If this temperature is reached, stop work and allow your engraver to
cool before further use.
Step 12. When you have fi nished engraving, close your engraving software and then turn off your machine in the
following order: laser power supply, control panel, any ventilation device, the water cooling system, and
the emergency power button. Remove your laser key from the control panel.
Step 13. Fully clean the workbed, emptying any debris from the lower bay.
Step 14. For best results, lock and disconnect your laser engraver from its power supply between uses. Unplug it
or turn off its intermediary surge protector.
4.3 Instructions for Specifi c Materials
The following instructions are suggestions to help speed safe work with a range of materials. The user should
research the specifi c safety and engraving requirements of their specifi c material to avoid the risk of fi re, hazardous
dust, corrosive and poisonous fumes, and other potential problems. Once the product is known to be safe or
appropriate protective equipment has been set up, it can be helpful to engrave a test matrix of small boxes produced
at various speed and power settings to discover the ideal settings for your design. Alternatively, start with low power
and fast speed settings and rerun your design as many times as needed, using progressively greater laser intensity.
Power 10% 20% 30% 40% 50% 60% 70% 80% 90% 100%
Current 2–3 mA 5–6 mA 5–7 mA 9–10 mA 12–13 mA 18–19 mA 21–23 mA 26–27 mA 26–28 mA 28 mA
Average Engraving Settings
Description Acrylic Glass
Leather
Tile/Stone Wood
Natural Artifi cial
80 W
Speed 325 mm/s 225 mm/s 400 mm/s 425 mm/s 145 mm/s 200 mm/s
Power 18% 18% 16% 15% 18% 19%