Do you have a question about the oticon Agil and is the answer not in the manual?
Introduction to fitting Oticon Agil instruments, covering possibilities and instrument features.
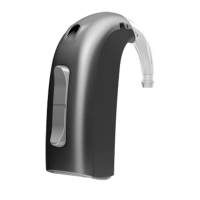
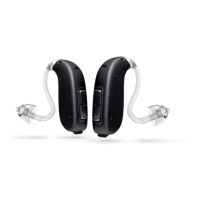
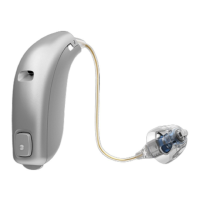
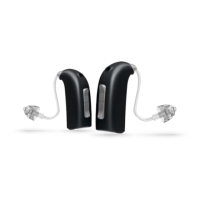
Overview of the different hearing instrument types within the Oticon Agil family.
Explains the compression and fitting logic used for Oticon Agil instruments.
Details the new flexible receiver system with S, M, and P options for Agil instruments.
Lists the key features and capabilities of the Oticon Agil hearing instruments.
Outlines the available fitting options and rationales supported by Genie 2010.1 software.
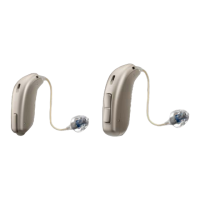
Visual presentation of the different styles of Oticon Agil hearing instruments.
Displays the available colour options for Oticon Agil hearing instruments.
Compares key features like T-coil, ConnectLine, Auto Phone, and controls across instrument styles.
Compares battery sizes, fitting types, and signal inputs (FM/DAI) for instrument styles.
Details the full fitting range of Oticon Agil instruments from CIC to Power models.
Lists key factors for achieving optimal performance, cosmetics, and fit for miniRITE/RITE.
Details MPO and Gain specifications for Standard, Medium, and Power Receivers.
Explains the availability and common usage of five receiver lengths for Standard, Medium, and Power Receivers.
Guidance on determining ear canal suitability for RITE Power receivers using a measurement gauge.
Explains how to identify receiver type (S, M, P) and size markings on the unit.
Describes how to measure ear canal length for non-power receivers using a measuring tool.
Details specific measurement adjustments for power receivers with custom moulds.
Step-by-step instructions for connecting the receiver unit to the hearing instrument shell.
Guide on using the multi-tool to safely detach and remove the receiver unit.
Instructions on how to attach the ear grip for improved receiver retention in the ear.
Method for dislodging and removing the ear grip from the receiver unit.
Detailed steps for inserting the earpiece and positioning the hearing device behind the ear.
Techniques for adjusting the receiver wire shape for better fit and depth using heat.
How to straighten the S-portion of the receiver wire to add length.
Adjusting the receiver wire bend to control insertion depth and prevent bowing.
Overview of choices for domes (Open, Plus, Power) and custom moulds for different receivers.
Details on Open Dome sizes and suitability for hearing losses up to 70 dB.
Information on Plus Domes, their gain characteristics, and suitability for increased loudness.
Description of Power Dome sizes and their use for instant fittings up to 80 dB.
Explains the use of Micro Moulds as an acrylic custom solution instead of a dome for RITE fittings.
Lists available custom mould styles: Canal, Canal Lock, Skeleton, Half Shell for RITE instruments.
Describes short vents in micro moulds and their larger vent effect compared to diameter.
Details long vents in Canal RITE moulds and their vent effect relative to diameter.
Step-by-step guide for attaching the receiver unit to the micro mould, including using a mould tool if needed.
Instructions for correctly inserting the receiver into the micro mould, ensuring a click and proper alignment.
Procedure for safely removing the micro mould from the receiver unit using a special tool.
How to determine ear canal suitability for RITE Power receivers using a measurement gauge.
Steps for attaching a power mould to a power receiver, ensuring correct fit and recess.
Detailed steps for removing the power mould from the receiver unit using a screwdriver and tool.
Information on the transparent Power Micro Mould option and its selection in Genie.
Instructions for attaching a power adapter to the receiver unit for Power Mould usage.
Step-by-step guide for converting a hearing instrument from a mould to a dome fitting.
Lists the components included in the Corda² kit for thin tube fittings.
Describes Micro Moulds and other custom mould options (Canal Lock, Skeleton, Half Shell) for Corda².
Explains how to connect Oticon Agil instruments to the Genie fitting software using cables.
Procedure for fitting Corda² with moulds within the Genie software, including vent size verification.
Instructions for connecting miniRITE instruments using the Flex Connect interface.
Steps for connecting BTE and RITE instruments via the Programming Shoe.
Guide for connecting ITE and ITC instruments using the Programming Adapter.
Instructions for connecting CIC/MIC instruments using the Flex Connect interface.
Describes using nEARcom for flexible and comfortable cordless fitting of Oticon Agil instruments.
Steps for detecting instruments and performing a BEEP test for proper identification and programming.
Overview of the Genie software interface, including the Organizer and Task Pane for programming.
Guide on navigating to the Oticon Agil family within Genie for fitting simulation or actual programming.
Process of selecting instrument styles and features based on client needs and available options.
Details on adjusting gain, compression, and frequency channels using Genie's fitting controls.
Introduction to the Adaptation Manager for gradual acclimatisation of hearing instrument settings.
How to adjust gain controls and Maximum Power Output (MPO) in Genie for fine-tuning.
Explains the initial low-frequency gain settings for RITE/Corda² and how to adjust them.
Using the Program Manager to activate, configure, and manage programs and fitting rationales.
Steps to activate and set the Adaptation Manager for client acclimatisation.
Explains how directional microphones adapt to improve speech understanding in noisy environments.
Details TriState Noise Management for detecting speech and reducing noise without compromising clarity.
Describes "My Voice" feature for recognizing client's own voice to optimize noise reduction.
Using the Acoustics tool to adjust vent size or dome type.
Employing the Feedback Manager to set feedback limits and prevent static feedback.
Navigating between different identities (prescribed vs. fine-tuned) using the Identity Selector.
Using Live Demonstration to show real-time evaluation of amplification, directionality, and noise management.
Explains how to demonstrate amplification, directionality modes, and noise management effects.
Oticon Agil Memory tracks instrument usage and environmental data for learning and adaptation.
Details the Life Learning feature for automatic adaptation and its configuration options.
Using the Fitting Assistant to address common fitting issues and adjust controls based on client complaints.
Procedure for performing in-situ audiometry to make precise fittings using client's own instruments.
Selecting whether to use in-situ audiogram results for calculations or continue with normal audiogram.
Using the Genie REM tool to verify fittings by comparing measurements with simulated curves.
Steps to link the Streamer to the instruments, including reading the serial number.
Defining the functionality of buttons, volume control, and beeps on Oticon Agil instruments.
Enabling binaural coordination to synchronize button operations across both instruments.
Setting audible indications for program and volume control changes.
Explains single button operations for program changes and volume control on miniRITE instruments.
Describes push button operations for program changes and volume control on ITC instruments.
Overview of adjustable controls in ConnectLine for General Perception, Power Bass, and Music Widening.
Fine-tuning settings for General Perception, Power Bass, and Music Widening for TV streaming.
Adjusting General Perception and Power Bass for phone streaming via ConnectLine.
Fine-tuning settings for General Perception, Power Bass, and Music Widening for music streaming.
Defining Auto Phone functionality and boosting DAI/FM signals for relevant programs.
Using the tool to instruct clients on instrument operations and printing information.
Explains ConnectLine as an integrated system for entertainment and communication benefits.
Details the advantages of ConnectLine for handsfree communication and audio streaming.
Describes the roles of Streamer, TV Adapter, and Phone Adapter in the ConnectLine system.
Instructions for pairing Streamer with devices for wireless communication.
Guidance on adjusting volume, muting microphones, and daily use of the Streamer.
Steps for pairing mobile phones with the Streamer via Bluetooth.
Instructions for answering, rejecting, hanging up, and making calls using Streamer with a mobile phone.
Procedure for pairing the TV Adapter with Streamer for wireless TV audio transmission.
How to start and stop TV sound streaming from the TV Adapter via Streamer.
Steps to pair the Phone Adapter with Streamer for landline phone audio.
Managing incoming phone calls while listening to TV via Streamer.
Connecting and starting wireless audio streaming from Bluetooth devices to Streamer.
Connecting audio sources via cable to Streamer for audio playback.
How to stop wireless or wired audio streaming and return to the default program.
Guidelines on wearing the Streamer and battery charging and life.
How to use the key lock to prevent unintended button activation.
Steps for connecting Streamer to a PC and performing a firmware upgrade.
Important notes and prerequisites for successfully upgrading Streamer firmware.
Instructions for replacing domes on hearing instrument receivers due to wax clogging.
Explains the damper's function as an acoustic filter and how to replace it when clogged.
Guidance on replacing the NoWax filter in receivers when clogged or no sound is detected.
Instructions for replacing the WaxStop filter in RITE moulds and power receivers.
Lists the tools required, such as multi-tool and tweezers, for miniRITE top shell exchange.
Step-by-step guide for removing and installing the miniRITE top shell, including pin management.
Detailed steps for carefully removing the existing miniRITE top shell.
Instructions for correctly mounting and securing the new miniRITE top shell.
Steps for removing and installing the battery door on a miniRITE hearing instrument.
Answers questions about changing domes, NoWax filters, and receiver units.
Clarifies receiver compatibility with different instrument models and usage scenarios.
| Type | Behind-the-Ear (BTE) |
|---|---|
| Noise Reduction | Yes |
| Directional Microphones | Yes |
| Feedback Management | Yes |
| Battery Type | Size 13 |