– 21 –
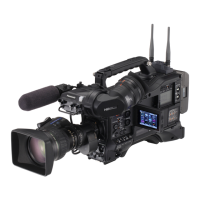
Chapter 2 Description of parts — Shooting and recording/playback functions section
Shooting and recording/playback functions section (recording unit)
HOLD COUNTER RESET MONITOR SEL
/REW STOP FF/ PLAY/PAUSE
CAM
AUDIO
SETUP
SET
THUMBNAIL
KEY LOCK
TOP
MULTI SEL
EXIT
CANCEL BOTTOM
MENU
SHIFT
HOME
LIGHT
0
-10
-18
-20
-30
dB
TC NDF SLAVE P -REC
1 2
MEDIA
E
F
BATT
E
F
CH1
CH2
A
2
3
4
7
19
18
17
28
23
27
26
25
24
20
1
8 9
16
21 22
6
29
5
10 11 12 13
14 15
1 <REC> button (page 54)
Press this button to start recording. Press it again to stop recording.
This button has the same function as the VTR button on the lens side.
2 <SDI OUT1> terminal (page 82)
This is the output terminal for SDI signal. Output is performed in the same signal format as in the system mode. Down-conversion and up-conversion
are not supported.
3 <GL IN/VIDEO OUT> terminal (pages 102)
This is the input terminal for reference signals when setting the genlock to the camera unit. This is also the output terminal for the VBS signal for
monitor. Switch the setting using the main menu → [IN/OUT SEL] → [GL IN/VIDEO OUT SEL].
@@
NOTE
t Supply Y signal of HD or composite signals as the input signal. However, the sub-carrier of the composite signal on the camera cannot be
externally locked.
4 <SDI OUT2/IN> terminal (page 82)
This is the output terminal for the SDI signal for monitor. This is also the input terminal for SDI signal. Switch with the main menu → [IN/OUT SEL] →
[SDI OUT2/IN SEL]. Video independent from the <SDI OUT1> terminal can be output. Also, the HD SDI signal or the down-converted SD SDI signal
can be selected in the [SET02:MON OUT SELECT] screen of SmartUI. Cross-conversion and up-conversion are not supported.
5 <LAN> terminal (page 194)
Connect the LAN cable.
@@
NOTE
t For the cable to be connected to the <LAN> terminal, use the shielded cable.
6 <USB2.0> terminal (sub-host) (pages 192, 193)
Mount the wireless module AJ-WM30 (optional). Or, attach the USB 2.0 extension cable connecting the body and the 4G/LTE USB modem
(optional).
7 <FOCUS ASSIST> button (page 58)
Switch on/off the focus assist function.
8 microP2 memory card 1 access LED (page 48)
Indicate the access status of recording and playback of the card inserted in the microP2 memory card slot 1.
9 microP2 memory card slot 1 (page 47)
10 Busy (active status indication) lamp (page 91)
Indicate the active status of the SD memory card, and is illuminated when the card is active.
@@
NOTE
t Do not remove or insert the card while the lamp is lit. Doing so may damage the SD memory card.

 Loading...