Do you have a question about the Paradox Spectra 1759EX V1.0 and is the answer not in the manual?
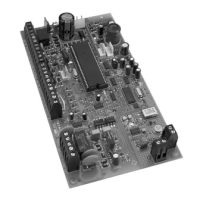
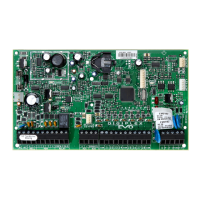
Key features of the Spectra 1759EX control panel, including programmable zones, partitions, and communication capabilities.
Technical specifications for the Spectra 1759EX control panel, covering power, battery, and output ratings.
Specifications for various Spectra keypads, including power input and current consumption.
Guidelines for selecting an optimal location and mounting the control panel cabinet.
Instructions for properly grounding the control panel and its associated terminals.
Details on connecting the AC power transformer and selecting the appropriate transformer.
Instructions for connecting the backup battery for power loss protection.
Information on using auxiliary power terminals to power system modules and accessories.
Instructions for connecting the telephone line to the control panel for central station communication.
Details on connecting bells and sirens to the control panel's bell output.
How to connect devices to the programmable output (PGM) terminals for various functions.
Connecting detection devices like motion detectors and door contacts to zone input terminals.
Connecting keypads to the control panel and configuring keypad zones.
Connecting keyswitches for arming/disarming the system and their programming.
Wiring and programming for Fire Zones, including 4-wire installation for smoke detectors.
Instructions for programming the Spectra Series control panels using WinLoad software.
Steps for entering programming mode and using keypad programming methods.
Steps to configure LED keypads (1686H, 1686V, 1689) for zone, EOL, and tamper settings.
How to copy programming between panels using the Paradox Memory Key (PMC-3).
Setting the length of access codes to either 4 or 6 digits.
Information on the Installer Code used to enter programming mode.
Details on the System Master Code for system programming and user code management.
Configuring user code options to define arming methods and partition access.
Locking the System Master Code to prevent deletion.
Designating User Code 048 as a Duress Code for silent alerts.
Explanation of expansion inputs for increasing system zone capacity.
Reassigning Keypad Zone 2 to function as an expansion input.
Reassigning zones to expansion inputs to increase display capability on 10-Zone LED Keypads.
Defining zone parameters, partition assignment, and alarm reaction.
Describes the 9 available zone definitions for alarm detection.
Configuring zones for entry delay 1, used for entry/exit points.
Configuring zones for entry delay 2, with a separate timer.
Zones that trigger an alarm only after an entry delay zone has elapsed.
Zones that trigger an immediate alarm when breached.
Zones that trigger an alarm immediately, regardless of system state.
Zones that trigger a keypad buzzer notification for breaches.
Special zone definitions for on-board terminals: Keyswitch, Standard Fire, Delayed Fire.
Programming zones for keyswitch operation to arm/disarm the system.
Configuring 24hr. Fire Zones for immediate alarm reporting.
Programming delayed fire zones for residential use with potential false alarms.
Assigning zones to Partition 1, Partition 2, or both.
Configuring various zone options like Auto Zone Shutdown and Bypass.
Enabling auto shutdown for zones after multiple alarms in a single armed period.
Enabling zones to be bypassed by users.
Enabling zones to be bypassed when the system is Stay Armed.
Defining alarm types (steady, pulsed, silent, report only) for zones.
Reducing false alarms by using an Intellizone delay timer.
Delaying alarm transmission to reduce false alarms from entry delay zones.
Enabling zones to be force armed, ignoring open zones at arming time.
Configuring keyswitches as maintained/momentary and for regular/stay arming.
Defining how quickly the control panel responds to an open zone.
Enabling the use of EOL resistors for zone detection devices.
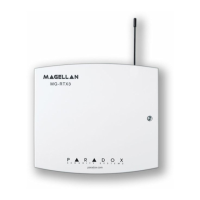
Steps to assign wireless transmitters to the Spectra 1759EX and program zones.
Assigning wireless transmitters to expansion inputs (zones) using serial numbers.
Verifying the signal strength of installed wireless transmitters.
Procedure for deleting wireless transmitters from the system.
Displaying the serial number of any wireless transmitter on the keypad.
Assigning remote controls to specific user access codes.
Programming the functions of remote control buttons.
Configuring supervision options for wireless transmitters.
Steps to program remote controls for arming/disarming and other functions.
Configuring the panel for Omnia or Parakey remote controls.
Procedure for deleting assigned remote controls from the system.
Setting a timer to automatically stop the bell or siren after an alarm.
Re-verifying zone status and generating another alarm if zones are still open.
Configuring how the system reacts to tamper detection on zones.
Configuring panic alarm types (emergency, auxiliary, fire) and their audible/silent settings.
Setting a timer to ignore disarm signals from remote controls during a panic situation.
Enabling or disabling the system's reporting and dialing capabilities.
Programming 1 or 2-digit hexadecimal report codes for system events.
Programming report codes for user access codes when arming the system.
Report codes for special arming features like auto-arm and keyswitch arming.
Programming report codes for user access codes when disarming the system.
Report codes for special disarming features like auto-arm cancel.
Programming report codes for individual zones when they generate an alarm.
Report codes for when zones return to a normal state after an alarm.
Report codes for panic alarms, auto zone shutdown, and duress events.
Report codes for zones experiencing tamper or wiring faults.
Report codes for when tampered zones are restored.
Report codes for system troubles like AC failure, battery failure, and module faults.
Selecting reporting formats for phone numbers 1 and 2.
Using standard pulse reporting formats like Ademco Slow and Sescoa.
High-speed reporting format transmitting 2-digit report codes.
Using Contact ID format with pre-defined industry standard messages.
Options for Contact ID reporting, including programmable or all codes.
Transmitting report codes to pagers or cellular telephones.
Directing event groups to specific central station telephone numbers.
Selecting between Pulse Dialing and Tone/DTMF Dialing.
Selecting European or U.S.A. pulse ratios for pulse dialing.
Enabling the bell output when communication with the central station fails.
Setting a delay for dial tone detection or hanging up if no dial tone.
Configuring the number of attempts to dial a central station telephone number.
Setting the waiting time between dialing attempts.
Enabling the panel to dial the backup telephone number after every failed attempt.
Setting a delay for transmitting the Recent Close report code after arming.
Programming automatic test reports to be sent to the central station.
Delaying the transmission of AC Failure report codes.
Configuring when disarming report codes are sent to the central station.
Configuring when zone restore report codes are sent to the central station.
Verifying the presence of a telephone line and reporting failures.
Programming events that trigger a PGM to activate.
Programming events or delays that cause a PGM to deactivate.
Setting a delay period for PGMs to deactivate after activation.
Configuring PGMs as normally open (N.O.) or normally closed (N.C.).
Configuring PGM2 output as steady or pulsed (strobe) and its behavior when armed.
Configuring the Alarm Relay to follow the Bell Output or the Global PGM.
Procedure for performing a hardware reset to factory default settings.
Locking programming to prevent unauthorized changes.
Configuring keypad lockout after multiple invalid code entries.
Setting the battery charge current to 350mA or 700mA.
Enabling and configuring the system's partitioning feature.
Programming the current time into the system.
Adjusting the system clock for gain or loss.
Monitoring the on-board tamper status of keypads.
Enabling audible trouble warnings on keypads.
Configuring keypads to turn off LEDs and screens after inactivity.
Using specific keys for quick access to installer functions like test mode.
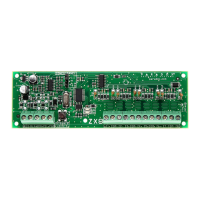
Enabling supervision for 4-PGM Output Modules.
Enabling supervision for the Printer Module.
Enabling supervision for Zone Expansion Bus Modules.
Enabling low battery supervision for wireless transmitters.
Configuring supervision options for wireless transmitter tampering.
Reprogramming expansion modules after replacement or configuration changes.
How to view and interpret trouble conditions indicated on the keypads.
Procedures for programming and deleting user access codes.
Steps to disarm the system or deactivate an alarm using an access code.
How to arm the system using the Regular Arming method.
How to arm the system in Stay Arming mode, allowing users to remain on site.
How to switch armed zones to Instant zones during the exit delay.
How to Force Arm the system, ignoring open zones.
How users can program the system to ignore specified zones for the next arming.
Arming the system without an access code by pressing and holding specific keys.
Using a keyswitch to arm and disarm the system.
Activating panic alarms (emergency, medical, fire) by pressing key combinations.
Programming partitions to arm automatically based on timers or no movement.
Viewing zones that were in alarm during a previous alarm period.
Enabling chime notification for specific zones when they are opened.
Enabling or disabling keypad muting for quieter operation.
Adjusting the backlight level of the keypads.
FCC compliance information, registration numbers, and connection requirements.
Information regarding Class B digital device compliance and potential interference.
Installation guidelines and requirements for UL and ULC listed systems.
Specific installation notes for UL listed equipment and system configurations.
| Model | Spectra 1759EX V1.0 |
|---|---|
| StayD Mode | Yes |
| Input Voltage | 16.5 VAC |
| Zones | 8 |
| PGMs | 2 |
| Battery Backup | 12V 7Ah rechargeable battery |
| Supported Protocols | Contact ID, SIA |
| Operating Temperature | 0°C to 50°C |