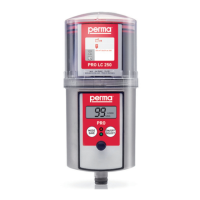
permaPRO-2-
Quick Reference Guide for the Lubrication System perma PRO
OnthispageyouwillndsomeimportantinformationforquickandeasyoperationandsettingofthepermaPRO.
BeforetherstinstallationofthepermaPRO,andwheneveryouneeddetailedinstructions,youshouldreadthe
completeOperatingManualwhichcontainsinformationthatmustbeobserved.Makesuretofollowtheinstructions
giveninthechapter“SafetyNotes”.
1
Assembly of perma PRO / Exchange of PRO LC unit
(refer to chapter 4 and 7)
♦ Mountthedriveunitonthemountingplateandsecureitatthethreepre-drilledholes(seeattached
template).
♦ Insertanewbatterysetintothebatterycompartment(followdirectionsofthearrows).
♦ PlacethePROLCunitinsidethecoverandremovetheplugofthePROLCunit.
♦ PushthePROLCunitintothecoveruntillubricantcomesoutoftheopening.
♦ PlacethePROLCunitwithitscoveronthedrive-unit.Makesurethatthecatchlocksandthatthe
teethofPROLCunitanddriveunitinterlock.
♦ Turnthecoverclockwiseuntilthebayonetcatchlocks.
2
Determine Discharge Period
(refer to chapter 6.7)
♦ Refertothemanufacturer’sguidelinesaboutthelubricationpointthatyouwanttolubricate,inorder
todeterminetherequiredlubricantamountincm
3
peronehundredoperatinghours.
♦ Refertochart3(chapter6.7,chart4)andndyourrequiredlubricationamount.Basedonthat,
thechartwillshowyoutherequiredPROLCunitsize,thesettingofthedischargeperiod,and
thesettingmode.
♦ YoumayalsorefertoourpermaSelectprogramwhichcanbedownloadedfromourwebpagefree
ofcharge.Ithelpsyouinselectingthecorrectsettings.
3
Setting of LC unit Size, Discharge Period, Outlets and PIN
(refer to chapter 6.8)
♦ HolddowntheMODE/SAVEbuttonuntilthesettimeisdisplayed.
♦ HolddowntheMODE/SAVEbuttonagainuntilyoureachthecurrentPIN(PINcannotbechanged
here/PINsettingatdeliveryis“ ”).
♦ HolddowntheMODE/SAVEbuttonagainuntilyoureachtheothersettingmenus:
LCunit,dischargeperiod,outlets(onlywithattachedMP-6),andPINchange.Changesettingswith
ashortpushofMODE/SAVEorON/OFF/SELECT.
4
Save Settings
(refer to chapter 6.8)
♦ KeeptheMODE/SAVEbuttonpresseduntildisplayshows“ ”.
5
Starting perma PRO
(refer to chapter 6.5)
♦ HolddowntheON/OFF/SELECTbuttonuntilthe“RemainingVolume”appearsinthedisplayand
thegreenLEDstartsblinking.
6
Stopping perma PRO
(refer to chapter 6.6)
♦ KeeptheON/OFF/SELECTbuttonpresseduntilthedisplayshows“ ”.