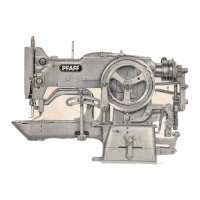
in
accordance
with
position
marks.
Both
the
arm
ond
worm
wheel
shafts
must revolve freely, without having any end play. The only gears that may
have a scarcely perceptible amount of play
are
the worm and worm wheel.
Place machine on
stand
and
test-run it. If the worm
gear
assembly should
be too noisy, correct this condition by setting the worm as close to the
worm wheel as possible
and
relapping
both parts. If the
arm
shaft
should
hove any
end
play, drive
taper
pin
(2056)
out
of the driving pulley, set
pulley as close to arm shaft
rear
bearing as possible,
and
tighten set
screws securely. Re-ream pin hole with a
taper
reamer,
and
take
a thicker
taper
pin to pin driving pulley on arm shaft. Make sure the
taper
pin does
not protrude from the hub of the pulley, as this would interfere with the
proper functioning of the stop cam spring.
If a new arm shaft must be installed in the machine, drill the toper pin
hole in the driving pulley only
after
the
latter
has
been
mounted on the
shaft. The driving pulley is screwed onto the arm shaft only until the front
ports have been installed. Rotate the driving pulley on the arm shaft until
the groove in the stop com extends vertically. Check to see that the machine
stops when the ascending take-up lever has reached a position about
^Ua",
or 2.0 mm, below the highest point of its stroke. To make whatever adiust-
ment may be necessary, insert stop com spring, Novotex segment
(20275),
and stop cam
(20062)
into the driving pulley.
Insert shuttle drive connecting rod
(22059)
and oscillating rock shaft
(6674),
and check to see that both parts move freely without having any end ploy.
Mount thread nipper components in machine arm.
Front
Parts
Screw on needle plate, and odd take-up lever. Insert needle bor frame
with needle bar, and align so that needle is correctly centered in the needle
hole. Mount presser
bar
with guide, spring and pressure regulating screw.
Cylinder
Bed Ports
Insert feed plate carrier
bar
and
bearing bracket. Set guide plate as close
to the feed plate carrier
bar
as possible so that the latter moves freely
without having ony lateral play. Screw feed across driving block
and
guide plate
(22391)
to feed plate carrier bar, making sure the attached
parts
move
freely. Install
feed
across
shaft
with
set
collars
as
well as
front
and rear cranks. Adjust the front crank so that driving stud
(22025)
is centered
in the cutout of the feed across driving block when both feed motions
are
set on
zero.
Add shuttle driver
shaft
with crank
(6568).
Feed
Com
Attach feed cam,
and
tighten hexagon nut on worm wheel shaft. Make sure
the machine runs smoothly and the roller does not chafe
against
the bottom
32