6
Setting slaves (Vehicle and/or Pedestrian)
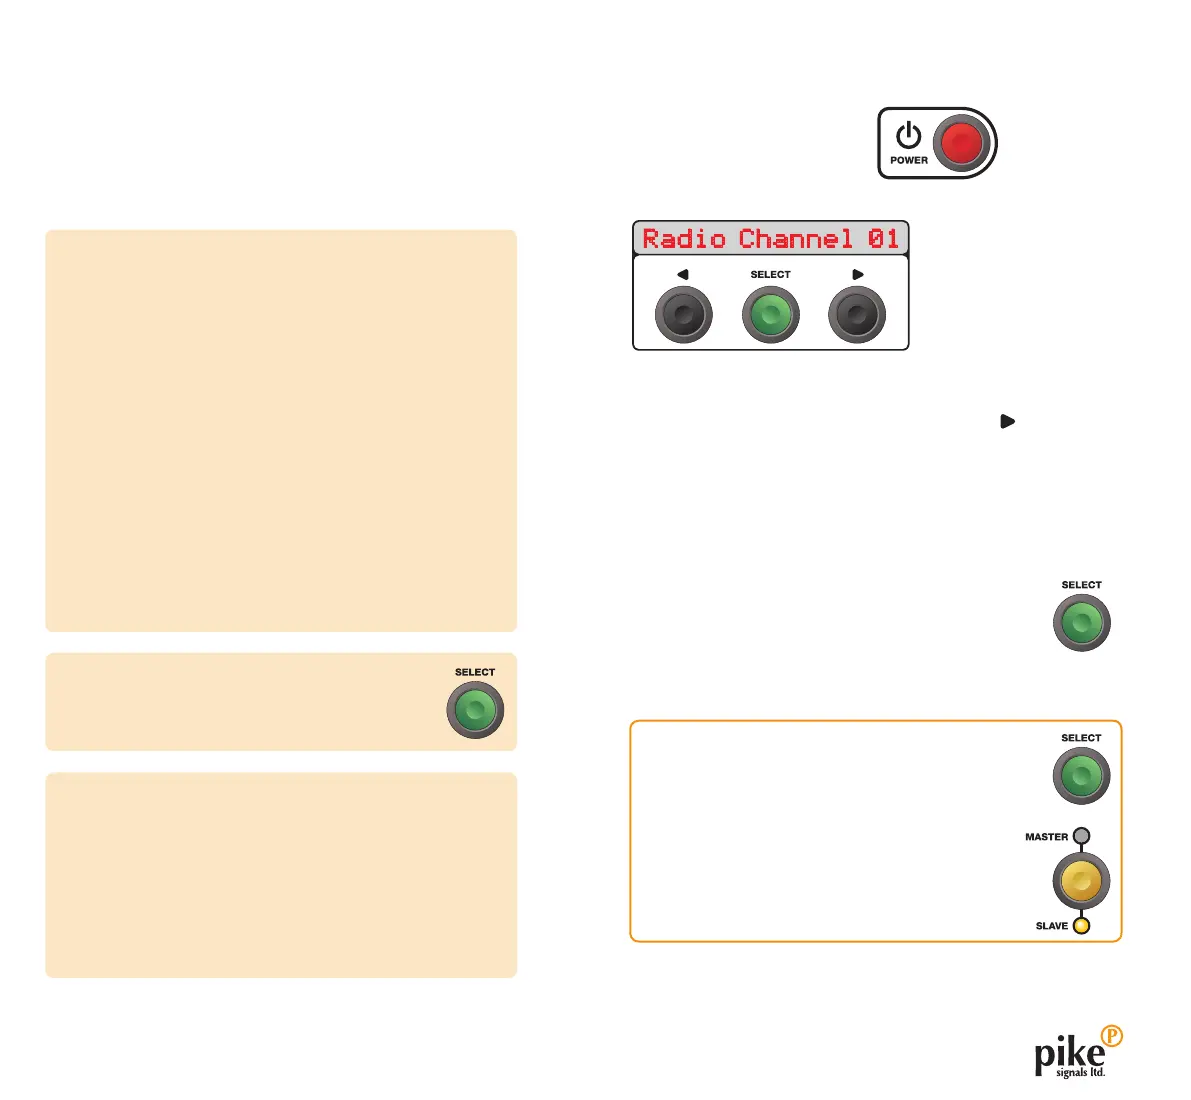
1 Press POWER to switch on.
The text display will briefly show PIKE SIGNALS and then*:
• Tochooseradio
channel 01 (the usual choice), go
straight to step 2 below.
• Tochooseadifferentradio
channel, press .
The text display will advance through the available
channels (either 1 and 2 for a standard unit or 01 to 17 for
a MULTI controller). After 17, the display may show SCAN
(see the lower left box) and after that it will show CABLE,
which is a function reserved for future use - and then it will
roll over to channel 01. See page 13 for details.
2 Press SELECT to fix the chosen radio channel. The
display will now show Radio Tx Power 3. In normal
conditions, press SELECT to choose this option.
3 The text display will show the previously used mode, such as
Slave Veh 2S.
Preparing for operation
This chapter covers all of the actions that you need to carry
out when setting up an EVO system. The main stages are:
• Settingallvehicleslaves-page 7
• Settingallpedestrianslaves-page 7
• Setupthemaster-page 8
Notes
• Ifyouaresettingupadedicatedpedestrian
crossing, go to page 12.
• OlderPikeXL2slavecontrollerscanbeusedas
part of an Evo layout for vehicle control, however,
if you require pedestrian crossings, then only Evo
controllers can be used. Once an XL2 controller is
introduced, the system operation will automatically
revert to an earlier HA Specification requirement
which is limited to four vehicle phases and has no
provision for pedestrian facilities.
• EveryEvocontrollercanautomaticallysensewhich
type of signal heads (vehicle and/or pedestrian)
and will restrict/allow certain adjustments
accordingly. For instance, if an Evo PT5 controller
has only a vehicle signal head attached, then no
pedestrian slave options will be offered.
*
If a tactile indicator on a pedestrian panel
is NOT sensed by the controller during
startup, the display will first show NO
TACTILE. Press SELECT to acknowledge.
Next
• Ifthepreviousmodeisappropriate,press
SELECT and go to step 6.
• Ifyouneedtomakechanges,gotostep4
opposite.
• Ifyouneedtochangefrommastertoslave
mode, press MASTER/SLAVE until the SLAVE
indicator is lit. Then go to step 4 opposite.
SCAN option
On MULTI controllers at switch on, after scrolling through
the first 17 radio channel options, if the controller is in
Master mode, you will see a SCAN option. If you press
SELECT to choose this option, the controller will scan
the surrounding area and show the first available clear
radio channel (takes approx. 20 seconds). You can
either press SELECT to choose that channel or manually
choose a different one. See page 13 for details.
Note: If vehicle and pedestrian heads are both fitted to the
same slave controller, you will be prompted to choose the
vehicle head designation, followed by the pedestrian head.