PS Engineering
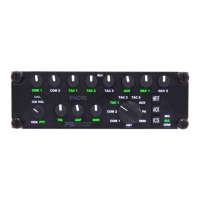
PAC45 Audio Selector Panel and Intercom System
Installation and Operator’s Manual
200-045-0000 Page 2-13 Rev. 7, May 2019
2.7 Wiring Checkout
After wiring is complete, verify power is ONLY on pin 16 &17 of J451and airframe ground on pin
34. Failure to do so will cause serious internal damage and void PS Engineering's warranty.
CAUTION: Do not connect or disconnect (HOT SWAP) any components with power applied, this
will damage the units
2.8 Operational Checkout
2.8.1 Required Test Equipment
In order to return an aircraft to service after installation of the PAC45, the installer must have
access to headset(s), and be able to establish 2-way communications on appropriate radios.
Equivalent test equipment is acceptable as long as the testing requirements can be met.
2.8.2 Audio controller Test
NOTE
The IntelliVOX® is designed for ambient noise levels of 80 dB or above. Therefore, some clipping
may occur in a quiet cabin, such as without the engine running, in a hangar. This is normal.
Use of a Stereo headset is required to obtain full effect of MultiTalker processing.
1. Apply power to the aircraft and avionics.
2. Plug stereo headsets into the pilot, copilot, and occupied passenger positions, or monaural
if not using HRTF feature.
3. Verify fail-safe operation by receiving and transmitting on com 1 from the pilot position,
with the audio controller power off /EMG mode. The Com audio will be present in one ear
cup only if stereo headset and both ear cups if using monaural headsets.
4. Switch on the unit by turning the XMT select knob to the full CCW position (COM 1).
5. Check intercom operation.
6. Verify that the COM 1 legend in both the XMT and RCV change to green. Verify that transmit
indicator is not flashing green... If the LED is flashing green, stop testing and troubleshoot
the microphone PTT installation. If for any reason the transmit PTTs are stuck then they will
disconnect after 35 seconds.
7. Verify proper transmit and receive operation from the copilot position, noting that the copi-
lot PTT switch allows proper transmission on the selected transceiver. Verify that the Xmt
legend flashes green when the copilot is transmitting.
8. Rotate the XMT knob to the next transceiver position and verify the indicators change to
track the selection, and Com 2 receiver is heard.
9. Repeat for remaining transceivers.
10. Verify proper operation of all receiver sources by selecting them using the appropriate knob.
11. Verify proper Intercom system operation in the ALL, ISO and CREW modes (see Table 3-1).
12. Verify that the audio selector panel system does not adversely affect any other aircraft sys-
tem by systematically switching the unit on and off, while monitoring the other avionics and
electrical equipment on the aircraft.
2.8.3 Bluetooth Checkout
Verify that the PAC45 will “pair” with a Bluetooth device, and interface with cellular phone and
Music source. See § 3.7.2 for more information.
If PAC45 is not connecting, resetting the Bluetooth memory might be required. Hold down HRTF
& ICS buttons for 3 seconds until there is a chime in pilot headset.