WARNING! The positioning belt should be secured at all times. Never
allow the positioning belt to hang or drag on the fl oor as it may become
entangled.
To install the positioning belt:
1. Remove the rearmost screw that holds the seat hinge to the seat base
on both the left and right seat hinges.
2. Insert the screw through the supplied washer, through the positioning
belt and into the seat base for each side of the power chair seat.
3. Tighten both screws.
To release the positioning belt:
1. Press the push button mechanism on the plastic housing.
MANDATORY! Make sure the positioning belt is properly secured to
the power chair and is adjusted for operator comfort before each use.
MANDATORY! Inspect the positioning belt for loose parts or damage,
including tears, worn spots, bent hardware, damaged latch mechanisms,
dirt or debris, before each use of the power chair. If you discover a
problem, contact your Quantum Rehab Provider for maintenance and
repair.
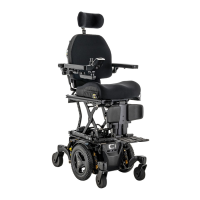
To adjust the positioning belt for operator comfort:
1. Once seated, insert the metal tab on one side of the belt into the plastic
housing on the opposite side until you hear a click. See fi gure 16.
2. Pull the excess strap attached to the metal tab until it is secure, but not
so tight as to cause discomfort.
Figure 16. Positioning Belt Adjustment