20
8. C
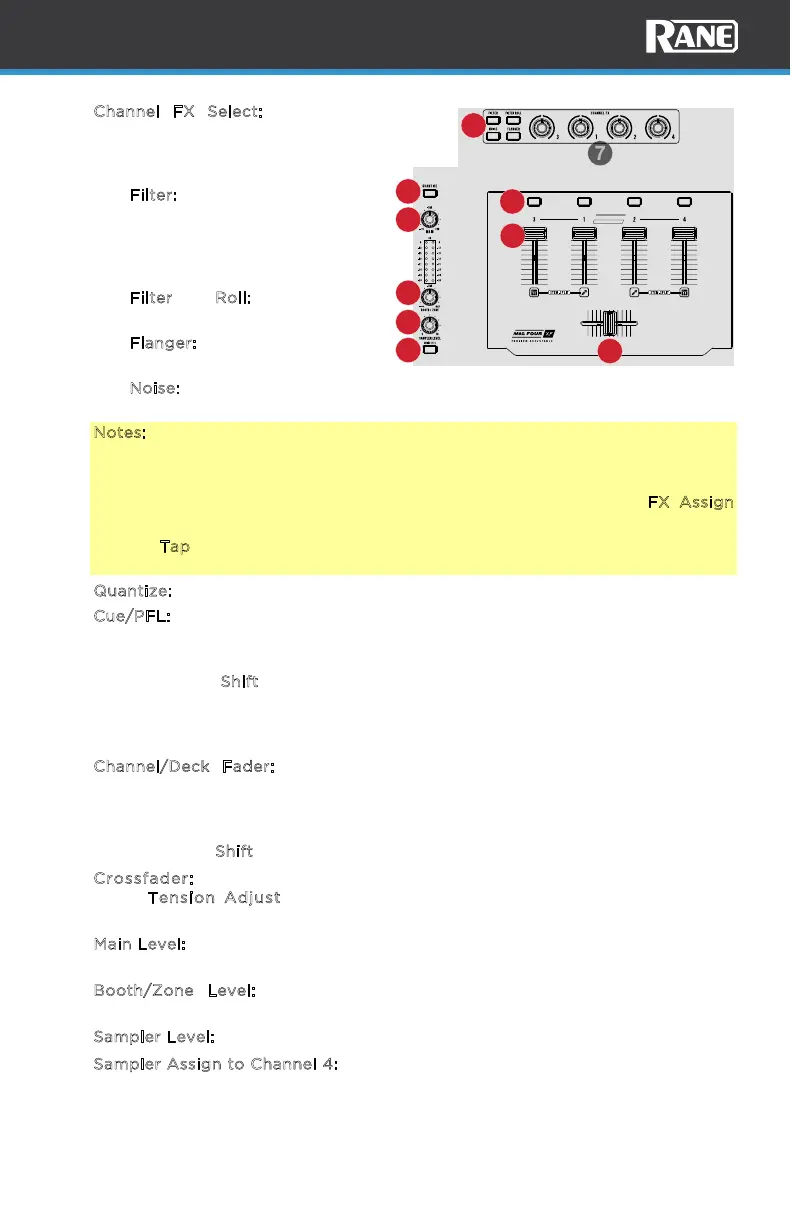
hannel FX Select: Press these
buttons to select the desired
software Channel FX: Filter, Filter
Roll, Noise, or Flanger.
• F
ilter: Pre-fader. Can be a
software or hardware eect.
When used as a hardware
eect, it is only available for
line/phono sources.
• F
ilter Roll: Pre-fader.
Software eect.
• F
langer: Pre-fader. Software
eect.
• N
oise: Pre-fader. Software
eect.
Notes:
Upon power-up, the FX BPM will default to 100 BPM.
When connected to Serato DJ, the software will send the BPM (from the FX
Unit) for only the assigned channel as dictated by the hardware FX Assign
buttons (per side).
Use the Tap button to manually tap in the tempo in order to obtain the BPM for
line input signals.
9. Q
uantize: Press to activate quantize mode in the software.
10. C
ue/PFL: Press this button to send the pre-fader, post-EQ signal to the cue
channel for monitoring. When engaged, the button will be lit. To cue multiple
channels, press the Cue buttons at the same time for each channel.
Press and hold S
hift and press this button to change the function of the deck
EQ knobs to control Stem Level. When Stem Level mode is active, the Cue/PFL
button will flash while Shift is held. In Stem Level mode, High EQ controls the
vocal, Mid EQ controls the melody/bass and Low EQ controls the Drums.
11. C
hannel/Deck Fader: Move this fader to adjust the volume level of the
corresponding channel/deck. Set the preferred tension of the channel faders by
removing the fader plate and adjusting the set screw. Turn to the right to
tighten, turn left to loosen.
Press and hold S
hift and move faders to enable Fader Start.
12. Crossfader: Move this crossfader to mix between the decks. Set front
panel T
ension Adjust to your personal preference. Turn right to tighten,
turn left to loosen the tension.
13. M
ain Level: Turn this knob to adjust the output volume of the program mix. The
meters next to this knob indicate the audio signal level of the program mix.
14. B
ooth/Zone Level: Turn this knob to adjust the output volume of the
Booth/Zone Outs.
15. S
ampler Level: Turn to adjust the gain of the software sample player.
16. S
ampler Assign to Channel 4: Press to route the sampler to channel 4. This will
allow the sampler to have all gain, EQ, and FX controls for that channel.
ADJUSTABLE FADERS
PERFORMER
CUE
CUE CUE CUE
PRECISION FEEL
STEM LEVELSTEM LEVEL
STEM LEVEL
STEM LEVEL
8
10
11
12
9
13
14
15
16