6
Top Panel
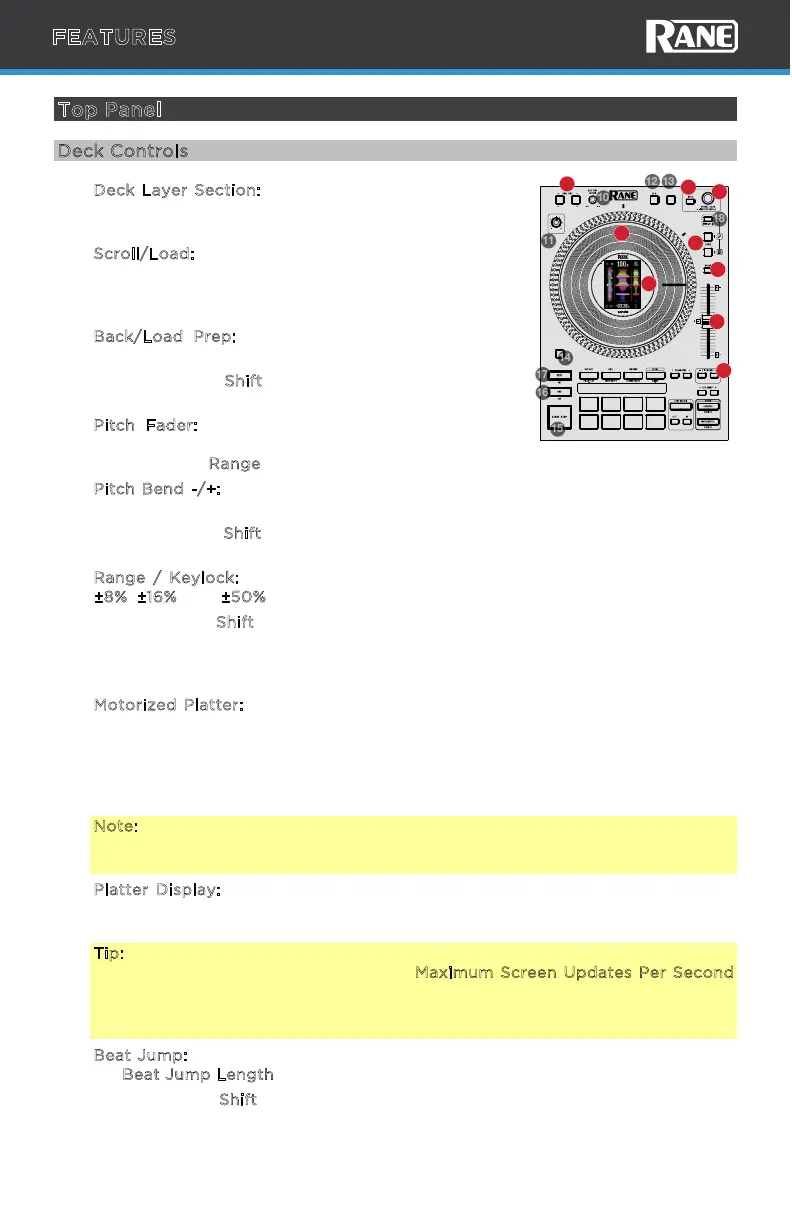
Deck Controls
1. D
eck Layer Section: Press to select the active deck
layer. Decks 1 and 3 are on the left deck. Decks 2 and
4 are on the right deck.
2. S
croll/Load: Turn the encoder to navigate through
the software. Push to load a song to the active deck
layer. Press this knob twice quickly to load the same
track to both decks (“instant doubles”).
3. B
ack/Load Prep: Press this button to move back
through levels of library organization.
Press and hold S
hift and press this button to load
the currently selected track to the Prepare crate.
4. P
itch Fader: Move this fader to adjust the speed
(pitch) of the track. You can adjust its total range
with the pitch R
ange button.
5. P
itch Bend -/+: Press and hold one of these buttons to momentarily reduce or
increase (respectively) the speed of the track.
Press and hold S
hift and press these buttons to change the platter playback
speed (Pitch Bend - = 33 RPM, Pitch Bend + = 45 RPM).
6. R
ange / Keylock: Press this button to adjust the range of the Pitch Fader to
±
8%, ±16%, and ±50%.
Press and hold S
hift and press this button to activate or deactivate Keylock: the
key of the song will lock to whatever position the pitch fader is at when Keylock
is activated. This feature allows you to change the speed of the song without
changing the key.
7. M
otorized Platter: These motorized platters are used to control song position,
scratching, and pitch bend.
To customize the scratch feeling, first remove the
acrylic vinyl control disc from the platter. Then you can add, remove, or change
the order of the slip rings until you get the desired feel. To return the acrylic
vinyl on top of the slip rings, line up the four slots underneath it to fit into the
platter’s four magnetic squares.
Note: To ensure consistent playback and scratch performance, use a maximum
of 2 slip rings per side and ensure the slip ring configuration is identical on both
platters.
8. P
latter Display: This 2” color display provides info for Beat Jump Size, Album
Artwork, BPM, Time Remaining/Elapsed, Song Key, Needle Position, Loop, and
Moving Waveforms.
Tip: For the best playhead and needle position response, make sure that the
Serato DJ Library + Display preference Maximum Screen Updates Per Second
is set to 30 or higher. The digital needle can also be turned o in the device
menu and a needle sticker can be applied to the control disc for greater
accuracy.
9. B
eat Jump: Press these buttons to jump back or forward in the software at the
set B
eat Jump Length.
Press and hold S
hift and press either Beat Jump buttons to change the platter
display view.
FEATURES
STOP TIME
CENSOR /
SILENT CUE
SEARCH LOAD PREPREVERSEMOTOR
KEYLOCK
LOOP IN
33 RPM 45 RPM
LOOP OUT
KEY SYNC
RESET
SHIFT
DISPLAY MODE
RELOOP
1
2
3
4
5
6
8
7
9