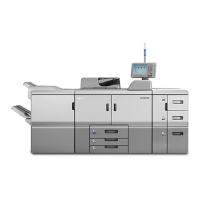
You can enter values from 0.1 to 999.9 mm in 0.1-mm increments.
3. Press [OK].
4. Press [Exit].
5. Press [OK].
6. Press [Overwrite].
7. Press [Yes].
8. Press [Exit].
Checking Adjusted Results
1. From the supplied CD, print the file of the format matching the size of the paper requiring
image position adjustment. Continuously print the format on both sides of 10 sheets.
2. Using the 6th sheet among the printed copies, check whether any misregistration occurs
on the front and back of the paper.
• When using thin paper, check for misregistration by seeing through the paper.
• When using thick paper or paper that cannot be seen through, pierce the paper with a tool
such as an eyeleteer and check for misregistration.
Eliminating misregistrations on the front and back of the paper
Adjust the image position and magnification on Side 2 to match those on Side 1.
• To adjust the following settings, pre-register the type of paper in use as a custom paper. For details
about registering custom papers, see "Specifying a Custom Paper", Preparation.
Adjusting the Image Position of the Either Side of the Paper
173
 Loading...