15
Build the Top Header Assembly
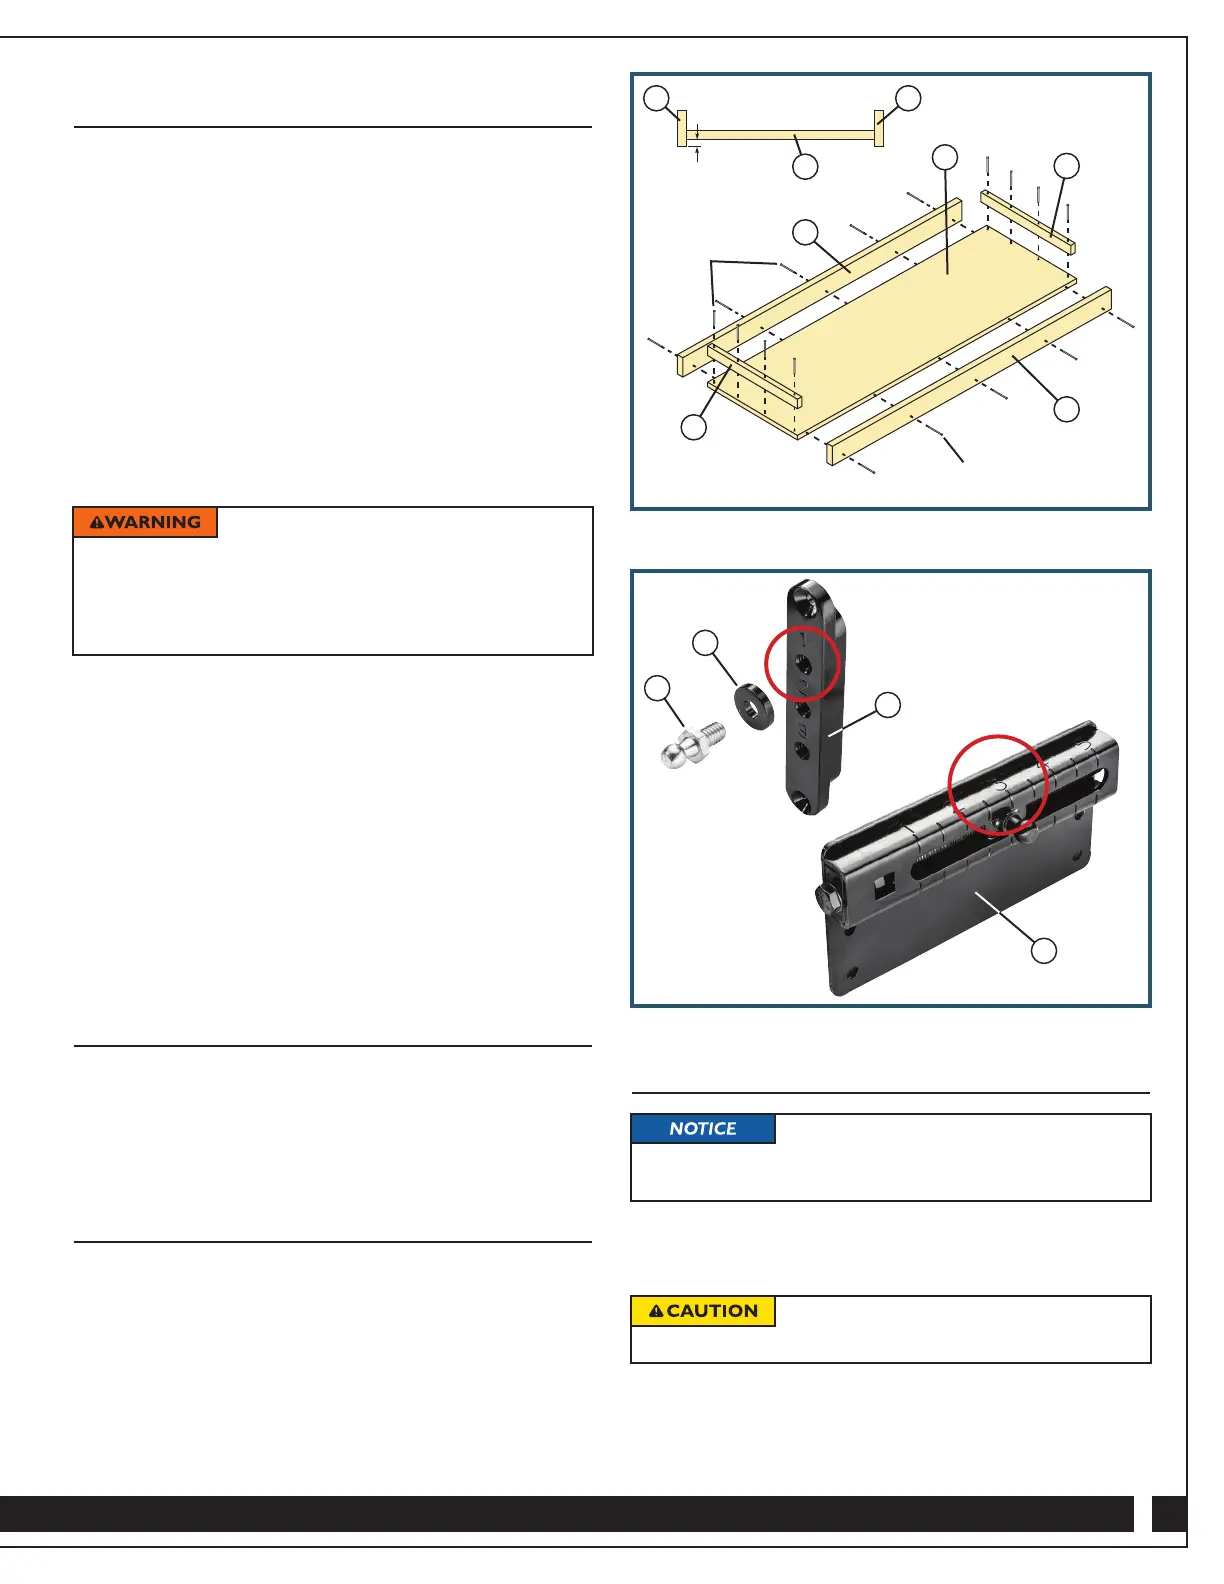
1. Apply Veneer Edge Banding to the bottom edges of the
Top Header Front Rail (K) and Top Header Rear Rail (L).
Trim excess. Fig. 9.
2. Use 1/2" deep spacer blocks to raise the Top Header (J)
off the work surface. This will provide the necessary 1/2"
overhang of the Top Header Front and Rear Rails (K and L).
3. Run a bead of glue along the front edge of the Top
Header (J). Position the Top Header Front Rail (K) so
that its ends are flush with the ends of the Top Header.
4. Attach the Top Header Front Rail (K) with 2" Finish Nails.
Fig. 9.
5. Run a bead of glue along the back edge of the Top
Header (J). Position the Top Header Rear Rail (L) so
that its ends are flush with the ends of the Top Header.
The Top Header Rear Rail (L) MUST be
attached securely to the Top Header with glue and #8 x 2"
Coarse-Thread Screws. Failure to securely attach the Top
Header Rear Rail to the Top Header increases the chance
that the bed cabinet could detach and tip over, potentially
resulting in serious injury.
6. Drill pilot holes through the Top Header Rear Rail (L) into
the Top Header (J). Attach with #8 x 2" Coarse-Thread
Screws. Fig. 9.
7. Position both solid-wood Top Header Mounting Cleats (M)
between the Top Header Front and Rear Rails (K and L) on
top of and flush with the ends of the Top Header (J). Drill
four evenly spaced countersunk 1/8" diameter pilot holes
through the top edge of the Mounting Cleats and into the
Top Header. Take care not to drill all the way through
the Top Header.
8. Apply glue to the bottom edges of the Top Header Mounting
Cleats (M); then place them in position and secure them
to the Top Header (J) with #8 x 2" Coarse-Thread Screws.
Fig. 9.
Apply Finish Before Installation
1. Remove all hardware from the wooden components to
make finishing easier.
2. Fill all nails holes and sand all components.
3. Apply finish of choice to visible areas of all pieces,
including moldings.
Get Set Up at Installation Site
1. After the wooden bed parts have been finished, reinstall
all hardware except for the Bed Stops (19) and the Metal
Pivoting Legs (1 and 2).
2. Position the assembly on the floor where you plan to install
the bed, first placing a blanket, rug or other padding under
the Face Panel (G) surface to protect it from scratching.
Establish Initial Ball Stud Plate Settings
Do NOT overtighten the Ball Studs in the
Upper Ball Stud Plates.
These are initial settings to provide
maximum lifting power in beds constructed with 3/4" thick
plywood material. They can be adjusted, if necessary, later.
1. Use a 7/16" socket or other wrench to adjust the two
Lower Ball Stud Plates until the ball stud of each is at
position 3. Fig. 10.
2. In each of the two Upper Ball Stud Plates (15), thread a
Ball Stud (16) through a Ball Stud Spacer (17) and into
position 1 in the Upper Ball Stud Plates. Tighten until
snug. Do not overtighten. Fig. 10.
Fig. 9
Fig. 10
2" Finish Nail
#8 x 2"
Coarse-Thread
Screws
1/2"
K
M
L
J
L K
M
J
8
15
17
16