20
Distributed by Rockler Companies, Inc.
4365 Willow Dr. Medina, MN 55340
69479
Rev 12/19
1-800-279-4441
www.rockler.com
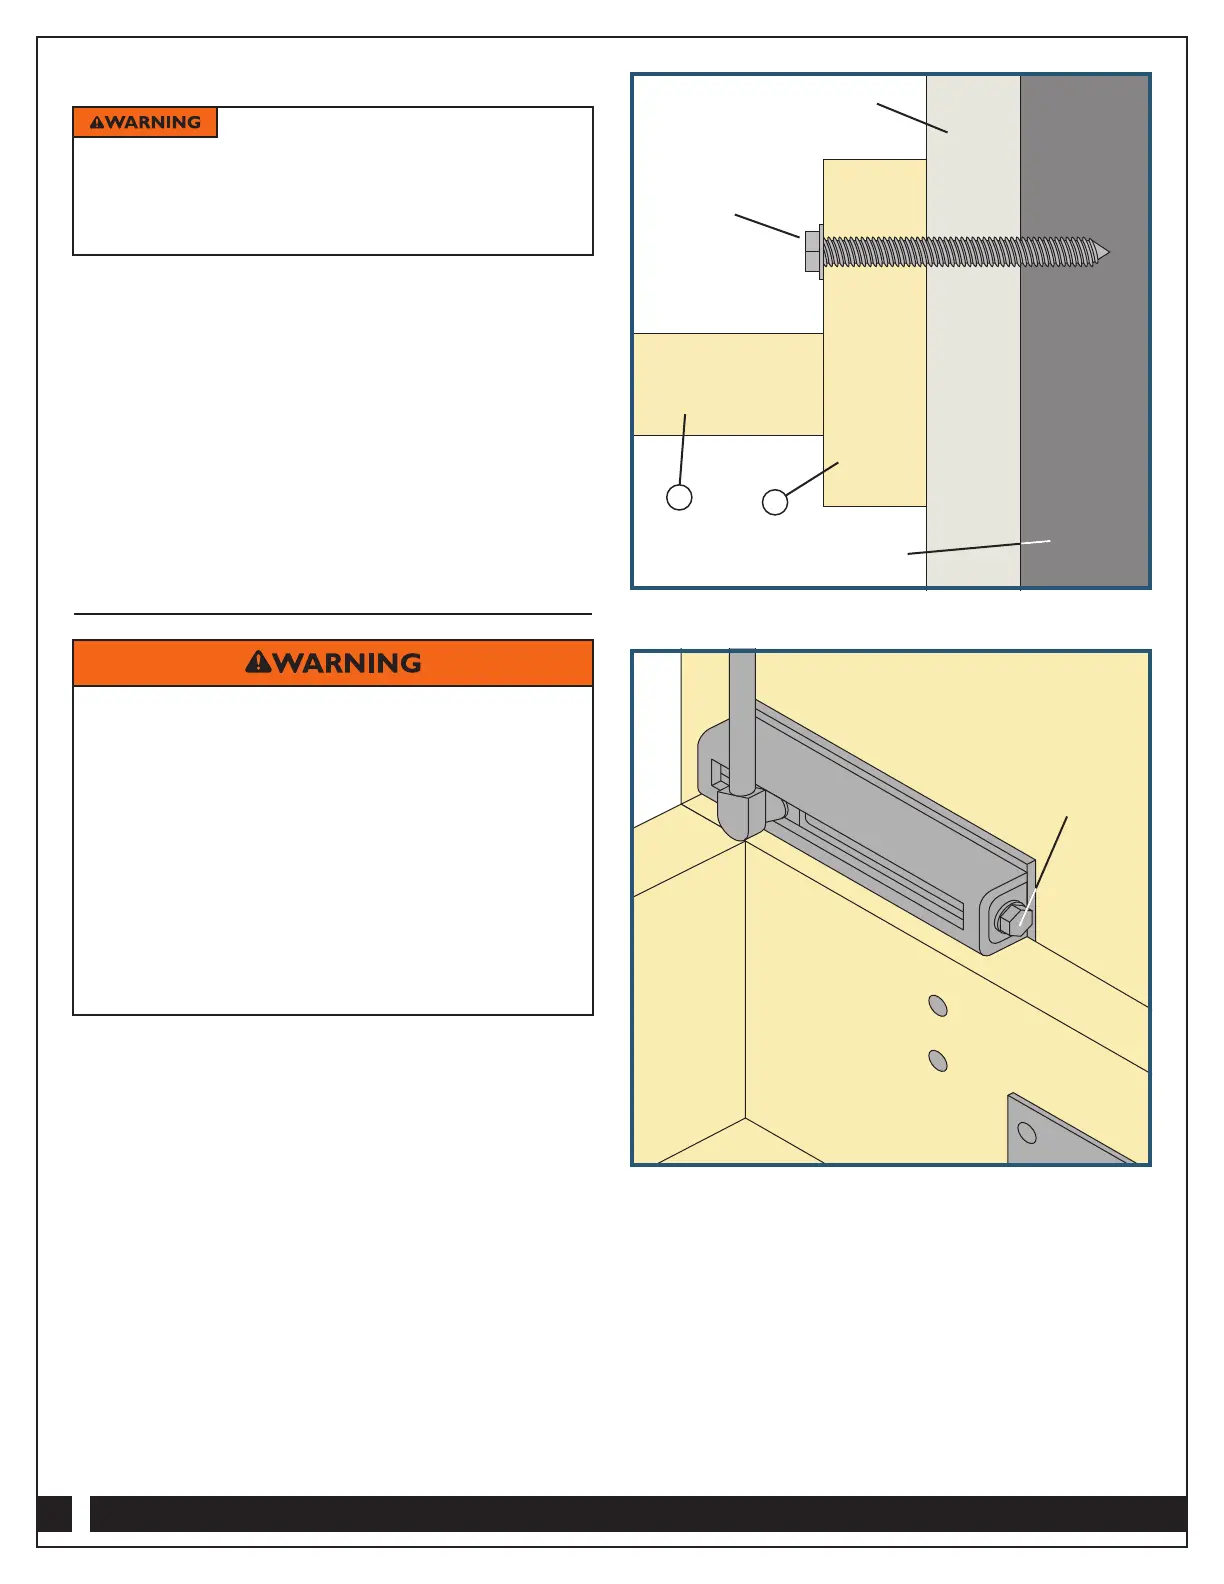
For concrete, mortar or brick walls:
A. Drill four evenly spaced 3/16" through holes in the
Top Header Rear Rail (L).
B. With a 4"-long 5/32" diameter concrete drill bit, use
the through holes in the Rear Header Rail (11) to drill
pilot holes 2" into the wall.
C. Attach securely with 3/16" x 2
1
⁄4" masonry screws.
Fig. 18.
4. If the gap between the bed frame and the Cabinet Verticals
is uneven, push or gently kick the Cabinet Vertical at the
bottom on the side with the smallest gap at the top.
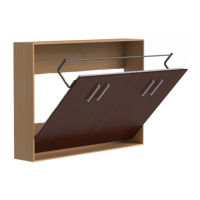
Install Mattress and Fine-Tune
Ball Stud Plate Settings
1. With the help of another adult, rotate the bed frame out of
the cabinet, unfold the leg assembly and lower the bed frame to
the floor, making sure to maintain downward pressure.
2. While the helper continues to hold the bed frame down,
place the mattress on the frame and secure it with the Mattress
Retaining Straps (20).
3. If lowering the bed frame seems too difficult, or if the bed
frame starts to lift even with the mattress in place, the setting
on the Lower Ball Stud Plates could be too high, resulting in too
much lifting power.
To decrease the lifting power, use a socket wrench or driver to
turn the hex head on the Lower Ball Stud Plates (7 and 8)
to the right, moving the ball stud to a lower setting. Be sure to
make identical adjustments to both Lower Ball Stud Plates.
And make adjustments in small increments. Even small
adjustments can make a big difference in the bed’s lifting power.
Fig. 19.
If the bed frame sticks out beyond the front of the cabinet when
the bed is in the closed position, you will need to make a similar
adjustment, turning the hex head on the Lower Ball Stud Plates (7
and 8) to the right to move the ball stud to a lower setting. Again,
make small, identical adjustments to both Lower Ball Stud Plates
to “sneak up” on the right setting. Do NOT force the bed frame
closed without making the adjustment; if you do, you will damage
the head of the gas spring.
> You MUST have another ADULT help you while installing
your wall bed unit to make sure the bed doesn’t close
inadvertently while you are working. Failure to do so
increases the risk of serious injury.
> Once the Gas Springs (18) are installed, the bed will not
stay down without the weight of a mattress. Operating
the bed mechanism without a mattress in place increases
the risk of sudden closing, entrapment and serious
personal injury.
> Mattress dimensions MUST NOT exceed 39" x 75" x
12" thick, including pillowtop. Mattress MUST NOT weigh
less than 35 lbs. or more than 50 lbs. Do NOT use a
foam or very light mattress with this product.
You MUST attach the bed cabinet
assembly to the wall by driving at least four 3/16" x 2
1
⁄4"
masonry screws through the Top Header Rear Rail (L)
into the wall. Failure to secure the unit properly increases
the chance that the bed cabinet will detach and tip over,
potentially resulting in serious injury.
Check Rockler.com for updates. If you have further questions, please
contact our Technical Support Department at 1-800-260-9663
or support@rockler.com
Fig. 19 - Mattress Removed for Clarity
Fig. 18 - Concrete, Brick or Mortar Walls
Wall
3/16" x 2
1
⁄4"
Masonry Screw
Concrete Wall
L
J
Hex Head
Adjustment