33
Creating Sounds
If more than one User Tone uses the same user samples or
multisamples, the user samples are not deleted until all related
User Tones are deleted (i.e., the amount of free memory will not
increase).
Loading Exported User Tones
1. In the Tone section, press the [User] button.
The User Tone list appears.
2. Use the direct buttons or function buttons to select the
import destination.
3. Press the [Option] button.
The UST Option screen appears.
4. Use the direct buttons to select “Import.”
Files that can be imported from the USB ash drive are shown.
5. Use the direct buttons to select the le that you want to
import.
A conrmation message appears.
6. To import the data, select “ Ye s .”
If you want to change the import destination, select “No” to return
to the page where you can change the import destination.
NOTE
If the user sample memory is full, you can’t import user tones.
Increase the amount of free memory and then import once again.
MEMO
Place the les you want to import in the “My UST” folder of the
USB ash drive.
If there is no “My UST” folder in External Storage (USB ash
drive), you can either use the E-A7 to format the USB ash drive,
or create a folder named “My UST.”
Creating a User Drum Kit
The E-A7 lets you create your own original drum kit (User Drum Kit)
from user samples and multisamples. Here’s how to create a new
user drum kit.
* User Drum Kit is sometimes abbreviated as UDK.
1. In the Tone section, press the [User] button.
The User Tone list appears.
Each time you press the [User] button, you’ll switch between the UST
and UDK lists.
2. Use the direct buttons to select the UDK that you want
to edit.
MEMO
If you want to create a new UDK, select “Empty.”
3. In the User Drum Kit list page, press the [Option]
button.
The UDK Option screen appears.
4. Use the direct buttons to select “Edit.”
The UDK Edit screen appears.
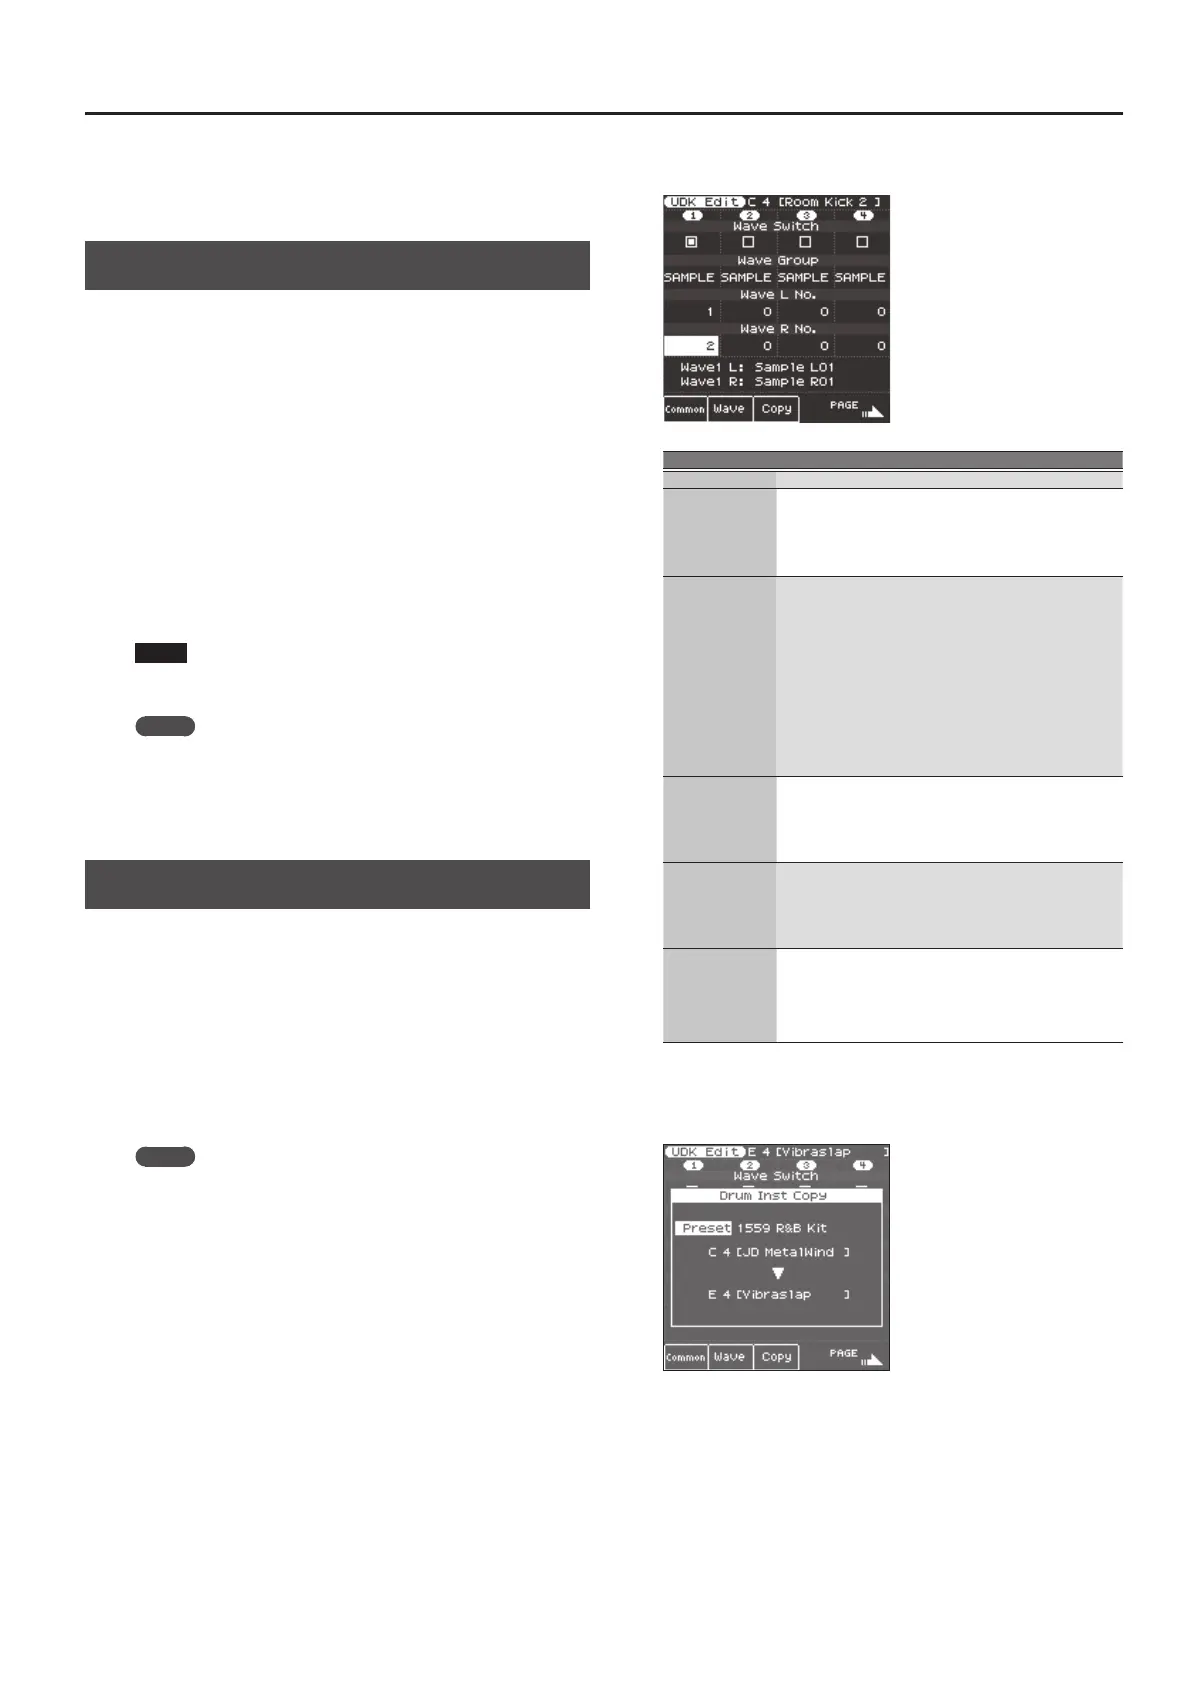
In a drum kit, you can assign a dierent drum sound (Drum inst) to
each note of the keyboard.
A single drum tone consists of four elements of sound (Wave 1–4).
For each wave, you can change the waveform and edit the
parameters.
5. From the keyboard, select the drum inst (key) that you
want to edit.
The screen indicates the number (key position) and name of the
selected drum inst.
* The name of the Drum Inst shows the name of the waveform
that’s assigned to No.L of Wave1.
Use the cursor buttons or direct buttons to select the parameter that
you want to edit, and use the Value [-] [+] buttons to edit the value.
Alternatively, you can use the [Balance/Value] knob to edit the value
(when the Value function is active / LED unlit).
Parameter Parameter Explanation
Wave Switch ON, OFF Wave on/o
Wave Group
INT, SAMP,
MSAMP
Group of the waveform (wave) that you
want to assign.
INT: Internal sound waveforms
SAMP: Sample waveforms
MSAMP: Multisample waveforms
Wave No. L
(Mono)
Wave No. R
OFF, 1 -
Selects the waveform. Along with
the wave number, the wave name
is also shown at the bottom of the
screen. (The name is not shown for INT
waveforms.)
If you want to use mono, specify only
the left side (L). If you want to use
stereo, specify the right side (R) as well.
* If you want to use a multisample in stereo,
specify the same number for L and R.
* If you use a sample in stereo, you should
likewise specify the same wave for L and R.
Velocity Range
Lower
1–UPPER
Species the lowest keyboard playing
strength that will sound the wave.
Make this setting if you want to use
keyboard playing strength to switch
between waves.
Velocity Range
Upper
LOWER–127
Species the highest keyboard playing
strength that will sound the wave.
Make this setting if you want to use
keyboard playing strength to switch
between waves.
Inst Coarse Tune C-1–G9
Selects the pitch of the note that will
sound the drum inst.
* The default value is 60 (C4). If you’ve
selected a sample or a multisample, edit
this value if you want to play a dierent
key of the multisample.
For details on other parameters, refer to “Reference Manual” (PDF).
6. If you want to copy a drum inst from a dierent drum
kit, press the [F3] (Copy) button.
Use the direct buttons to move the cursor, and use the Value [-] [+]
buttons to change the value.
5 Select the drum instrument (key position) of the copy-source
drum kit. The copy-source drum kit can be selected from
“Current” (the currently-edited drum kit), “Preset” (internal
drum kits), or “User” (user drum kits). After selecting one of
these, use the direct buttons to move the cursor, and use the
Value buttons to select the drum kit number and name. After
selecting the drum kit, move the cursor and change the drum
instrument (key position).