14
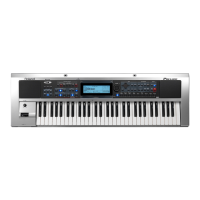
Panel Descriptions
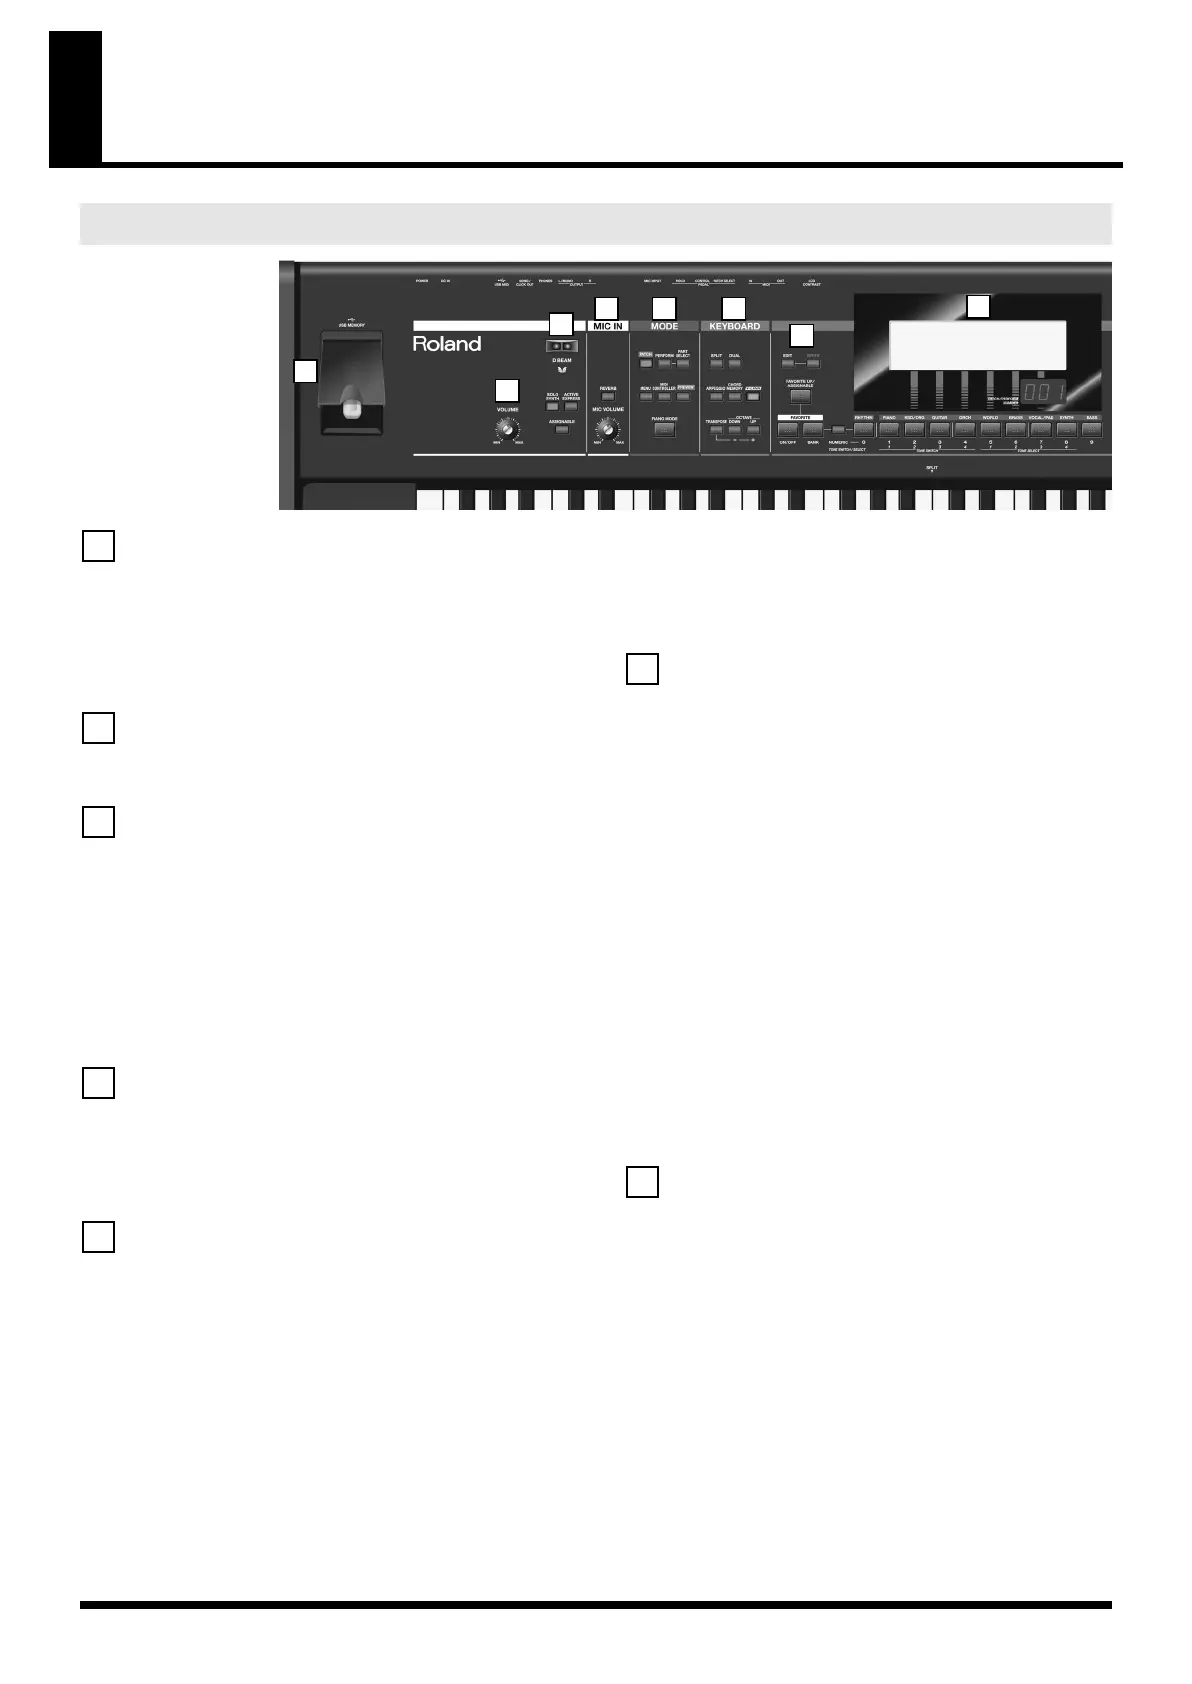
fig.Front.eps
USB MEMORY Connector
You can connect USB memory (sold separately) to this connector.
931
* Carefully insert the USB memory all the way in—until it is firmly in
place.
930
* Connect the USB memory after you turn on the JUNO-STAGE’s
power. Never disconnect the USB memory while the JUNO-STAGE is
powered up.
VOLUME Knob
Adjusts the overall volume that is output from the rear panel OUTPUT jacks
and PHONES jack (p. 22).
D BEAM Controller
Turns the D Beam controller on/off. You can apply a variety of effects to
the sound by moving your hand above the D Beam controller (p. 56).
[SOLO SYNTH]
The D Beam will function as a monophonic synthesizer (p. 57).
[ACTIVE EXPRESS]
The D Beam will control active expression (p. 57).
[ASSIGNABLE]
You can assign a variety of parameters or functions to the D Beam to
control the sounds in real time (p. 57).
MIC IN
[REVERB]
Turns on/off the reverb that is applied to the sound from MIC INPUT jack.
MIC VOLUME Knob
Adjusts the volume of the input from MIC INPUT jack (p. 87).
MODE
[PATCH]
Selects Patch mode (p. 45).
[PERFORM]
Selects Performance mode (p. 49).
[PART SELECT]
Shows the patch that is selected for each part (p. 50).
[MENU]
Displays a menu where you can make system settings and use utility
functions.
[MIDI CONTROLLER]
Selects MIDI Controller mode, allowing you to control an external MIDI
sound generator (p. 89).
[PREVIEW]
Hold down this button to audition the currently selected sound (p. 47).
[PIANO MODE]
Selects Piano mode. This provides the most suitable settings for piano
playing (p. 25, p. 116).
KEYBOARD
[SPLIT]
Splits the keyboard into left and right zones, allowing you to play separate
sounds (patches) in each (p. 51).
[DUAL]
Puts the keyboard in “Dual,” allowing you to play two sounds (patches)
simultaneously as a layer (p. 51).
[ARPEGGIO]
Turns the arpeggiator on/off.
A setting screen will appear when you press this button to turn it on (p. 60).
[CHORD MEMORY]
Turns the chord memory function on/off.
A setting screen will appear when you press this button to turn it on (p. 64).
[V-LINK]
Turns V-LINK on/off.
The setting screen will appear when you turn V-LINK on (p. 66).
[TRANSPOSE]
By holding down [TRANSPOSE] and pressing [-] [+] you can raise or lower
the pitch of the keyboard in semitone steps (p. 52).
OCTAVE [DOWN/-] [UP/+]
Transpose the pitch of the keyboard in one-octave units (p. 52).
[EDIT]
Allows you to make detailed settings for patches, rhythm sets, and effects
(p. 79, p. 94, p. 120).
[WRITE]
Saves the modified settings in internal memory (p. 73, p. 97, p. 123, p.
133, p. 145).
[FAVORITE UP/ASSIGNABLE]
Switches the favorite to the next number (p. 48).
If desired, you may assign a different function to this button (p. 148).
FAVORITE [ON/OFF]
Turns the Favorite function on/off (p. 47).
FAVORITE [BANK]
When this button is on, you can use [RHYTHM/0]–[BASS/9] to select
Favorite banks (p. 47).
[NUMERIC]
When this button is on, you can use [RHYTHM/0]–[BASS/9] to enter
numeric values (p. 44).
Front Panel
1
2
3
4 6
7
8
5
1
2
3
4
5
6
7
JUNO-STAGE_e.book 14 ページ 2008年10月17日 金曜日 午後12時27分