Do you have a question about the Roland V-800HD and is the answer not in the manual?
Covers essential safety measures like reading instructions, avoiding water, and proper ventilation.
Details on grounding the apparatus and wiring color codes for safe electrical connections.
Explains the meaning of WARNING and CAUTION notices and safety symbols used in the manual.
Provides guidelines on power cord use, placement, ventilation, and handling liquids.
Instructions for supervising children and protecting the unit from impact.
Guidance on safe use of power outlets, extension cords, and cable management.
Precautions regarding unit placement, ventilation, and preventing liquid entry.
Procedures for disconnecting, cleaning, and safety during lightning storms.
Notes on power supply connections, noise, and unit placement considerations.
Guidance on unit cleaning, handling, and general operational precautions.
Instructions for handling USB memory devices and information on the security slot.
Details on the main V-800HD unit and the owner's manual.
Lists the power cord, rack mount angles, and input template included with the unit.
Instructions for connecting a monitor using an HDMI input.
How to select Y/Cb/Cr or RGB output format for the multi-view monitor.
Procedure for accessing and exiting the setup menus on the multi-view monitor.
Explanation of the preview and program output sections on the multi-view display.
Description of the source channel monitors and their display indicators.
Information on source display limitations, still images, and frame rate differences.
Procedure for connecting the unit to AC power using the included cord.
Guidance on grounding the unit and identifying unsuitable connection points.
Step-by-step instructions for using the cord hook to secure the power cord.
Step-by-step procedure for turning on the V-800HD and connected equipment.
Step-by-step procedure for turning off the V-800HD and connected equipment.
Important notes regarding power cycling, processing messages, and complete power disconnection.
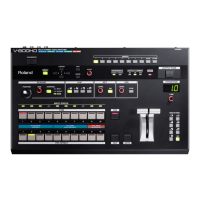
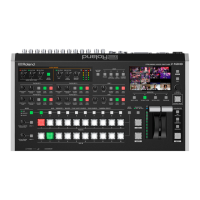
Description of the USB port and the setup controls on the top panel.
Overview of the scaling, compositing sections, and input status indicators.
Explanation of the PGM and PST/EFFECT cross-point buttons and their functions.
Details on MEMORY buttons, signal indicators, and the OUTPUT FADE button.
Descriptions of transition controls, DSK, CUT, AUTO buttons, and the video fader.
Overview of power switch, MIDI, RS-232C, and TALLY connectors.
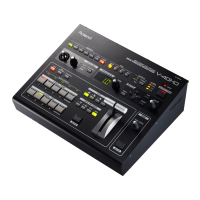
Details on the various input connectors and their assignments.
Description of the cord hook, AC IN connector, and REFERENCE IN/THRU connectors.
Details on the various output connectors and their capabilities.
Illustrates the flow of signals from input to output through the unit's internal processing.
Details the signal processing stages including mixing, keying, and scaling.
Essential precautions to take before connecting external equipment.
Lists the various signal formats supported for input by the V-800HD.
Procedure for connecting SDI sources to channels 1 through 4.
Procedure for connecting Composite sources to channels 1 through 4.
Steps to change input source from SDI to Composite via the Input menu.
How to connect computers or cameras via DVI/HDMI to channels 5 through 8.
How to connect computers with analog RGB to RGB/COMPONENT IN connectors.
Steps to change input source from DVI to RGB/Component via the Input menu.
How to assign a single source video to multiple cross-point buttons.
Procedure for connecting an external clock source for synchronization.
Guidance on connecting output equipment like projectors and video decks.
Details on TALLY connectors, their specifications, and channel pin assignments.
Explains the main output format settings and related indicators.
Steps to change the main output format via the Output menu.
Details on setting formats for analog RGB/Component and Composite outputs.
Lists supported formats for SDI, RGB/Component, DVI-D/HDMI, and SD output connectors.
How to select PGM, PVW, or AUX as the output source for different connectors.
Explains HDCP and provides steps to enable HDCP input support.
Notes on how enabling HDCP affects output from various connectors.
Describes the function and behavior of the HDCP indicator on the top panel.
How to check HDCP compatibility of connected source and output equipment.
Using the AUTO button to apply transition effects during video switching.
How to set transition time using the dial and select wipe patterns.
Procedure for selecting standby channels and executing transitions with AUTO button.
How to use the CUT button for an immediate, non-transitioned video cut.
Manual control of transition time using the video fader.
Steps to select channels and execute video transitions using the fader.
How to use the OUTPUT FADE button for fade-out and fade-in effects.
Using menus to configure fades to still images or output freeze.
Introduction to Picture-in-Picture compositing and its controls.
Overview of Luminance, Chroma, and External Key compositing methods.
Introduction to the Downstream Keyer for overlaying graphics or text.
First step in PinP: selecting the background video channel.
Selecting the inset screen channel and previewing the PinP result.
Adjusting inset screen size, position, and outputting the composited result.
Procedure to make the inset screen disappear after compositing.
Selecting background and overlay channels for Luminance/Chroma Key.
How to preview the compositing results using the KEY section.
Adjusting keying amount and making the overlaid picture disappear.
Procedure for performing compositing using an external key source.
Confirming background video and previewing DSK compositing results.
Adjusting the amount of keying and edge blur for DSK.
How to output the results of DSK compositing.
Changing the background picture while the DSK is active.
Enlarging or reducing the source picture and adjusting its display position.
Enlarging or reducing the output picture and adjusting its display position.
Steps to access the System menu to change multi-view labels.
Procedure for changing text strings for channel names on the multi-view monitor.
Step-by-step guide to saving the current unit settings to memory buttons.
How to load previously saved settings from memory buttons.
Instructions for connecting and formatting a USB memory device.
Detailed steps for formatting a USB memory device using the unit.
Steps to navigate the System menu to save settings to a USB device.
How to edit the filename and save settings to the USB memory device.
Explanation of menu items for loading, saving, and deleting settings.
Specifies the required format and resolution for still image files.
Procedure for assigning still images to channels 9 and 10.
Instructions for saving still image data to a USB memory device.
Steps to load still images from USB memory into internal memory.
How to assign loaded still images to specific input channels.
Procedure for deleting still image data from internal memory.
How to use the Output Capture function to create a still image.
Selecting the source video and destination memory for the still image.
Steps to access the cross-point assignment screen via the System menu.
How to assign or change input channels for cross-point buttons.
Procedure to reset all settings to factory defaults.
Explains how to display and navigate through the unit's menus.
How to modify setting values using the VALUE dial and other controls.
Details on video processing capabilities and supported input/output formats.
Lists and describes the various input and output connectors on the unit.
Information on power supply, unit dimensions, weight, and included accessories.
Information on remote control via MIDI, RS-232C, and MIDI Visual Control.
Guidance on rack mounting the unit and using the input template.
Troubleshooting steps for display issues and input signal detection problems.
Resolving issues related to USB memory devices and unit performance.
Troubleshooting for compositing failures and slow startup times.
Diagrams showing the physical dimensions of the V-800HD unit in millimeters.
Support for 3G-SDI Level B and synchronization with SDI input.
Features for field sync processing and A/B mode switching.
Details on AUX output, auto memory save, and expanded color correction.
Fine adjustment capabilities for Chroma Key HUE.
Support for connecting HDCP non-compatible multi-view monitors.
How to check the unit's version number in the System menu.
Statements regarding compliance with FCC and Canadian radio frequency regulations.
California Proposition 65 warning and China RoHS compliance information.
Information on separate collection of products from household waste in EU countries.
Explanations of WEEE symbols for various EU countries.
| Video Processing | 10-bit |
|---|---|
| Maximum Resolution | 1920 x 1080 |
| Audio Processing | 24-bit/48 kHz |
| Video Inputs | 4 x HDMI |
| Video Outputs | 2 x HDMI, 2 x SDI |
| Video Formats | 1080p, 1080i, 720p, 480i, 576i |
| Audio Inputs | Embedded in HDMI/SDI |
| Audio Outputs | Embedded in HDMI/SDI |
| Control Interface | RS-232, Ethernet |
| Other Connectors | USB |
| Effects | transitions |
| Display | LCD |
| Power Supply | AC 100-240V |