18
OUT-OF-CIRCUIT CAPACITOR TESTING
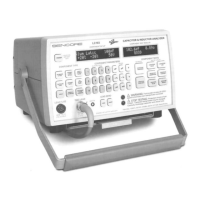
Fig. 13: Controls used for out-of-circuit capacitor tests.
The LC103 ReZolver checks capacitors out-of-circuit for
value from 1.0 pF to 20 F in 12 automatically selected
ranges. The automatic features of the LC103 ReZolver
allow you to perform two levels of automated capacitor
testing: basic parameter testing, and automatic GOOD/
BAD testing. For basic parameter testing, you simply
connect the component to the test leads and push the test
button. The LC103 measures the capacitor and displays
the test result. You must look up the values of leakage,
ESR and dielectric absorption in a table to determine if
the capacitor is good or bad.
For automatic GOOD/BAD testing, you first enter the
parameters of the capacitor before performing the test.
Then the LC103 will display the test results along with a
GOOD/BAD indication of the capacitor. Only selected
parameters need to be entered into the LC103, depending
upon which tests you desire a GOOD/BAD readout for.
OUT-OF-CIRCUIT CAPACITOR PARAMETER TESTING
The LC103 checks out-of-circuit capacitors for value,
leakage, dielectric absorption and equivalent series
resistance (ESR). These tests are made directly using the
four beige colored OUT-OF-CIRCUIT TEST buttons.
Simply connect the component to the Out-of-Circuit
Test Leads, push the desired CAPACITOR TEST
button, and read the test result in the display. You can
determine if the component is good or bad by comparing
the measured ESR and leakage values to the standard
values listed in the tables in this manual and In the
PULL CHART located conveniently in the LC103.
NOTE:Except for the capacitor leakage test, no
component parameters need to be entered to perform
any out-of-circuit capacitor parameter test. If any blue
Inductor Component Type button is selected,
“Component Type Selection Error” will appear in the
display when you attempt to make a capacitor test. Push
the "CLR" key on the gray NUMERIC keypad twice to
clear any parameters.
Component Test Results
The following procedures provide all the necessary
information required to perform the out-of-circuit
capacitor parameter tests. A more detailed description of
each of the capacitor tests and failure modes can be
found in the APPLICATIONS section of this manual.
Measuring Capacitor Value
To measure capacitor value:
1. Connect the Out-of-Circuit test leads.
2. Zero the test leads.
3. Connect the capacitor to the test leads. If the
capacitor is polarized, be sure to connect the black
test clip to the “-“ terminal of the capacitor and the
red test clip to the “+” capacitor terminal.
4. Press the CAPACITOR VALUE button.
5. Read the value of the capacitor in the COMPONENT
TEST RESULTS display.
NOTE: The "SHORT" message appearing in the display
when the CAPACITOR VALUE button is depressed
indicates a resistance of 1 ohm or less at the test leads.
Check the test leads. If they are not shorted, the
capacitor is bad.
Measuring Capacitor ESR
Equivalent Series Resistance (ESR) occurs when a
capacitor develops abnormally high internal resistance.
The LC103 tests capacitors for abnormal amounts of
internal resistance using a patented ESR test. To test a
capacitor for excessive ESR, simply press the
CAPACITOR ESR button and compare the measured
ESR to the maximum allowable ESR listed in Table 1
COMPONENT TYPE
NUMERIC INPUT ENTER OUT-OF-CIRCUIT
COMPONENT PARAMETERS COMPONENT TESTS
ALUMINUM
LYTICS
DOUBLE
LAYER
LYTICS
HIGH R
DOUBLE
LAYER
1234pFμFF
CAPACITOR
VALUE
CAPACITOR
ESR
CAPACITOR
LEAKAGE
DIELECTRIC
ABSORPTION
+ % - % V5678
ALL
OTHER
CAPS
TANTALUM
CAPS
CERAMIC
CAPS