Logic description
• Stop Close: the automatism controls the complete closure of the door wings.
In this logic the inputs START1 and START2 of the electronic control card are not monitored; if present, the electric
locking system blocks the door wings.
• Stop Open: the automatism controls the complete opening of the door wings. In this logic the inputs START1 and
START2 of the electronic control card are not monitored.
• 2 radar (Entry-exit radar): both the inputs START 1 and START 2 of the electronic control card are monitored. A
signal originating from a sensor connected to one of these inputs triggers the opening and consequent closing of the
door wings. The electric locking system, if present, never blocks the door wings.
• 1 radar (Exit-only radar): only the input START 2 of the electronic control card is monitored. A signal originating from
a sensor connected to this input triggers the opening and consequent closing of the door wings. The electric locking
system, if present, blocks the door wings every time that these reach the position of complete closure.
• Manual opening: the automatism controls the complete closure of the door wings. In this logic the inputs START1
and START2 of the electronic control card are not active.
The automatism performs an opening maneuver and closing only and exclusively as a result of pressing the button of
manual opening control. The led indicators indicate the logic currently active (led lit up). To change the logic, press the
SELECT key; every time the key is pressed the led corresponding to the various logics lights up in sequence.
When the desired logic is reached, the led blinks for a few seconds; when the light remains on, the control card
acquires the new logic.
If it’s the Multi Slave activated, when you change the operating logic, you are prompted which port is meant to
operate, and you can choose a port (by choosing the number of the port on which you want to change logic).
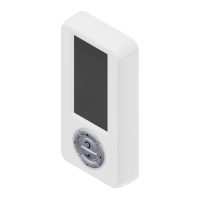
Trough the LCD display and navigation buttons, you can move through the menu functions.
SCROLL DOWN key ': Allows you to scroll down the menu functions
SCROLL UP key: Allows you to scroll up the menu functions
RUN key: allows you to confirm your selection choice
RESET button: when pressed causes a reset of the control panel of the operator.