MX-M350/M450 N/U SIMULATION 9 - 60
2) Press [START] key.
3) Enter the adjustment value with 10-key.
4) Press [P] key or [START] key. When [START] key is pressed,
the adjustment value set and copying is performed.
(Image off-center adjustment)
1) Enter 1 with 10-key.
2) Press [START] key. The adjustment pattern is printed.
3) Check the off-center of the printed image.
(UNIT: 0.1mm/step When the adjustment value is increased,
the print image is shifted to the front direction.)
NOTE: This adjustment can be performed with SIM 50-5.
(Copy condition setting in this simulation)
∗ To select paper (paper feed tray), perform the following proce-
dures.
1) Enter 0 with 10-key.
2) Press [START] key. (The mode is changed to the paper feed
tray selection mode.)
3) Enter the number corresponding to the paper feed tray to be
used with 10-key. (Select one of 1 - 5)
4) Press [START] key. (The paper feed tray is selected.)
When the total of the above set value (1 - 5) and 10 is entered, the
mode is changed to the duplex print mode.
∗ To set the copy magnification ratio, perform the following proce-
dure.
1) Enter 2 with 10-key.
2) Press [START] key.
3) Enter the copy magnification ratio with 10-key.
4) Press [START] key.
NOTE: When [P] key is pressed after entering the adjustment
value in this simulation, the adjustment value is set. When
[START] key is pressed, the adjustment value is set and
copying is performed.
Operation/Procedure
(Select the scan mode to be adjusted.)
1) Enter the number corresponding to the scan mode to be
adjusted with 10-key. (Select one of 3 - 5.)
2) Press [START] key.
Normal display NOW COPYING.
ERROR display Door open DOOR OPEN.
Jam JAM
Paper empty PAPER EMPTY.
1TRAY1 TRAY1
2TRAY2 TRAY2
3TRAY3 TRAY3
4TRAY4 TRAY4
5 BPT Manual feed
Set range 25 - 400 (%)
Select 0, and
press [START] key.
Press [START] key, or
press [SYSTEM SETTINGS] key.
50-12
Purpose Adjustment
Function
(Purpose)
Used to adjust the scan image off-center position.
(Adjusted separately for each scan mode.)
Section
Item Picture quality Image position
Item Set range Default
0 TRAY SELECT Paper feed tray
selection
1 - 5 –
1 COPY START Copy START
(Default)
––
2 MAGNIFICATION Print magnification
ratio
25 - 400% 100
(Resist adjustment value)
3 PLATEN OC mode
adjustment
0 - 99 50
4 SPF SIDE1 SPF front surface
adjustment
5 SPF SIDE2 SPF back surface
adjustment
50
2
Select 1,
and press
[START] key.
Select other than 0 - 2, and
press [START] key.
Press [SYSTEM SETTINGS] key.
Press [START] key.
Press [SYSTEM SETTINGS] key,
or terminate copying.
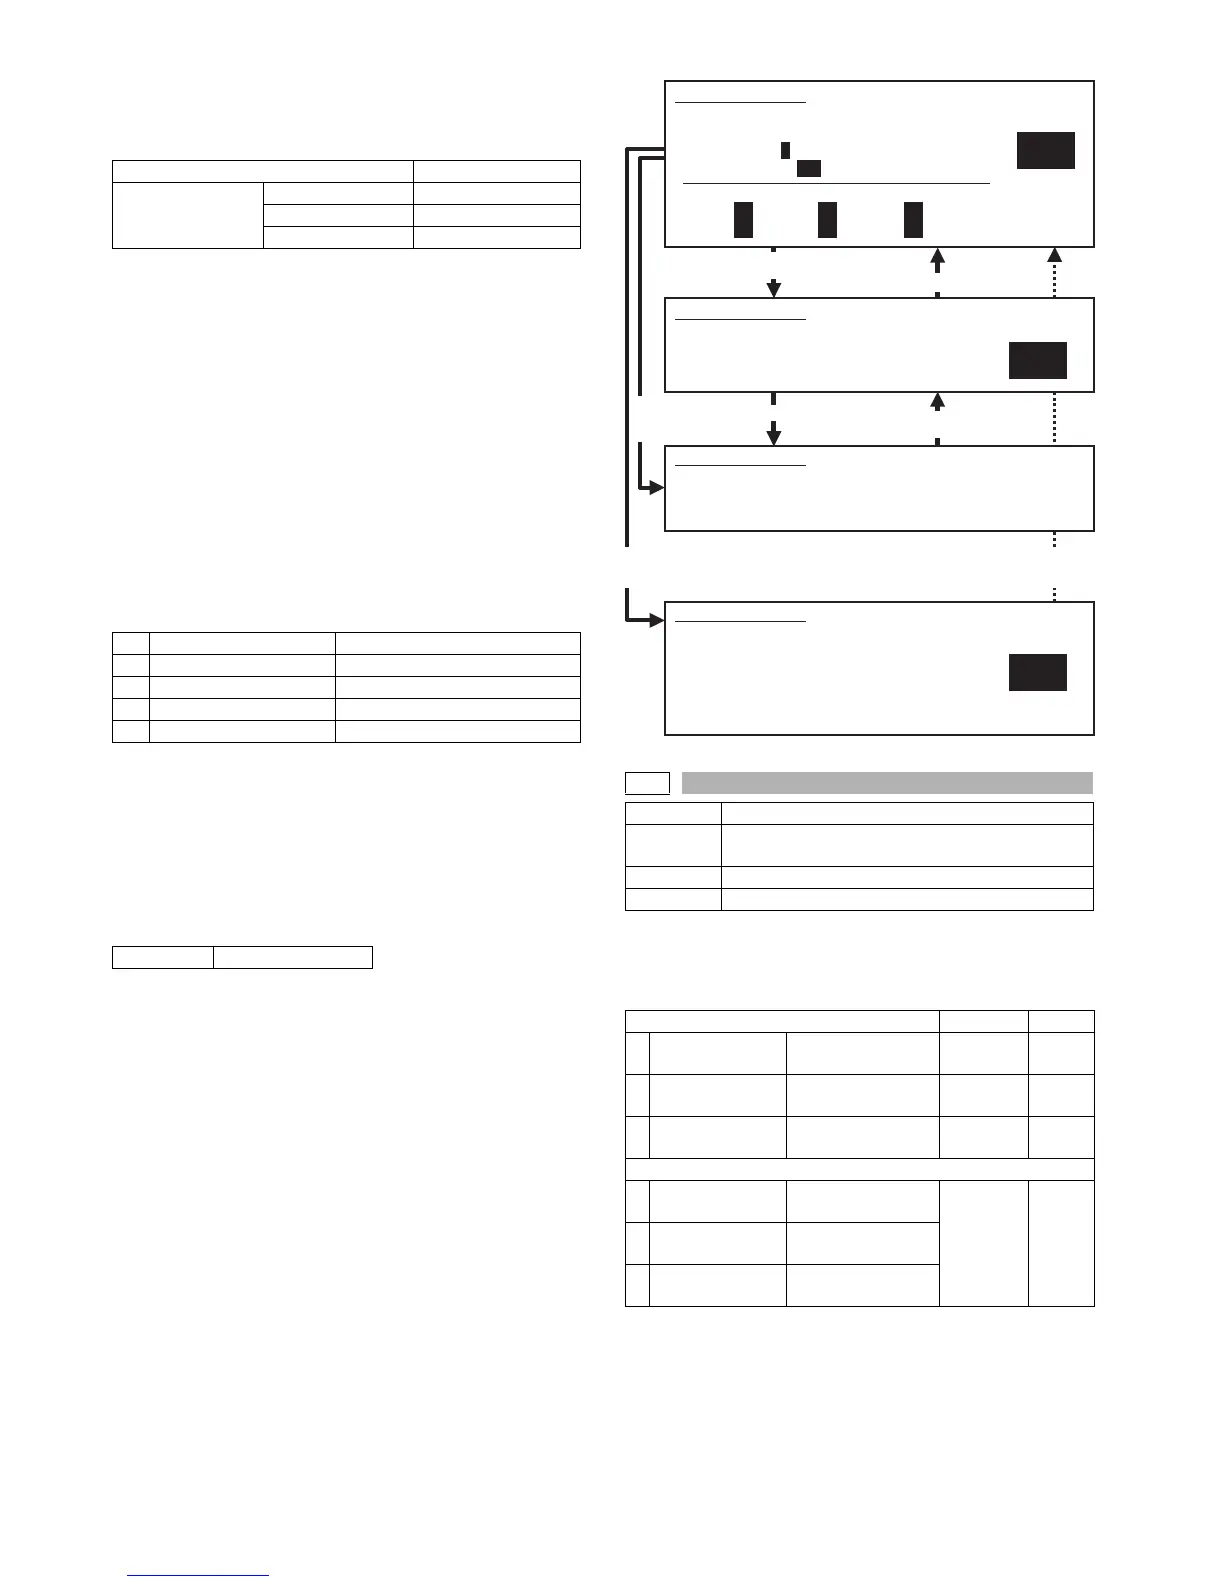
SIMULATION 50-10
PRINT OFF-CENTER ADJUSTMENT. SELECT 0-8, AND PRESS
START.
0.TRAY SELECT 1 1.COPY START
2.MAGNIFICATION 100
(ADJUSTMENT DATA)
3.TRAY1 50 4.TRAY2 50 5.TRAY3 50
6.TRAY4 50 7.BPT 50 8.ADU 50
SIMULATION 50-10
PRINT OFF-CENTER ADJUSTMENT. NOW COPYING.
SIMULATION 50-10
PRINT OFF-CENTER ADJUSTMENT. INPUT VALUE 0-99, AND
PRESS START.
3.TRAY1
1
SIMULATION 50-10
PRINT OFF-CENTER
ADJUSTMENT. SELECT 1-15, AND PRESS
START.
(FEED TRAY)
1.TRAY1 2.TRAY2 3.TRAY3 4.TRAY4
5.BPT
(ABOVE+10: DUPLEX MODE)