7SG15 MicroTAPP Application Guide
9 Wiring Configurations
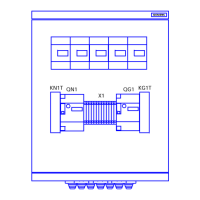
Diagrams located at the end of this section show typical arrangements for tap change control schemes. Inputs to
the relay and outputs for indications and control are user programmable. Tables 5, 6 and 7 give examples of the
I/O allocation for a complete control system as shown in the example scheme with the inclusion of other features
not shown on the diagrams. 11 inputs are used with 5 outputs. Other combinations of I/O are available, see
description of operation.
INPUTS
Terminal Default Allocation
Status 1
MicroTAPP enabled (to allow for control at tap
changer)
Status 2 Lower signal to tap changer
Status 3 Raise signal to tap changer
Status 4 3% voltage reduction from SCADA **
Status 5 6% voltage reduction from SCADA **
Status 6 Prepare for Switch-Out from SCADA **
Status 7 Tap in Progress switch is closed
Status 8 Auto selection from SCADA **
Status 9 Manual selection from SCADA **
Status 10 Raise signal from SCADA **
Status 11 Lower signal from SCADA **
Table 5
Controls can also be carried out by use of the serial communication connections into the relay making use of the
inputs marked ** unnecessary.
OUTPUTS
Terminal Default Allocation
Relay 1 Prepare for Switch-Out complete
Relay 2
Use N/C for Tap Changer motor supply
contactor reset
Relay 2
Use N/O for Tap Changer motor supply
latched contactor trip
Relay 3 Voltage control fault alarm
Relay 4 MicroTAPP initiated Lower signal
Relay 5 MicroTAPP initiated Raise signal
Table 6
OTHER INPUTS
B9,11,13,15,17,19 (B23 is
common)
Digital TPI
B23,25,27 Resistor TPI
Table 7
©2011 Siemens Protection Devices Limited Chapter 5 Page 14 of 21
 Loading...