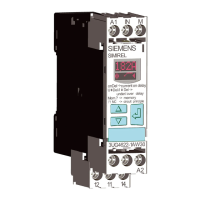
Front view/terminal labeling 3UG4983
Front view Description
9
8*
/
9
9
/
96
/99/
(9969
//
9
8*$
9
/
8*
99(
96
/
9
9/
9/
PDLQVFRQQHFWLRQ
s
Position digits
① Terminal block:
Screw-type connections are possible.
② Device article number
③ Circuit diagram
④ Label
Terminal labels
VL+ Measuring signal input, connection to the system
VL- Measuring signal input, connection to the system
VS Connection to 3UG4583 terminal VS
VE Connection to 3UG4583 terminal
V Measuring signal input, ground connection
L+ Connection to 3UG4583 terminal L+
L- Connection to 3UG4583 terminal L-
V1+ Connection to 3UG4583 terminal V1+
V1- Connection to 3UG4583 terminal V1-
Mounting onto standard rail
The gure below shows how to install the 3UG4983 voltage reducer module on a standard rail.
① /
②
Position the device on the top edge of the DIN rail and press it down until it snaps onto the bottom
edge of the DIN rail.
Figure 13-18 Installing the 3UG4983 voltage reducer module (mounting onto standard rail)
Accessories
13.3 Accessories for 3UG458.-1AW30 / 3UG4583-1CW30 insulation monitoring relays
SIRIUS 3UG4 / 3RR2 monitoring relay
268 Equipment Manual, 07/2021, NEB927043002000/RS-AD/005
 Loading...