9
Front Panel Controls
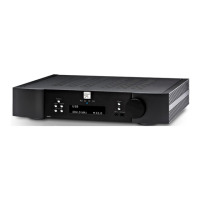
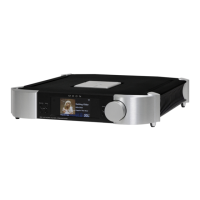
Figure 1: Front panel of the MOON 240i
The front panel will look similar to Figure 1 (above). The “Standby” button places the unit into Standby mode; You can
configure this to your own preferences– refer to the “Power Settings” section of the “Software Setup”. When switching from
“Standby” to the “on” mode (i) Five (5) seconds of animation will appear in the display prior to the 240i being ready for use
and (ii) The blue indicator LED will illuminate unless you have programmed it differently using the “SETUP” software
The “Mute” button mutes the output signal to all outputs.
Pressing the “Mute” button a second time will reinstate the
volume back to its previous level. Below are two (2) screen
capture images that demonstrate what appears on the
display during muting and immediately after unmuting
the output signal:
The “Display” button allows you to adjust the
brightness of the large display window. It also
provides you with the option of turning o the
display. There are three (3) dierent levels of
brightness; The default is high. Pressing the
“Display” button once will decrease the level to the
low setting. Pressing the button again will increase
the brightness to the medium setting. Pressing the
“Display” button a third time returns the display to its
default setting of high. To turn the display o, press
and hold the “Display” button for 2 seconds. When the
display is turned o, it will still come back on briey
whenever you press any of the buttons located
on the front panel or the remote control, using the
previously set brightness level; the display will
automatically turn o again once you are done.
To turn the display back on, simply press and hold
the “Display” button for 2 seconds.
The two (2) buttons labeled “ Input ” allow
you to sequentially scroll, either forward “” or
backward “” through all nine (9) inputs. These inputs
are ordered as follows going forward (): “OPTICAL
1”, “OPTICAL 2”, “SPDIF 1”, “SPDIF 2”, “USB”, “ANALOG 1”,
“ANALOG 2”, “PHONO” and “MP IN”.
The display window will show the currently selected
input. Each type of input has a uniquely respresen-
tative icon, located to the left of the input name, to
help clearly identify it. Here are examples of these
aforementioned inputs.
Note: The two (2) OPTICAL, two (2) SPDIF and two (2)
ANALOG inputs each use the same type of icons: