A-Scan Operation and Clinical Use Section 3
6. Scan Eye. Pick up the syringe from its place
on the patient’s shoulder and slowly inject
the saline or BSS into the shell. As soon as
the liquid fills the shell sufficiently to reach
the tip of the probe (about 2cc), the
characteristic waveforms of immersion
biometry will be visible on the display.
Gently tap the side of the probe tip to insure
that no air bubbles have been trapped on the
tip of the probe.
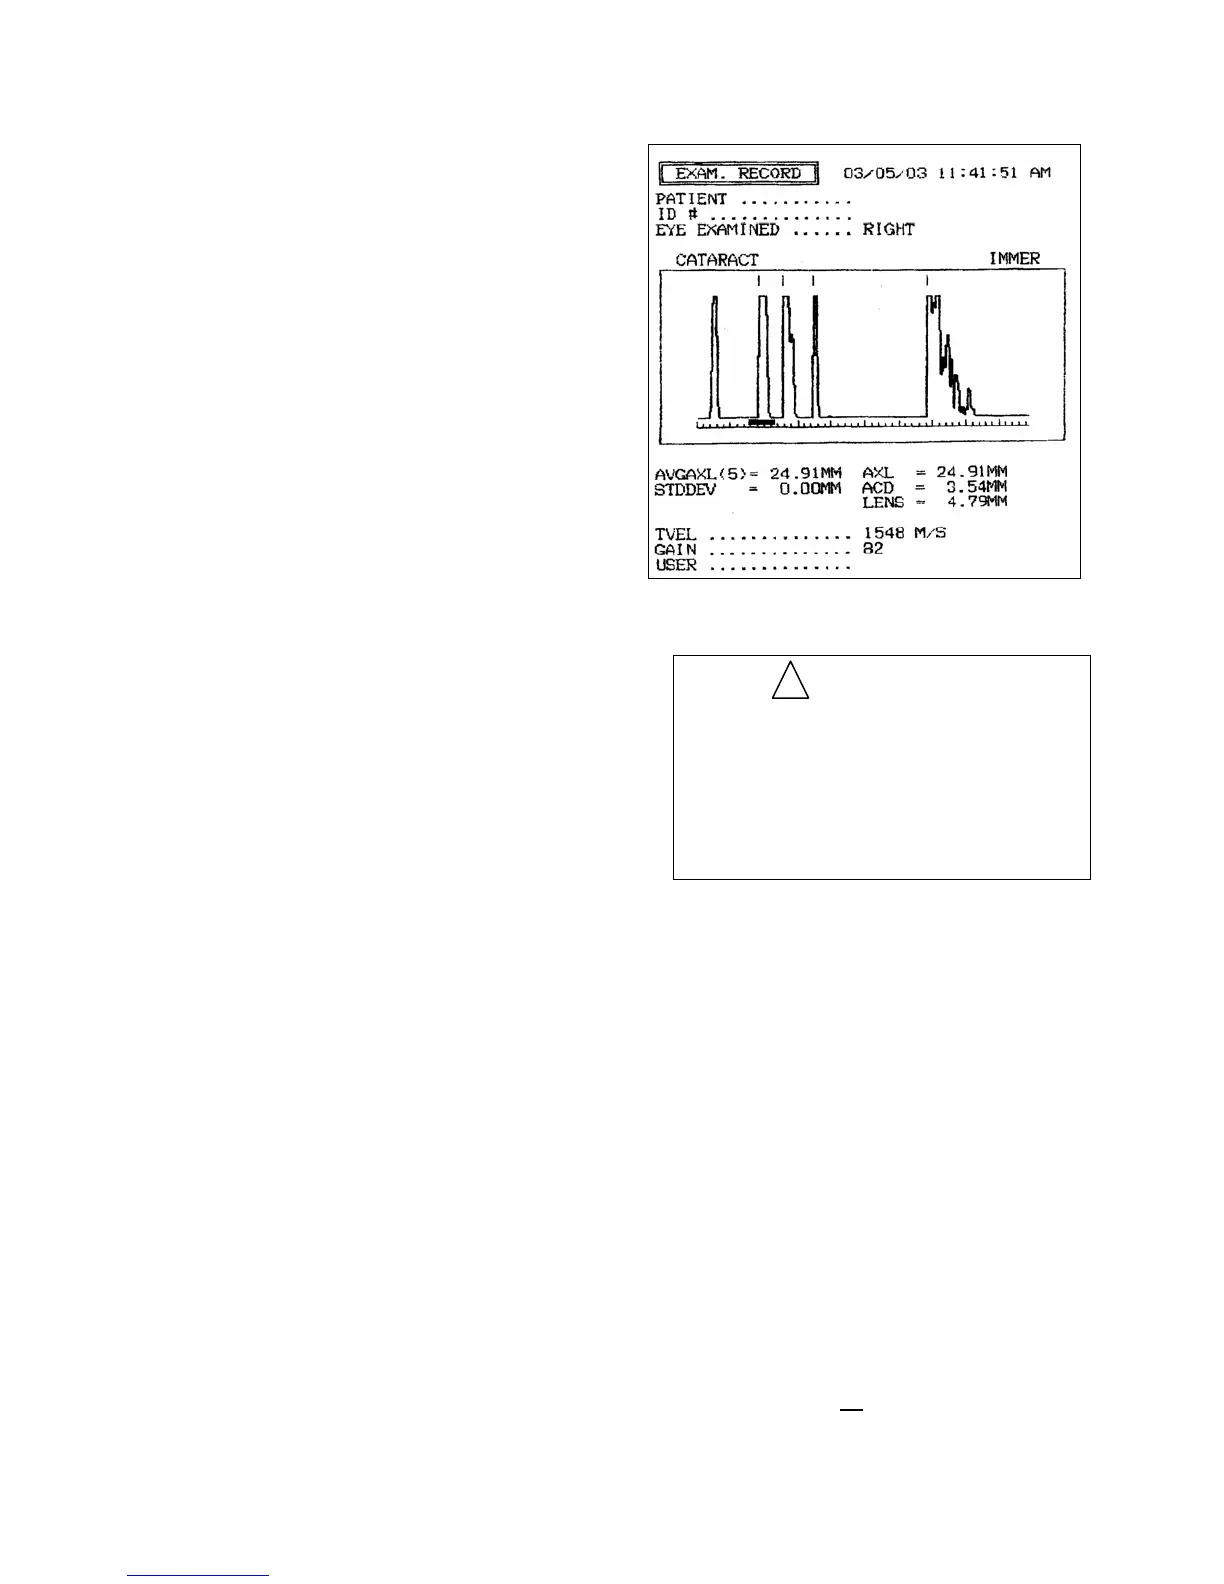
7. Automatic Image Capture. If the scan meets
all the parameters of the selected
examination mode, it will immediately be
frozen, saved and a long audible tone will be
emitted signifying that the instrument has
accepted the measurement. The proper
location of the corneal echo should be
confirmed on the scan waveform (see Figure
3-7). The first spike seen on the waveform
is the probe “main bang” followed by the
corneal echo. The acceptable position for
the corneal echo is indicated by the corneal
echo window (horizontal bar) displayed
below the waveform. The echo from the
cornea must fall within this window for a
proper immersion scan. If the corneal echo
is outside of this window, the position of the
probe within the Prager Shell should be
adjusted accordingly.
If necessary, the gain control may be
adjusted by touching the [ MIN ] and
[
MAX ] buttons at the bottom center of the
Measure Screen. The resulting gain as a
percentage of the maximum will be
displayed. Frequently a lower gain setting
may be used in Immersion scanning than
typically used in Direct Contact mode.
Once accepted, the scan pattern will be
displayed on the screen; the axial length will
be calculated and stored under “SCAN 1” in
the upper center of the Measure Screen. The
anterior chamber depth and lens thickness
will also be displayed. Gate markers will be
displayed above the waveform to indicate
the detected positions of the cornea, lens
anterior and posterior surfaces and the
retina.
Figure 3-7. Immersion Mode Record Print
IMPORTANT
It is important to remember that the auto
modes are meant to facilitate the
examination procedure but not replace the
examiner's clinical judgment. All scans
should be thoroughly evaluated by the user
prior to being accepted and used for
calculating lens powers.
!
8. Repeat. The protocol can be repeated to
obtain up to five (5) scans. As the scans are
captured, the axial length for each is
displayed in the upper center of the Measure
Screen. Additionally, the axial length
average and standard deviation for the group
of scans will be displayed. Each scan pattern
may be reviewed by touching the [ SCAN# ]
button to scroll through the captured scans.
The Prager scleral shell should be left in
place until all desired scans are achieved.
9. Deleting Scans. If a scan is captured which
is no longer desired, it may be deleted by
touching the [ DEL SCAN ] button.
Deleting a scan will remove the scan pattern
and all associated data from system memory,
and will exclude the associated axial length
from the average and standard deviation
calculations. If
all scans are no longer
3 - 8 Doc # 0300-A-1901-3D