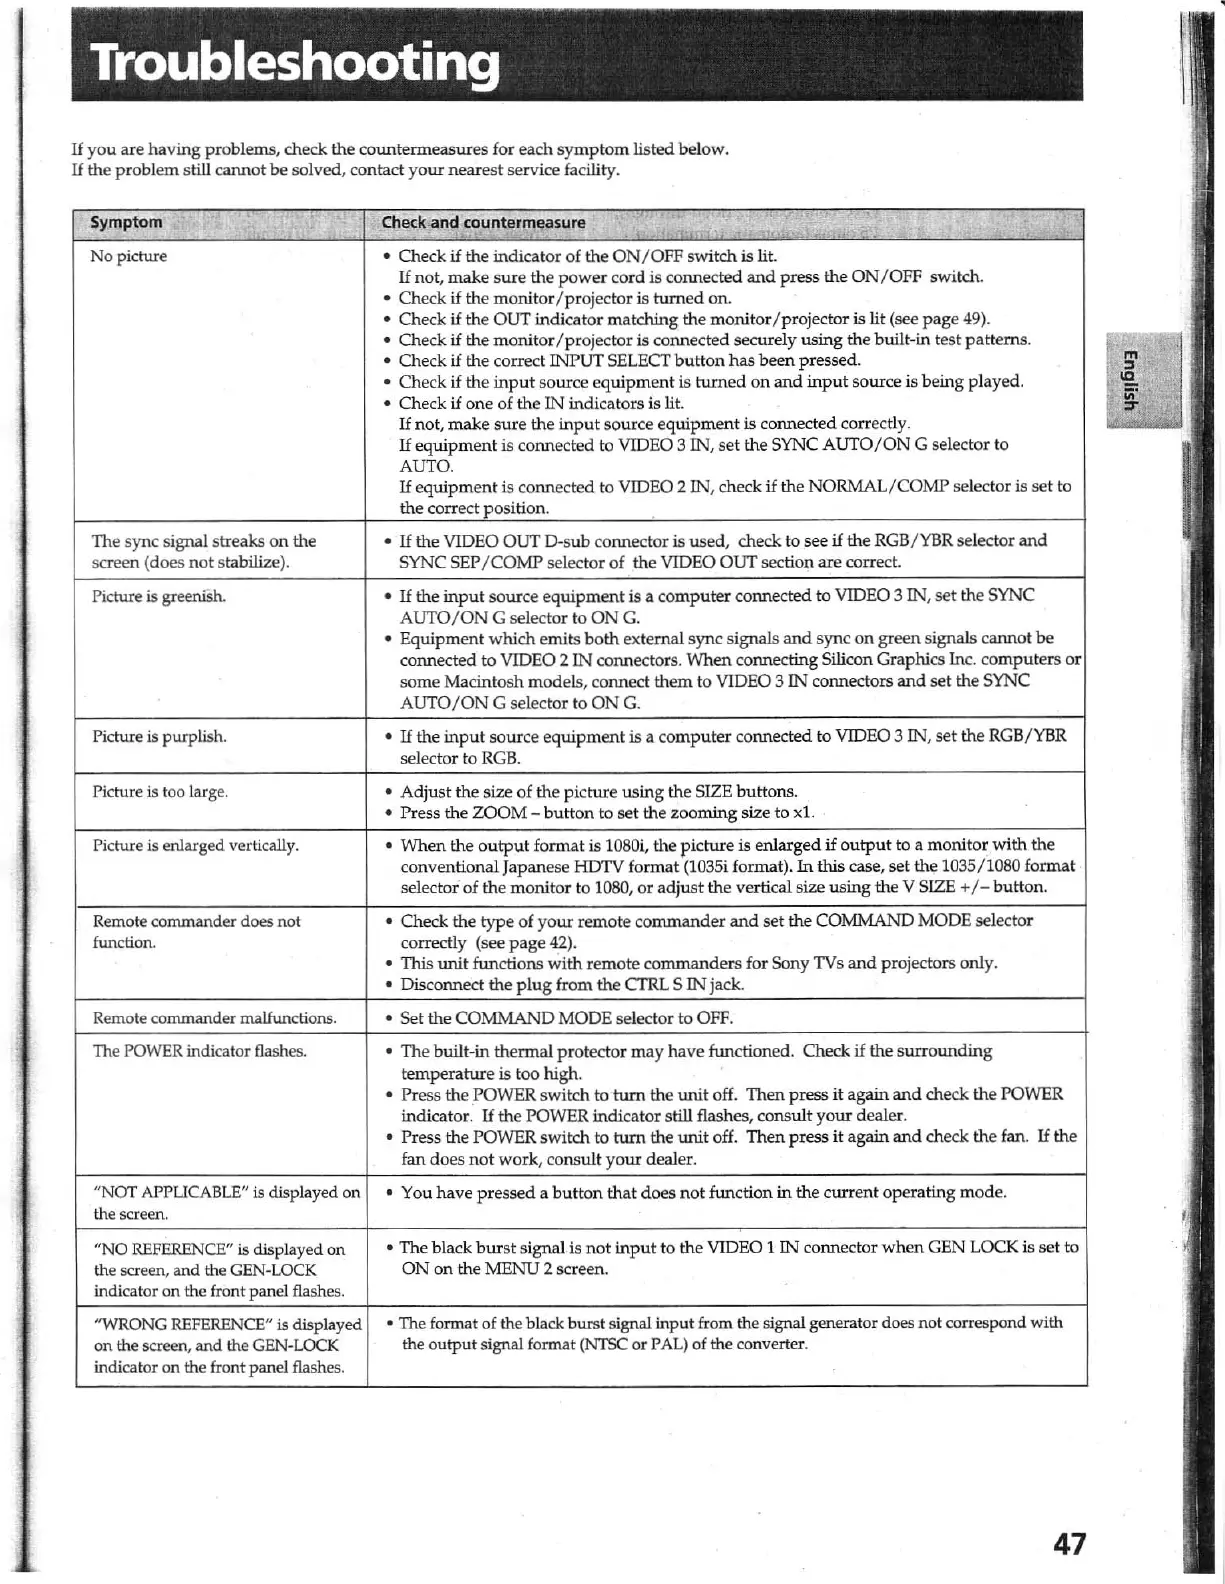
Troubleshooting
If
you
are
having
problems,
check
th
e cOlUltermeasures for each s
ymptom
listed below.
Ii
the probl
em
st
ill c
annot
be
so
lved, contact
yo
ur
nearest
serv
ice facility.
Symptom
,
Check
and
countermea
s
ure
"
No picture • Check
if
the
indi
cator
of
th
e
ON/OFF
switch is lit.
If
not,
make
sure
th
e
power
cord is cormected
and
press
the ON JOFF switch.
• Check
if
the
monitor
/p
rojector is
turned
on.
• Check
if
the
OUT indicator matching
the
monitor/
pro
ject
or
is
lit (see
pag
e
49)
.
• Check
if
the monitor / projector is connected securely using the
bui
lt-in t
est
patterns.
• Check
if
the correct INPUT SELECT
button
has
been
pressed
.
• Check
if
the input source equipment is turned
on
and input sour
ce
is being played.
• Check
if
one
of
th
e
IN
indicators is lit.
If
no
t,
make
sure
the
input
s
our
ce
equipment
is
connected correctly.
If
equipment
is
connected
to VIDEO 3 IN,
set
the SYNC
AUTO/ON
G selector to
AUTO.
If
equipment
is c
onn
ected to VIDEO 2 IN, check
if
the
NORMAL/COMP
selector is set to
the
correct position.
The s
yn
c signal streaks on
th
e •
If
the VIDEO
OUT
D-sub connector is used, check to see
if
the
RGB
/
YBR
selector
and
screen (does
not
stabilize). SYNC SEP /
COMP
selector
of
th
e VIDEO OUT section
are
correct.
Picture is greenish. •
If
the
inp
ut
so
ur
ce
equipment
is a co
mputer
connected to VIDEO 3 IN, set
th
e SYNC
AUTO/
ON
G
se
lector to
ON
G.
•
Equipment
which
emits
bo
th
external sync signals
and
sync
on
green
signals
cannot
be
connected to VIDEO 2 IN connectors.
When
connecting Silicon Graphics
In
c.
computers
or
so
me
Macintosh
mod
els, connect
them
to VIDEO 3 IN connectors
and
se
t
th
e SYNC
AUTO/ON
G selector to
ON
G.
Picture is purplish.
•
If
the
input
source
equipment
is a
computer
connected to VIDEO 3 IN,
set
the
RGB
/
YBR
selector to
RGB.
Picture is
to
o large.
•
Adjust
the size of
th
e picture us
ing
the SIZE
buttons
.
• Press the
200M
-
button
to set the zooming size to x
l.
Picture is enlarged vertically. •
When
the
outp
ut for
mat
is 108m,
the
picture is enlarged
if
ou
tp
ut to a monitor
with
the
conventional
Japan
ese HDTV format (1035i format).
In
this case, set
th
e 1035/ 1080 format
selectoi
of
th
e
monit
or to 1080, or adjust the vertical size
using
the V SIZE + / - button.
Remote commander does not
• Check the
type
of
yo
ur
rem
ote
commander
and
set
the
COMMAND MODE selector
function.
correctly (see
page
4.2
).
•
nus
Wlit functions w
ith
remote co
mmanders
for Sony TVs
and
projectors o
nl
y.
• Disconnect
the
plug
from
the
CTRL S
IN
jack.
Rem
ote commander malfunctions.
• Set
the
COMMAN
D MODE selector
to
OFF.
The POWER indicator flashes.
•
The
built-in
thermal
protector
may
ha
ve
functioned. Check
if
the surrOlUlding
temperature
is too
hi
gh.
• Press the .POWER
sw
itch to turn
th
e Wlit off.
Then
press
it again
and
check the POWER
indicator.
If
the POWER
indi
cat
or
still flashes, consult y
our
dealer.
• Press the POWER
swi
tch to turn the tmit off.
Then
press
it again
and
check
the
fan.
If
the
fan
does
not
work, consult y
our
d
ea
ler.
"NOT APPUCABLE"
is
displayed on • You have pressed a
button
that
does
no
t function
in
the cWTent operating mode.
the
scree
n.
"NO
REFERENCE"
is
displayed on
• The
bl
ack
burst
signal is
not
inp
ut
to
the
VIDEO 1 W co
nn
ector
whe
n GEN LOCK is set to
the screen, and the GEN-LOCK
ON
on
the
MENU 2 screen.
indicator on the front panel flashes.
"WRONG
REFERENCE"
is displayed
• The format of the blade burst signal input from the signal generator does not c
orCf!
spo
nd
with
on the screen, and the GEN-LQCK
the output
signal format
(NTSC
or P
AL)
of the converter.
indicator on the fron
tpan
e1
flashes.
47
,