1-1
SECTION 1
GENERAL
MVC-CD200/CD300
This section is extracted from
instruction manual.
6
Introduction
Captures images with your computer
You can easily copy images onto your computer through a CD-ROM drive, CD-R
drive, CD-RW drive, or the USB cable and view and modify images on your
computer using application software. When using a CD-ROM drive to view images
on your computer, the finalization is required (page 32).
Flow chart for disc operations
Start
• A new disc
• The disc finalized with a computer or other equipment
Disc preparation for
recording is complete.
(page 18)
View on a
computer
(page 35)
View on the
camera
(page 28)
View through
the USB cable
(page 38)
View through a
CD-R/CD-RW
drive
(page 41)
View through a
CD-ROM drive
(page 37)
(page 32)
About 13 MB disc
space is used
(page 34)
About 13 MB disc
space restores.
The disc status
is before
finalization
(page 82)
The disc space is fully
available.
Blank disc
Disc preparation
for viewing through
a CD-ROM drive is
complete.
Initialize
Finalize
Unfinalize
Format
Record
: CD-R
: CD-RW
[ ] : Required
time
[About 1 min]
[About 1 min]
[About 7 min]
Recording is complete
7
Getting started
Getting started
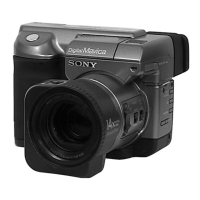
Identifying the parts
See the pages in parentheses for details of operation.
A
Shutter button (20, 26)
B
Built-in microphone
Do not touch while recording.
C
Battery cover (bottom surface)
(9)
D
Lens
E
Tripod receptacle (bottom surface)
Use a tripod with a screw length of
less than 6.5 mm (7/32 inch). You
cannot firmly secure the camera to
tripods having longer screws, and
may damage the camera.
F
Accessory shoe
G
Photocell window for flash
Do not block while recording with
the flash.
H
Flash (24)
I
Self-timer lamp/AF illuminator
(24, 25)
J
Hook for strap and lens cap
K
Disc cover OPEN lever (16)
L
ACC (Accessory) jack
Connects an external flash or other
equipment.
M
Lens cap (supplied)
N
USB jack (38)
O
A/V OUT (MONO) jack (76)
Audio output is monaural.
1
2
3
5
4
qa
9
0
7
8
qs
qd
qf
qg
About the Carl Zeiss lens (MVC-
CD300 only)
This camera is equipped with a Carl Zeiss
lens which is capable of reproducing fine
images. The lens for this camera uses the
MTF* measurement system for cameras
developed jointly by Carl Zeiss, in
Germany, and Sony Corporation, and
offers the same quality as other Carl Zeiss
lenses.
∗ MTF is an abbreviation of Modulation
Transfer Function/Factor, a numeric
value indicating the amount of light from
a specific part of the subject gathered at
the corresponding position in the image.
8
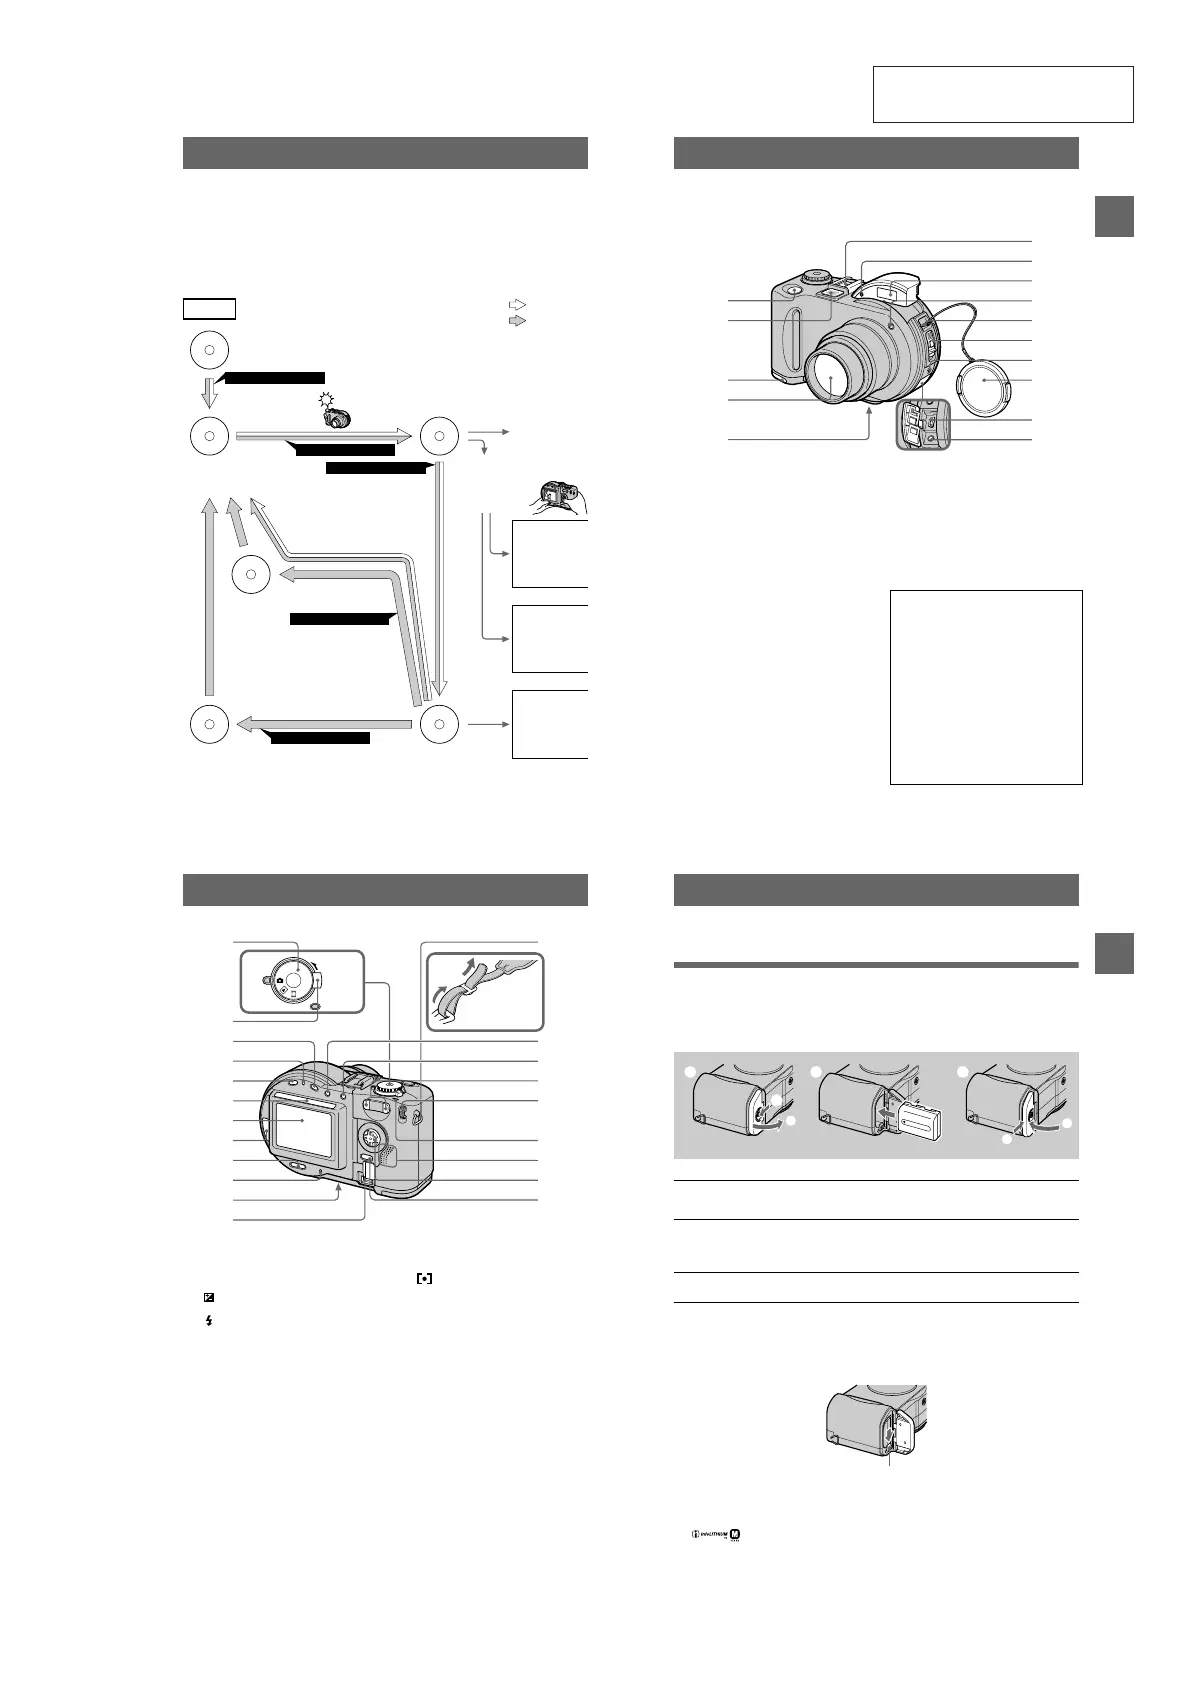
A
Mode dial (45)
B
POWER switch (14)
C
(Exposure) button (67)
D
/CHG (Charge) lamp (10, 25)
E
FOCUS button (66)
F
Photocell window for LCD
screen
The LCD screen becomes brighter
when exposed to sunlight.
G
LCD screen
H
Disc window
I
DISPLAY/LCD BACK LIGHT ON/
OFF button (23)
J
ACCESS lamp (20)
K
Reset button (99)
L
DC IN cover/DC IN jack (10, 13)
M
Hook for strap
N
(Spot meter) button (71)
O
AE LOCK button (55)
P
Zoom W/T buttons (22)
Q
Jog dial (48)
R
POWER ON/OFF (CHG) lamp
(14)
S
Speaker
T
Control button (46)
U
MENU button (46)
S
A
M
SCN
SET
UP
ON/
OFF(CHG)
POWER
4
5
3
2
1
7
8
6
9
0
qa
qs
qh
qj
qf
qd
qg
qk
ql
w;
wa
Attaching the
shoulder strap
Getting started
9
Preparing the power supply
Installing the battery pack
Your camera operates only with the NP-FM50 (supplied) “InfoLITHIUM” battery
pack* (M series). See page 91 for more information about “InfoLITHIUM” battery
pack.
To remove the battery pack
Open the battery cover. Slide the battery eject lever in the arrow direction,
and remove the battery pack.
Be careful not to drop the battery pack when removing it.
*
What is “InfoLITHIUM”?
“InfoLITHIUM” is a lithium ion battery pack which can exchange information such as battery
consumption with compatible video equipment. “InfoLITHIUM” M series battery packs have
the mark. “InfoLITHIUM” is a trademark of Sony Corporation.
1
Open the battery cover.
Slide the battery cover in the direction of the arrow.
2
Install the battery pack.
Insert the battery pack with the
v
mark facing toward the battery compartment
as illustrated.
3
Close the battery cover.
1 2 3
2
1
2
1
Battery eject lever

 Loading...