1-2
DVP-NS611HP/NS710H/NS710HP/NS717HP/NS718H/NS718HP/NS728H/NS728HP
8
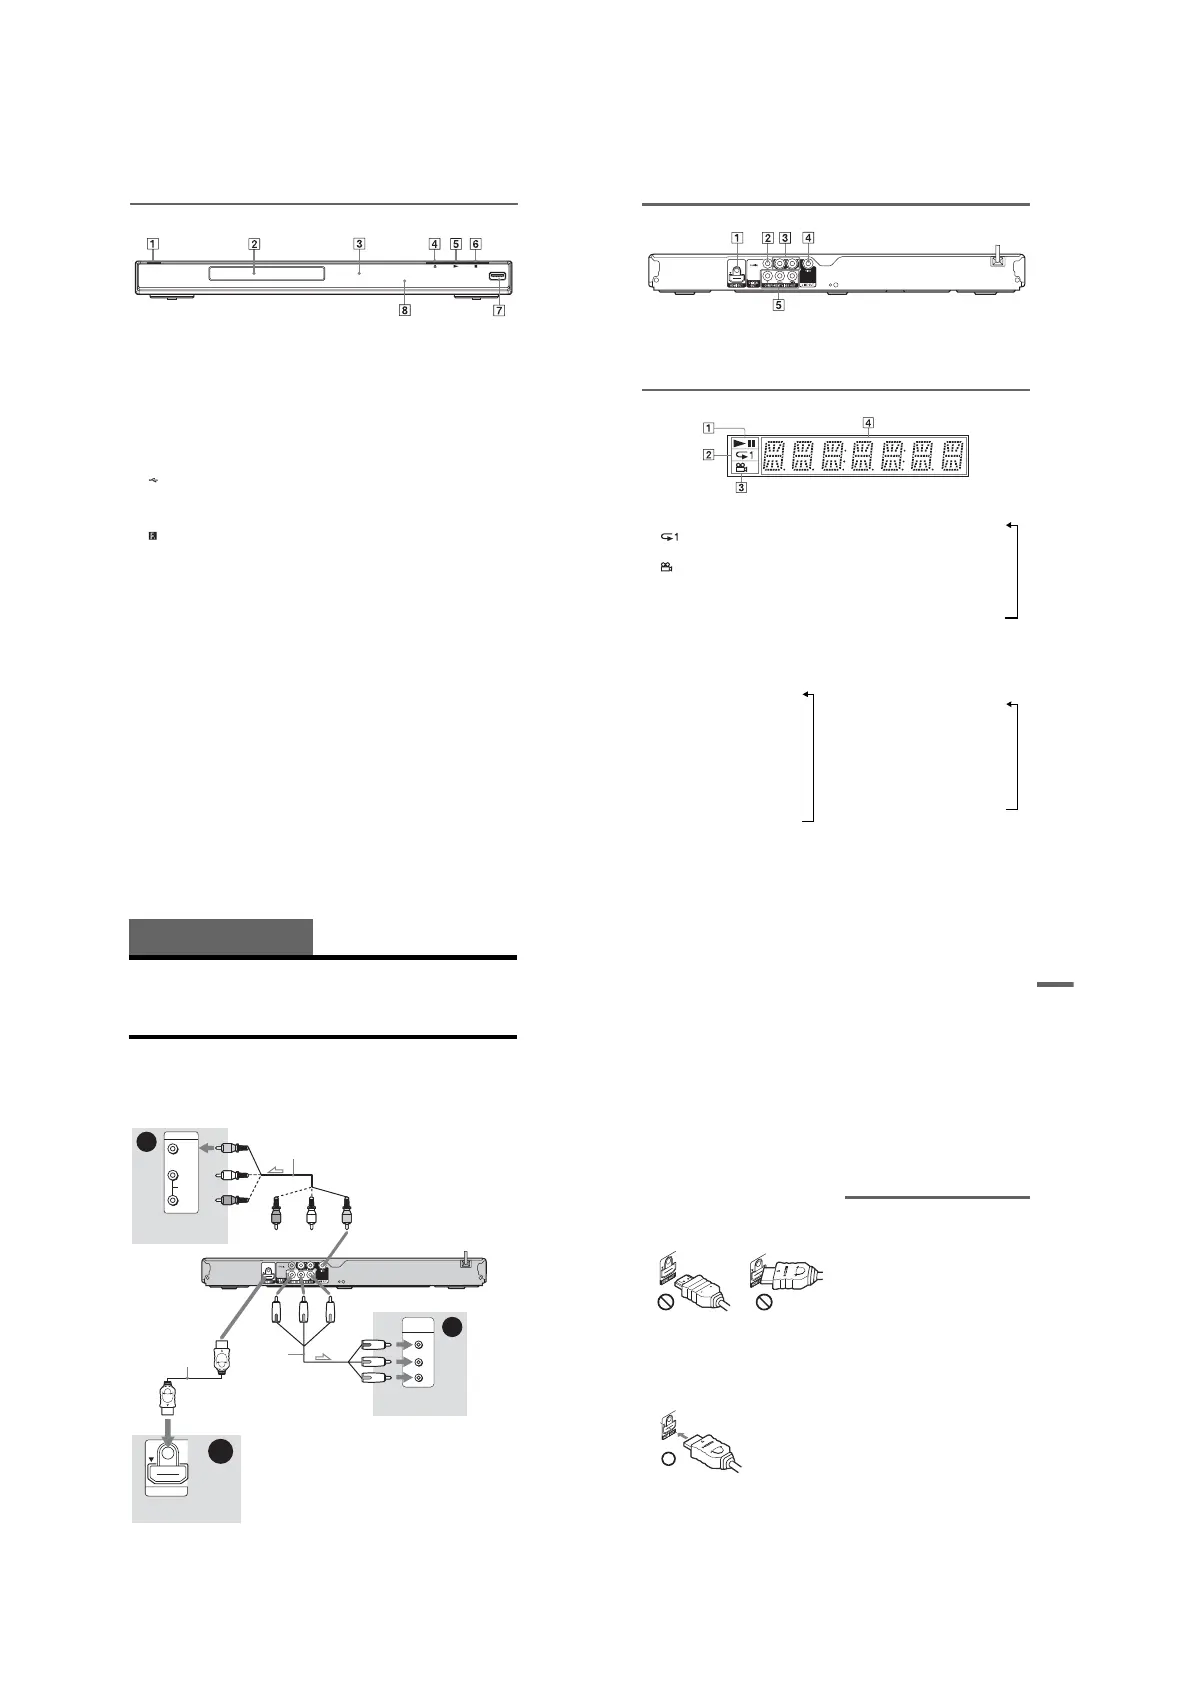
Front panel
A [/1 (on/standby) button (15)
B Disc tray (17)
C Front panel display (9)
D Z (open/close) button (17)
Opens or closes the disc tray.
E N (play) button (17)
The N button has a tactile dot*.
F x (stop) button (17)
Stops playback.
G USB jack (type A) (16, 29)
(DVP-NS728H and DVP-NS728HP
only)
Connect a USB device to this jack.
H (remote sensor) (13)
* Use the tactile dot as a reference when operating
the player.
To lock the disc tray (Child Lock)
You can lock the disc tray to prevent it being
opened by mistake.
When the player is in standby mode, press
O RETURN, ENTER, and then [/1 on the
remote.
The player turns on and “LOCKED” appears
on the front panel display. The Z button on
the player does not work while the Child
Lock is set.
To unlock the disc tray
When the player is in standby mode, press
O RETURN, ENTER, and then [/1 again.
b
Even if you select “RESET” under “SETUP” in the
Control Menu (page 32), the disc tray remains
locked.
To change the colour system
If the on-screen menu of the player does not
appear on the connected TV, switch the
player’s colour system to match the colour
system of the TV (NTSC or PAL).
First turn off the player by pressing [/1, and
then press [/1 again while holding down x
on the player.
The player turns back on, and the name of the
colour system will appears on the front panel
display.
9
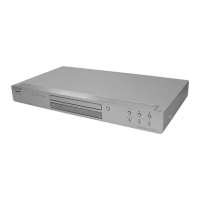
Rear panel
A HDMI OUT (High-Definition
Multimedia Interface out) jack (10, 12)
B DIGITAL OUT (COAXIAL) jack (12)
C LINE OUT L/R (AUDIO) jacks (12)
D LINE OUT (VIDEO) jack (10)
E COMPONENT VIDEO OUT jacks
(10)
Front panel display
A N, X
Lights up during playback or pause.
B
Lights up during Repeat Play.
C
Lights up when you can change the
angle.
D Playback information
You can view the time and text
information by pressing the TIME/
TEXT button on the remote repeatedly.
The display changes as follows:
When playing a DVD
Current title playing time
r
Current title remaining time
r
Current chapter playing time
r
Current chapter remaining time
r
Text
r
Current title and chapter number
(Returns to top automatically)
en p
ay
ng mus
c or v
eo
es
Current file
*1
or track
*2
playing
time and number
r
Current file
*1
or track name/MP3
ID3 track title
*2
r
Current album and file
*1
or
track
*2
number
(Returns to top automatically)
*
1
for video file
*
2
for music file
When playing a VIDEO CD (without
PBC functions) or CD
Current track playing time and
number
r
Current track remaining time
r
Disc playing time
r
Disc remaining time
r
Text
10
Hookups and Settings
When unpacking, check the supplied accessories by referring to page 46.
b
• Plug cables securely to prevent unwanted noise.
• Refer to the operating instructions supplied with the components to be connected.
• Be sure to disconnect the mains lead of each component before connecting.
Step 1: Connecting to Your TV
Connect this player to your TV using a video cable. Select one of the patterns A through C,
according to the input jack on your TV.
In order to view progressive signal (525p or 625p) pictures with a compatible TV, you must use
pattern B. Select pattern C when connecting to a TV equipped with HDMI input.
A
VIDEO
AUDIO
INPUT
L
R
PR/CR
PB/CB
Y
COMPONENT
VIDEO IN
B
HDMI IN
C
Audio/video cable (supplied)
Component
video cable
(not supplied)
(yellow)
(green)
TV
(red)
(green)
(blue)
(red)
to LINE OUT (VIDEO)
l : Signal flow
CD/DVD player
to COMPONENT
VIDEO OUT
(blue)
(yellow)
(white)(red)
(white)
(red)
TV
HDMI cord
(supplied with
DVP-NS710HP,
DVP-NS718HP, and
DVP-NS728HP only)
to HDMI OUT
TV
11
Hookups and Settings
A Video input jack
You will enjoy standard quality images.
B Component video input jacks
(Y, P
B/CB, PR/CR)
You will enjoy accurate colour reproduction
and high quality images.
C HDMI/DVI input jack
Use a certified Sony HDMI cord to enjoy
high quality digital picture and sound through
the HDMI OUT jack.
When connecting to a Sony TV that is
compatible with the CONTROL FOR HDMI
function, see page 11.
When connecting to the HDMI OUT jack
Follow the steps below. Improper handling
may damage the HDMI OUT jack and
the connector.
1 Carefully align the HDMI OUT jack on
the back of the player and the HDMI
connector by checking their shapes.
Make sure the connector is not upside
down or tilted.
2 Insert the HDMI connector straight into
the HDMI OUT jack.
Do not bend or apply force to the HDMI
connector.
To connect to a TV with DVI input
Use an HDMI-DVI converter cord (not
supplied). The DVI jack will not accept any
audio signals, so you have to use another
audio connection in addition to this
connection (page 12). Furthermore, you
cannot connect the HDMI OUT jack to DVI
jacks that are not HDCP compliant (e.g., DVI
jacks on PC displays).
When connecting to a standard 4:3 screen TV
Some images may not fit your TV screen. To
change the picture size, see page 33.
b
• Do not connect a VCR, etc., between your TV and
the player. If you pass the player signals via the
VCR, you may not receive a clear image on the
TV screen. If your TV has only one audio/video
input jack, connect the player to this jack.
• If the picture appears too white when you are
using A connection, set “BLACK LEVEL” in
“SCREEN SETUP” to “OFF” (page 34).
• Be sure to disconnect the HDMI cord when
moving the player.
• Do not apply too much pressure to the cabinet
wall, if you place the player on the cabinet with
the HDMI cord connected. It may damage the
HDMI OUT jack or the HDMI cord.
• When connecting or disconnecting, do not screw
in or rotate the HDMI connector.
About the CONTROL FOR HDMI
functions for ‘BRAVIA Sync’ (for
HDMI connections only)
By connecting to Sony components that are
compatible with the CONTROL FOR HDMI
function with an HDMI cord (supplied with
DVP-NS710HP, DVP-NS718HP, and DVP-
NS728HP only), you can enjoy the following
features:
• One-Touch Play (page 17)
• System-Power Off
When you turn the TV off by using the [/1 button
on the TV’s remote, the components compatible
with CONTROL FOR HDMI function turn off
automatically.
b
Depending on the connected component, the
CONTROL FOR HDMI function may not work.
Refer to the operating instructions supplied with the
component.
Connector is
upside down
Not straight