The surgeon will choose the technique depending upon his experience and
the clinical status of the patient.
The nal implantation of the device must satisfy the conditions for optimal
positioning of the sensor in the parenchyma.
Pr e c a u t i o N :
d
o n o t pe R f o R m t h e im p l a n t a t i o n o f a m o n i t o R i n g c a t h e t e R w i t h o u t h a v i n g a Re p l a c e m e n t
k i t a v a i l a b l e i n c a s e i t i s R e q u i R e d .
Choice of implantation area
Indication for implantation area: the standard right and left prefrontal areas are
the main implantation areas. This region allows the patient to turn his/her head
while remaining in the decubitus position without interfering with the intracranial
pressure monitoring function. Additionally, in most cases, the incision is made behind
the hairline, which is acceptable from an esthetic point of view.
Intracranial access
Once the implantation site has been chosen, the area is shaved and prepared
aseptically. A local anesthetic is applied in the incision area.
This is generally 2 to 3 centimeters in front of the coronal suture on the mid-pupillary line.
An incision of about one centimeter is made down to the bone.
Make sure the bony plate is well exposed and perform hemostasis on the wound edges.
The adjustable stop on the drill bit supplied in the kit may be positioned as required
by loosening the locking screw with the Allen wrench.
Position the adjustable stop depending upon the drilling depth chosen and retighten
the locking screw to maintain this position.
Wa r N i N g :
i
n c o m p l e t e t i g h t e n i n g o f t h e l o c k i n g s c R e w w i l l p R e v e n t t h e a d j u s t a b l e s t o p f R o m p l a y i n g
i t s R o l e , w i t h t h e R i s k o f d R i l l i n g t o o d e e p l y.
The drill bit is then xed to a helical drill and the perforation is performed through
the internal and external skull plates. The surgeon must ensure that any possibility of
a parenchymal lesion when he crosses the internal plate is avoided.
Pr e c a u t i o N :
m
a k e s u R e a c o m p l e t e l y R o u n d h o l e is m a d e w i t h t h e d R i l l b i t : t h e s h a f t o f t h e d R i l l
m u s t n o t m o v e d u R i n g p e R f o R a t i o n . ma i n t e n a n c e o f t h e b o l t i n t h e b u R R h o l e c o u l d b e
a f f e c t e d b y t h i s .
After having crossed the internal plate, the drill bit is withdrawn and the hole
is irrigated with sterile normal saline.
Incise the dura mater.
Putting the bolt in place
- Make sure that the dura mater has been perforated.
- Screw the Pressio® bolt into the skull using the tab (cf. Figure 4-1).
It is a matter for the competence of the surgeon to judge the depth of the bolt seating
depending on the thickness of the skull.
The spacer ring may be used to reduce the implantation depth of the bolt, otherwise
remove and discard it.
Use of the Pressio® bolt is contraindicated in young children because the bony plate
of the skull is not suciently thick.
Wa r N i N g :
e
n s u R e t h a t t h e b o l t is n o t s c R e w e d t o o d e e p l y. th e b o l t s h o u l d e R a n d i t s s p a c e R R i n g
a R e a s i m p l e v i s u a l m a R k e R a n d n o t a s t o p : t h e y w i l l n o t s t o p d e e p e R p e R f o R a t i o n d u R i n g
s c R e w i n g o f t h e b o l t .
P
r e c a u t i o N :
e
n s u R e t h a t t h e b o l t i s n o t un s c R e w e d a n d t h e n Re t i g h t e n e d i n t h e s a m e b u R R h o l e .
m
a i n t e n a n c e o f t h e b o l t i n t h e b u R R h o l e c o u l d b e a f f e c t e d b y t h i s .
Catheter implantation
Wa r N i N g :
l
i m i t t h e Re p e t i t i o n o f i n t R a c e R e b R a l c a t h e t e R i m p l a n t a t i o n s : fR e q u e n t i n ci s io n s i n t o
t h e b R a i n t o e n a b l e t h e i n s e R t i o n o f t h e ca t h e t e R c o u l d p R e d i s p o s e it t o e d e m a a n d
i n t R a c e R e b R a l h e m o R R h a g e , Re s u l t i n g i n a R i s e in i n t R a c R a n i a l p R e s s u R e .
- Introduce the guide stylet into the Pressio® bolt to create a passage through
the parenchyma in order to facilitate the introduction of the Pressio® catheter
(cf. Figure 4-2).
- Remove the guide stylet and irrigate the bolt with normal saline (cf. Figure 4-3).
- Introduce the catheter into the bolt.
Ensure that the pressure sensor has been zeroed beforehand (cf. § “Preparation
of a Pressio® catheter BEFORE IMPLANTATION: zeroing the pressure sensor”).
Wa r N i N g :
d
o n o t p e R f o R m t h e “sensoR zeRo” o n c e t h e c a t h e t e R i s i m p l a n t e d ; i t i s e s s e n t i a l
t o p e R f o R m t h e “sensoR zeRo” b e f o R e i t i s i m p l a n t e d t o c a l i b R a t e i t w i t h a t m o s p h e R i c
p R e s s u R e .
To perform a parenchymal measurement of intracranial pressure, the implantation
depth must be 1-3cm in the cerebral parenchyma.
- Push the catheter through the parenchyma. Position the catheter at the depth
desired using the centimetric marking:
A thicker marker located 4cm from the end of the catheter represents the length
of the bolt.
Once the catheter is introduced into the bolt this marker is no longer visible when
the sensor at the end of the catheter just emerges from the bolt. The sensor is then
in the sub-arachnoid space (cf. Figures 3 and 4.4).
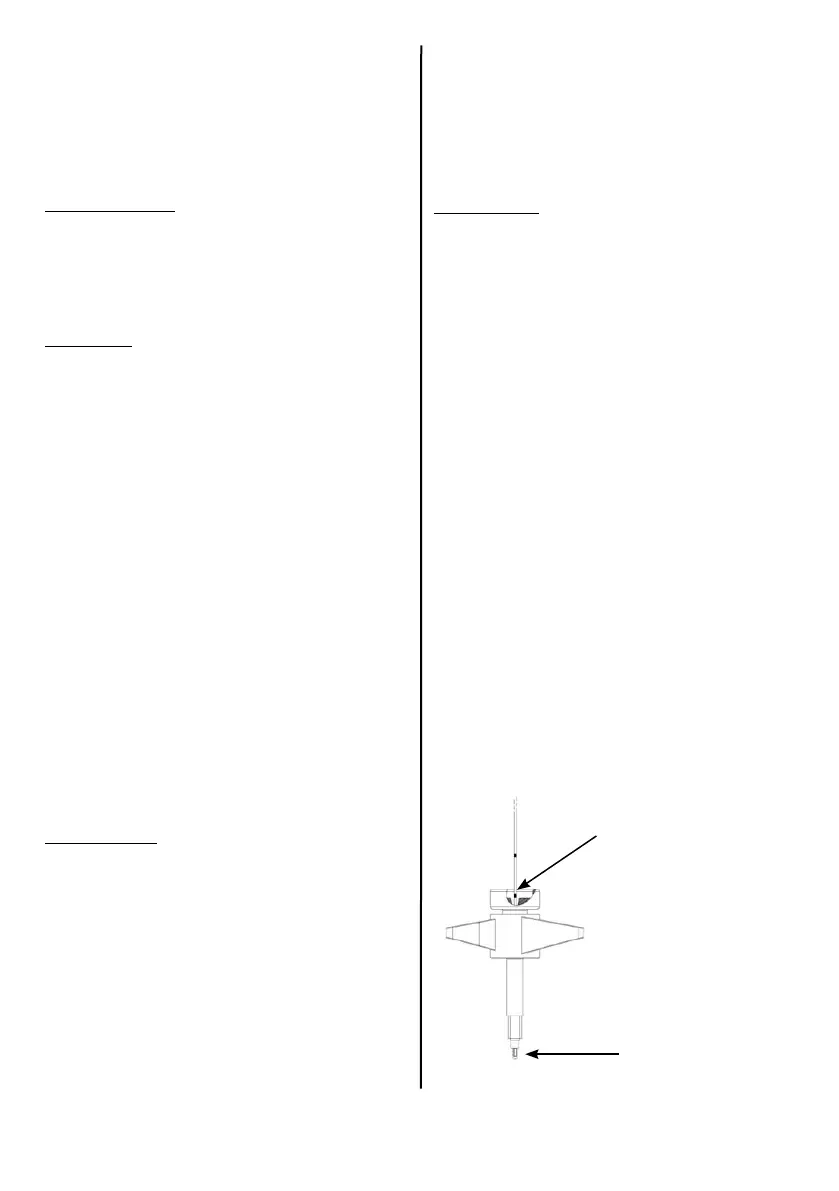
Figure 3
“4 cm” marker on the clamping nut.
Sensor at the end of the bolt.
 Loading...