11
Selected patterns Front to Back, Forward Gain and Beam Width
Frequency setting
Fault message if there is a problem needing attention.
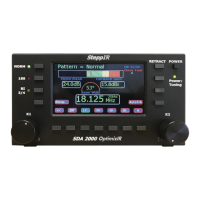
Screen After First-Time Power-On
There are pushbuttons surrounding the TFT full-color display. The buttons are labeled
NORM, 180 and BI 3/4. RETRACT and POWER always have the same function. Buttons
without labels have on-screen messages. These messages change depending on
controller’s operating mode.
When a button with an on-screen message is pressed, the color will change indicating
selection. For example, if AutoTrk button is pressed, it will illuminate green indicating the
Autotrack mode is enabled. In the case of Autotrack, it will not illuminate unless the
transceiver interface is ON, Refer to setup mode’s “Autotrack Setting” to configure the
controller for automatic frequency tracking.
The K2 knob adjusts displayed frequency by step-size displayed in upper right of
frequency window. The step-size can be changed by pressing K2 knob. If Autotrack is
enabled, frequency will change to radio frequency every time there is an update. This will
over-ride any changes made with K2 knob or band buttons.
The K1 knob will select antenna pattern from available list for selected band.
There are different patterns available for NORM, 180, and BI 3/4. For instance, if a
maximum front-to-back antenna is desired, select NORM, then use K1 knob to select
Fwd-MaxFB.
Across bottom of display there are band buttons plus a set of “<<” which indicate there are
more bands to the left. For example with a DB18, if display shows there are buttons for 20
meter through 6 meter bands, pressing “<<” will shift buttons so 40 meter through 12
meter bands are displayed.
Pattern = Normal DB-18E
Front to back Forward gain
0.0dB 00 0.0dBi