1.7. Applying Power for the First Time
Before applying power for the first time, it is a good idea to double check the following:
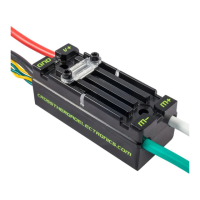
The red wire is connected to the positive source.
The black wire is connected to the source ground.
All electrical connections are secure and electrically isolated (wrapped in electrical tape,
heat shrink tubing or similar).
A 40A or smaller breaker is in series with the Talon SRX’s positive power input.
There are no short circuits on the Talon SRX’s output.
If using CAN bus to control Talon SRXs, it is a good idea to double check the following:
A unique ID has been assigned to each Talon SRX.
A yellow signal wire is plugged into the “H” terminal of the CAN controller.
A green signal wire is plugged into the “L” terminal of the CAN controller.
The CAN bus has two “ends” each ending in either the roboRIO, the PDP (with the
termination resistor jumper placed in the ON position), or a 120 Ω resistor.
If the PDP is not at the end of the CAN bus, its termination resistor jumper should be in the
OFF position, and an explicit 120 Ω resistor should be present at the end of the bus.
If using a PWM signal to control Talon SRXs, it is a good idea to double check the following:
The PWM connector is wired as shown on page 10.
The PWM connector is plugged in with the correct orientation.
The spare Yellow and Green wires of the twisted pair are electrically insulated from each
other.
The Talon SRX automatically checks for valid PWM or CAN bus on power up. No
additional configuration is necessary.