1. Installing a Talon SRX
Wiring a speed controller has never been easier than with the Talon SRX. By following a few quick
steps, your robot will be up and running in no time.
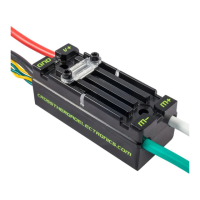
1.1. Wiring the Motor Output
Connect the white wire to the M+ side of the motor and the green wire to the M- side of the motor
using tightly crimped connectors.
If the motor’s inputs are not marked, the polarity of the input may be chosen by the user. Be sure to
connect the output wires to motors with consistent polarity so each motor will rotate the same
direction when given the same PWM signal. Reversing the output wire connections will result in the
motor rotating the opposite direction when given the same PWM signal.
In many cases, the output leads of the Talon SRX will not be long enough to reach the motor it is
controlling, so an extension cable will be required. Extension cables should be made using
appropriately sized wire and connected using tightly crimped connectors.
Note: For the most robust connection, it is highly recommended that all connectors are crimped and
soldered.
1.2. Wiring the Power Input
WARNING: TO MAXIMIZE PERFORMANCE, THE TALON SRX DOES NOT INCLUDE
REVERSE POLARITY PROTECTION. IF POWER IS APPLIED BACKWARDS, THE
TALON SRX MAY BE PERMANENTLY DAMAGED.
To power the Talon SRX, connect the positive input (red) wire to the selected positive terminal of the
Power Distribution Panel (PDP), and the input ground (black) wire to the corresponding ground
terminal. In many cases, the Talon SRX may be wired directly to the robot’s PDP without extension
cables – this is preferable since it reduces the number of electrical connections. If the robot’s design
does not allow for a direct connection to the PDP, extension cables may be used.
Always keep good electrical practices in mind when designing a robot's electrical system. The Talon
SRX’s source voltage should never exceed 28V. In addition, a 40A or smaller breaker should be
used in series with the Talon SRX’s positive input.