REPAIR
7-39
7
Disassembly
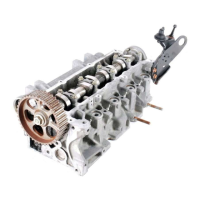
See Figures 7-91 and 7-92.
Figure 7-91
1. Label pistons to correspond with previously labeled
connecting rods.
2. Remove circlips (1), piston pin (6), and connecting
rod (5).
IMPORTANT
Be sure to note location and orientation of piston
rings to aid in assembly.
NOTICE
3. Using a piston ring expander, remove piston rings
(2, 3, and 4). Be sure to note location and orientation
of each ring.
Figure 7-92
4. Remove bearings (8) from connecting rod (7) and
cap (9).
5. Inspect all parts for wear or damage. Replace as
needed.
Inspection
Connecting Rods
1. Inspect connecting rods for cracks, wear, or damage.
Replace as needed.
2. Measure connecting rod small end ID. Compare
measurement to specification and piston pin OD
specification. Repair or replace as needed.
Connecting Rod Small End ID: 0.7087—0.7090 in.
(18.003—18.011 mm)
Piston Pin OD: 0.7084—0.7086 in.
(17.995—18.000 mm)
3. Measure connecting rod large end ID. Compare
measurement to specification and crankshaft
connecting rod journal OD specification. Calculate or
measure oil clearance and compare to specification.
Repair or replace as needed.
Connecting Rod Large End ID: 1.6141—1.6148 in.
(41.000—41.018 mm)
Crankshaft Connecting Rod Journal OD:
1.495—1.496 in. (37.982—38.000 mm)
Crankshaft/Connecting Rod Oil Clearance:
0.0007—0.0015 in. (0.020—0.040 mm)
Crankshaft/Connecting Rod Oil Clearance Limit:
0.002 in. (0.065 mm)
Required Tools
Piston Ring Expander
Do not expand piston rings any further than
necessary to remove. Piston rings can be
damaged if expanded too far.
TN0753
1
6
5
2
3
4
TN0499
7
8
9
 Loading...