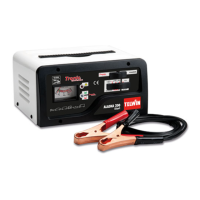
The three LED's indicate the condition of the battery by - Remove the caps of the battery charger (if foreseen) so as
reading its voltage. The top LED indicates a charged to let the gas produced go out.
battery, with a battery voltage reading greater than or - Check that the level of the electrolyte covers the plates of
equal to the voltage setting. The middle LED indicates that the battery. If these were not covered add distilled water
the battery is able to receive more current and, lastly, the and cover them up to 5-10 mm.
_________________________________________________________________________________
bottom LED indicates that the battery is flat.
NOTE: for further details about the indicator see FIG. B
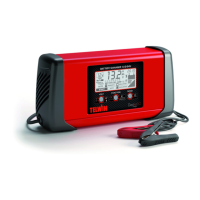
6-(DISPLAY) Current/Voltage/Time indicator :
WARNING: USE THE MAXIMUM CAUTION
This key can be used to select 3 different indicators:
DURING THIS OPERATION AS THE ELECTROLYTE IS A
- ”I”, displays the output current in Amps, in both
HIGHLY CORROSIVE ACID.
”CHARGE”, and “TRONIC” modes.
_________________________________________________________________________________
- ”V”, in this position the display shows the output voltage
over the battery terminals in Volts.
- Please remember that the exact charge status of the
- ”TIME”, in this position the display indicates the length
battery can only be determined by using a densimeter
of time that has elapsed during “CHARGE” mode, in
which allows measurement of the specific gravity of the
minutes.
electrolyte the following indicate approximate density
- The display also shows a set of letters representing the
values for the solute (Kg/l at 20°c):
current condition /mode (FIG. B).
1.28 = charged battery
- In “START-PAUSE” mode the display shows the time
1.21 = half-charged battery
remaining during the forced pause, in seconds.
1.14 = flat battery
_________________________________________________________________________________
7-Selecting Charging Time:
This key is used to select the charging time for the
“CHARGE” function; the following times are available:
WARNING: When handling the cables, make sure
2/4/6/10 hours.
that the “OFF” LED on the front panel is lit up.
In "CHARGE” mode, if the preset time passes before the
_________________________________________________________________________________
end-of-charge voltage is reached, the battery charger will
- Check the battery voltage and make sure that the settings
automatically charge for 2 more hours and then switch off.
on the battery charger panel are compatible with the
8-Potentiometer:
specifications for the battery being charged.
This potentiometer is used to set the charge current in
- Check the polarity of the battery terminals: positive for the
both "CHARGE" and “TRONIC” modes.
+ symbol and negative for the - symbol.
9-(OFF) Switching off:
NOTE: if it is impossible to distinguish between the
This key switches the current to the battery/ies ON or OFF.
symbols, bear in mind that the positive terminal is the one
WARNING: the battery charger is still powered even
that is not connected to the vehicle chassis.
when the OFF LED is lit.
- Connect the red charge clamp to the positive terminal of
the battery (+ symbol).
5. INSTALLATION
- Connect the black charge clamp to the vehicle chassis, far
SETTING UP (FIG. C)
away from the battery and from the fuel pipe.
- Unpack the battery charger and assemble the separate
NOTE: if the battery is not installed in the vehicle, connect
parts included in the package.
the black clamp directly to the negative terminal on the
battery (- symbol).
POSITIONING THE BATTERY CHARGER
- Power the battery charger by inserting the power supply
- Position the battery charger for operation, making sure
cable into the mains outlet.
that it is stable and that there is sufficient ventilation with
Position the switch on the back to the ( I ) position.
no obstructions to air passage through the vents provided
- Check the battery voltage and make sure that the settings
for this purpose.
on the battery charger panel are compatible with the
- Install the battery charger on a horizontal surface with a
specifications for the battery being charged. These
solid base.
checks should be carried out with the corresponding key
in "TEST" mode.
CONNECTION TO THE MAIN SUPPLY
- Set an appropriate current value using the potentiometer
- The battery charger should be connected only and
on the front panel.
exclusively to a power source with the neutral lead
connected to earth.
CHARGING
Check that the mains voltage is the same as the voltage of
Press the corresponding key to pass to “CHARGE” mode.
the equipment.
Position the battery charger to “ON” by pressing the
- Check that the power supply is protected by systems such
corresponding key on the front panel.
as fuses or automatic switches, sufficient to support the
Monitor the battery voltage and charge current parameters
maximum absorption of the equipment.
on the display using the “V / I/ TIME” key (FIG.A-6).
- The connection to the main supply has to be made using a
The ammeter will show the charge current (in amps) for the
suitable cable.
battery: at the end of this phase you will see that the value
- If you put an extension to the primary cable, the section
shown on the ammeter will decrease slowly to very low
should be adequate and, in any case, never less than that
values, according to the capacity of the battery and its
of the cable supplied.
condition.
- You always have to earth the equipment with the
yellow/green wire contained in the main cable, indicated
AUTOMATIC CHARGING
by the label ( ), while the other two wires should be
W
Press the corresponding key to pass to “TRONIC” mode.
connected to the mains.
Position the battery charger to “ON” by pressing the
corresponding key on the front panel.
6. OPERATION
During this phase the battery charger constantly monitors
BEFORE CHARGING
the voltage over the battery terminals, automatically
NB: Before charging check that the capacity of the
supplying or cutting off the charge current to the battery as
battery (Ah) which is to be charged, is not inferior to that
necessary.
reported on the data table. (C min).
Also in this case it is possible to monitor the battery voltage
Follow the instructions, taking great care to respect the
and charge current on the display using the “V / I / TIME” key.
order given below.
The charge current can be set as illustrated. When it is cut off
- 3 -