g010854
Figure29
1.Level
3.Turntheadjustablelinkbody(ifprovided)to
raiseorlowerthelinkarmuntiltheaeratorlevels
side-to-side.
Note:Refertothetractionunitoperator's
manualforadditionaladjustmentprocedures.
13
InstallingtheTines
Partsneededforthisprocedure:
–
Tines(asrequired)
Procedure
Youcanchoosefromawideselectionoftinesforthe
aerator.Choosethetinetype,size,andspacings
requiredforthejob.RefertothePartsCatalogforthe
listofaccessories.
1.Ensurethatthestandsorsupportblocksfully
supporttheaerator.
2.Turnoffthetractionunitengineandremovethe
key.
3.Loosentheclampingboltsandremovethe
previouslyusedtines(Figure30).
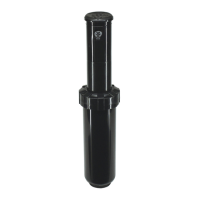
g016131
Figure30
1.Tine
2.Clampingbolt
4.Slidethenewtinesintotheholessizedtotthe
tinesselected.Neverusesmalldiametertines
inthelargediameterholes;thetinesshouldt
closelyinthehole.Besuretoslidethetineup
intotheheaduntilitbottomsout.
Note:Positionhollowcoringtineswiththe
ejectionslottotherear.Positionsolidtineswith
thetinetipanglefacingthemachine(Figure30).
5.Tightentheclampingboltsrmlytosecurethe
tines.Donotuseimpacttools.
6.Setthetineangleforthenewtines;refer
toAdjustingtheTineAngle(ModelsSR54,
SR54-S,SR70andSR70-S)(page26)or
AdjustingtheTineAngle(ModelSR72)(page
27).
7.Beforeaeratingformalturfforthersttime
afterinstallingtines,testtheaeratoronaless
importantareasothatyoucantryalternative
tractionunitgearsandnetunetheadjustment
toachievetheholespacingandturfappearance
desired.
14
SettingtheTineDepth
ModelsSR54-SandSR70-S
NoPartsRequired
Procedure
Setthetinedepth;refertoAdjustingtheTineDepth
(ModelsSR54-SandSR70-S)(page27).
18