IF08CZ10 April, 2019 - 95 -
DRIVE INSTALLATION DRAWINGS (cont’d)
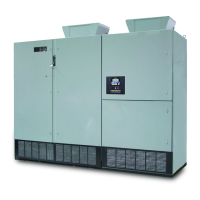
Frame B4 module lifting and installation
WARNINGS
Inverter cabinet is top heavy.
Cabinet must be anchored to
floor before withdrawing power
modules to prevent tipping.
Disconnect power and wait 15
minutes to ensure capacitors are
discharged before performing
inspection or maintenance.
Improper handling of the fiber
optic cables and connectors may
cause drive failure due to
problems transmitting signals.
Take care not to disturb fiber
optic cables when handling
power module.
Use module lifting attachment
GCI6721G055 and a lifting device
rated 350 lbs minimum for
removal and installation of
modules.
Power Module Removal
1. Disconnect and remove AC
neutral bus.
2. Disconnect power cables
ACL, P, C & N.
3. Remove control wiring
cover with two "A" & two
"B" bolts
4. Disconnect control signal
cable and 120VAC supply
cable from module.
Power Module Installation
1. Pull slide tray out until
slides lock.
2. Using module lifting
attachment and lifter, place
module on tray.
3. Secure module to tray with
four "C" bolts.
4. Press slide release buttons
and slide module into
compartment (use caution).
5. Reconnect control signal
cable and 120VAC supply
cable to module
connectors.
6. Reinstall control wiring
cover and secure with two
"A" & two "B" bolts.
7. Reconnect power cables
ACL, P, C & N.
8. Reinstall AC neutral bus.
9. Torque all power
connections (5/16-18 hdwr)
to 10-15 ft-lbs.
Power Module Removal
(cont'd)
5. Pull slide tray out until
slides lock.
6. Remove four "C" bolts
which secure module to
tray.
7. Using module lifting
attachment and lifter,
lift module from tray.
PINCH AREA
USE CAUTION
PRESS BUTTON TO
SLIDE TRAY BACK
B
B
C
C
C
C
AC NEUTRAL BUS
PINCH AREA
USE CAUTION
PRESS BUTTON TO
SLIDE TRAY BACK
CONTROL WIRING
COVER
LIFTING ATTACHMENT
LIFT HERE
N
C
P
ACN
ACL
CONTROL SIGNAL &
120VAC CABLES
A
A
 Loading...