Do you have a question about the Tritech SeaKing and is the answer not in the manual?
Explanations for Note, Important, Caution, and Warning symbols used in the manual.
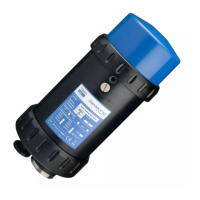
Describes the sonar head, software, and surface control units for system setup.
Highlights features like scan rate, dual frequency operation, and electrical connection.
Steps for connecting the sonar system and initial configuration.
Wiring diagrams and notes for ARCNET and serial (RS232/RS485) connections.
Configuring serial ports in Seanet Pro and checking connection status.
Describes the sonar head, waterblock, and standard connector.
Instructions for installing or updating the Seanet Pro software.
Guidelines for securely mounting the sonar head, avoiding damage.
Configuring SeaKing sonar for ARCNET communication.
Electrical installation requirements for subsea sonar heads.
Pin assignment for the Tritech waterblock connectors.
Methods to identify SeaKing sonar models (V5, V6, V7) for configuration.
Steps to change communication settings for serial or ARCNET.
Steps to configure communication settings for Ethernet-enabled sonars.
Note on the default subnet mask used by SeaKing Sonar.
Explains how sonar heads detect objects and interpret reflections.
Guide to using SeaKing & SeaPrince sonars with Seanet Pro software.
Overview of the Seanet Pro main display areas and their functions.
Controls for adjusting sonar display parameters like gain, contrast, range, and sector settings.
Accessing functions like Print, Screen Capture, and Exit via the main menu.
Navigating Seanet Pro menus for settings, applications, and diagnostics.
Using utilities for GPS, Compass, Comms setup, and logging data.
Customizing sonar display colours, windows, and sound settings.
Using the tool for range and position measuring of targets on the display.
Adjusting display contrast and sensitivity for optimal sonar imaging.
Using markers to measure range and bearing to targets on the sonar display.
Magnifying sonar data and configuring display options like grid lines.
Configuring sonar target location using GPS or fixed positions.
Selecting heading source and configuring general sonar setup parameters.
Adjusting interpolation, compass, and overlay settings for sonar display.
Defining properties for overlay shapes on the sonar display canvas.
Procedures for cleaning, drying, and storing the sonar head after use.
General guidelines and importance of regular maintenance for SeaKing units.
Identification of user-serviceable items on the SeaKing unit.
Step-by-step guide for safely disassembling the SeaKing sonar unit.
Step-by-step guide for safely reassembling the SeaKing sonar unit.
General guidelines for Super SeaPrince unit maintenance.
Step-by-step guide for safely disassembling the Super SeaPrince sonar unit.
Step-by-step guide for safely reassembling the Super SeaPrince sonar unit.
Troubleshooting communication loss with the sonar device.
Diagnosing loss of sonar head bearing during scanning.
Addressing sonar head rotation problems and potential transducer damage.
Troubleshooting when no seabed targets are detected by the sonar.
Provides contact details and required information for support.
Safety instructions for handling contaminated or radioactive products.
Physical dimensions and properties of SeaKing sonar units.
Acoustic properties and display characteristics of SeaKing sonar.
Electrical and communication specifications for SeaKing sonar.
Physical dimensions and properties of SeaPrince sonar units.
Acoustic properties and display characteristics of SeaPrince sonar.
Electrical and communication specifications for SeaPrince sonar.
Explains the need for termination resistors in ARCNET networks and their placement.
Diagram showing best practice for installing ARCNET termination resistors.
Benefits of CHIRP technology for improving sonar image quality.
Formula for calculating range resolution based on bandwidth.
How pattern matching improves echo amplitude and noise rejection.
Details various connector options available for SeaKing sonar integration.
Steps to reset the Super SeaPrince unit using a magnetic reset function.
Notes on magnet orientation for reset and re-configuring communications.
Overview of using magnetic reset to restore SeaKing V6 COM PCB to a standard.
Default values applied during magnetic reset for V6 COM PCB.
Overview of setup and baud rate parameter changes during reset.
Detailed steps for performing a magnetic reset on the V6 COM PCB.