/ 10 /
4.2 Main Menu Screen
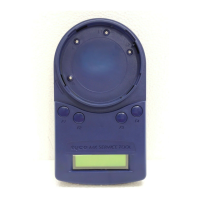
3
1
2 4
After the 4-digit PIN number has been successfully
entered, the main menu screen appears as shown in
Figure 7. Detail on using the main menu is covered in
Section 5.
Buttons or Icons
Buttons/Icons are used for entering access codes, text
strings or general information.
Table 2: Buttons
Fig. 7: Main Screen
1 – Battery Status
2 – USB Icon Indicates Disconnected
3 – Four Disabled Options
4 – 850EMT Settings Button
Each option leads to a further screen, which may present
further options.
When using the menus you use combinations of the
same basic methods – to navigate between the various
settings in a screen for example. To avoid repetition, this
guide does not provide full step by step details for every
screen.
LCD Display
A 3.5 inch QVGA TFT backlit LCD alphanumeric display
with a high resolution of 320 x 240 pixels and 262k
colours is provided as the Graphical User Interface.
This is used to display user interaction information, such
as alarms, status, messages and responses to user input.
Key Usage
Used to exit the current screen and
display the home screen or main
menu
Used to accept the inputs as
entered by the user or return to the
previous screen
Used to scroll up the list of devices
Used to scroll down the list of
devices
TEST FUNCTIONS
• Battery Status
The battery icon changes its display as shown in Table 3
to indicate the different states of charging.
Table 3: Battery States
Battery Status Icon
Empty battery
Charging in progress (ashes
between different charge states)
50% charged battery
75% charged battery
Completely charged battery
(not charging)
Fully charged battery (charging)
Error in charging battery
Nearly empty battery, need to
recharge immediately
 Loading...