EasyManua.ls Logo

Unitree A1 - User Manual

Unitree A1
21 pages
Print Icon
To Next Page IconTo Next Page
Loading...
A1
Quick Start Guide
Unitree
V1.0
Question and Answer IconNeed help?

Do you have a question about the Unitree A1 and is the answer not in the manual?

Summary

A1 Robot Overview

Component Identification

Identifies main robot components like depth camera, interfaces, and motors.

Motor and Reducer Details

Specifies thigh and calf motors and their associated reducers.

Power Switch and Battery Indicator

Locates the power switch and battery status indicator on the robot.

Remote Controller Functions

Joystick Control Mapping

Details the function of the main stick for robot attitude and position control.

Button Functions

Explains the purpose of left, right, START, R1/R2, and L1/L2 buttons.

Charging and Connectivity Features

Identifies the power button, charging interface, and Wi-Fi indicator.

Technical Specifications

Robot Weight and Dimensions

Details the machine weight and dimensions of the robot in stand and folded states.

Performance and System Specs

Covers speed, operating time, payload, DOFS, joint torque/speed, RTOS.

Safety and Interface Features

Lists protection modes, warning systems, and abundant external interfaces.

Optional Hardware Capabilities

Mentions optional lidar, NVIDIA TX2, and their capabilities.

Controller and Battery Specifications

Provides specifications for the remote controller's operating time and battery capacity.

Battery Management

Checking Battery Levels

Instructions on how to check the robot's battery status.

Charging Procedures

Guidance on charging the robot and its remote controller.

Robot Setup and Operation

Initial Robot Placement

Ensuring the robot is placed on a level surface with proper limb stowage.

Powering On and App Launch

Steps to power on devices and launch the Unitree App.

Robot Control Mode Selection

Lists various joystick control methods for different modes like Sport and SLAM.

Operational Guidelines and Safety

Recommended Mode Actions

Details actions that express the robot's performance and require following guidelines.

Actions to Avoid

Highlights actions likely to cause falls or reduce battery life, requiring caution.

Environmental Operation Advice

Advises on operating environment, avoiding steps, slopes, and specific ground surfaces.

Sport Mode: Basic Standing Actions

Initiating Sport Mode

Procedure to initiate Sport mode using controller buttons.

Vertical Body Control

Using the left stick to control vertical body movement (lift or squat).

Horizontal Body Rotation

Using the left stick for horizontal rotation (yaw) of the robot's body.

Forward;Backward Lean & Tilt

Using the right stick for forward/backward lean (pitch) and side-to-side tilt (roll).

Incremental Body Adjustments

Using the left button for incremental body lift and squat actions.

Sport Mode: Combined Standing Actions

Jaw Movement and Body Twist

Controlling jaw movement and body twist with the left stick.

Linked Stick Body Control

Using linked sticks for jaw control and forward/backward body movement.

Robot Body Rotation (Clockwise)

Using the right stick to rotate the robot body clockwise.

Robot Body Rotation (Counterclockwise)

Using the right stick to rotate the robot body counterclockwise.

Forward Lean with Body Twist

Combining sticks for leaning forward and twisting the body.

Backward Lean with Body Twist

Combining sticks for leaning backward and twisting the body.

Sport Mode: Special Actions (A Mode)

180° Roll and Movement

Performing a 180° roll and semi-squat/standing movements.

360° Roll and Joint Locking

Executing a 360° roll and locking joints in a half-squat state.

Manual Handling with Locked Joints

Locking robot joints in a half-squat state for manual repositioning.

Zero Torque and Calibration Mode

Entering zero torque mode for calibration of joint zero point and IMU.

Sport Mode: Basic Walking Actions

Switching Walking Modes

Using the START button to switch between stepping and stationary states.

IMU Drift Correction Procedure

Using left/right buttons to correct IMU drift during stepping.

Forward and Backward Walking Control

Using the left stick for controlled forward and backward locomotion.

In-situ Turning and Stepping

Using the left stick for in-situ rotation and stepping (clockwise/counterclockwise).

Lateral Sideways Movement

Using the right stick for side-to-side lateral movement.

Sport Mode: Walking Combinations

Forward Arc and Circle Walking

Using the left stick to control forward arc and circular walking.

Backward Arc and Circle Walking

Using the left stick for backward arc and circular walking.

Adjusting Robot Leg Height

Using L1 and left button to adjust robot leg height for different terrains.

Sport Mode: Fast Running Actions

Activating Fast Running Mode

Procedure to activate fast running state using controller buttons.

Fast Forward;Backward Movement

Using the left stick for controlled forward/backward movement and in-place jumping.

Fast In-situ Circling

Using the left stick for rapid in-situ rotation and stepping.

Fast Lateral Sideways Movement

Using the right stick for rapid side-to-side lateral movement.

Fast Forward Arc Running

Using the left stick for forward arc and circular running.

Fast Backward Arc Running

Using the left stick for backward arc and circular running.

SLAM Mode: Core Actions

Entering SLAM Mode Sequence

Sequence of button presses to enter SLAM mode from Sport mode.

Climbing Mode Activation

Using the A button to toggle climbing mode for terrain following.

Sport;SLAM Mode: Prohibited Actions

Discouraged Vertical Actions

Lift/squat actions in Sport/SLAM mode are not recommended.

Discouraged Creeping Forward;Backward

Creeping forward/backward with specific stick inputs is not recommended.

Discouraged Creeping Left;Right

Creeping left/right with specific stick inputs is not recommended.

Discouraged Creeping Rotation

Creeping rotation (counterclockwise/clockwise) is not recommended.

Discouraged Arc Walking

Arc walking with specific stick inputs is not recommended.

W;Sport Mode: Prohibited Arc Actions

Discouraged Arc Creeping

Arc creeping with specific stick inputs in W/Sport mode is not recommended.

UnitreeRobotics App Features

App Interface Introduction

Introduction to the UnitreeRobotics APP for Android and iOS platforms.

Homepage Navigation Elements

Explains the elements and sections of the APP's home screen.

Accessing Documentation and Connection

Accessing user manuals and establishing a connection with the robot.

App Vision and Tracking Features

Robot Vision Modes

Details image mode, depth mode, and body recognition for robot vision.

Character Following Function

Enabling character tracking for the robot to follow a selected person.

App Simulator and SLAM Functions

Simulator for Practice

Using the simulator to learn handle keys and functions without connecting to the robot.

SLAM Navigation Interface

Entering SLAM mode for navigation and mapping.

Autonomous Map Navigation

Selecting points on the map for autonomous navigation and obstacle avoidance.

SLAM Mode: Operational Notes

SLAM Navigation Tips

Important notes for setting target points, waiting for posture, and handling dynamic obstacles.

Overview

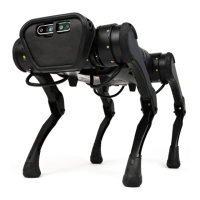
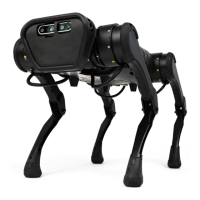
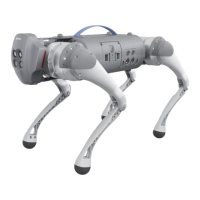
The Unitree A1 is a quadruped robot designed for a variety of applications, emphasizing both performance and ease of use. Its optimal joint design contributes to a reduced cost while significantly enhancing its motion capabilities and service life.

Function Description

The A1 robot excels in motion performance, particularly in "Sport mode," where it can achieve a maximum joint speed of 21 rad/s, allowing it to accelerate up to 3.3 m/s almost instantly. This mode also highlights its excellent balance ability. With a torque of 33.5 NM, the A1 is capable of performing complex maneuvers, including backflips.

A key feature of the A1 is its multi-eye depth camera, which enables intelligent applications such as real-time image transmission, offering 720P quality at 30 frames per second. This camera also supports character following, allowing the robot to track and follow a designated person. The robot is designed for secondary development, providing a platform for users to expand its functionalities.

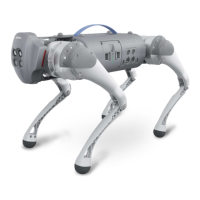
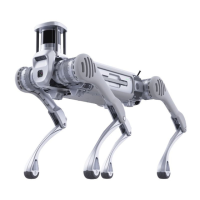
For enhanced capabilities, the A1 supports optional lidar integration. With lidar, the robot can perform advanced functions like dynamic obstacle avoidance, navigation planning, autonomous positioning, and map construction. Furthermore, it can be equipped with an optional NVIDIA TX2 for visual SLAM (Simultaneous Localization and Mapping) and gesture recognition, broadening its scope for intelligent interaction and environmental understanding.

The A1 is versatile in its control methods, supporting both Android and iOS applications, which allows for convenient control via mobile devices.

Usage Features

The A1 can be controlled using a remote controller that offers comprehensive command over the robot's movements and attitude. The joystick on the remote allows for 3-axis attitude and 3-axis position control when the robot is standing. This includes controlling forward and backward movement, left and right side shifts, in-situ turns, and various walking patterns on level ground, such as straight lines, circles, arcs, and rectangles. It can also crawl forward and navigate slopes or steps.

The remote controller connects to mobile phones via Bluetooth, ensuring stable and convenient signal transmission. Its ergonomic design aims to provide a comfortable user experience.

Basic operations in "Sport mode" include:

  • Checking Battery Levels: A quick press of a button on the robot allows users to check the battery status. Pressing and holding the button after a quick press turns the robot on or off.
  • Charging: The robot's batteries can be charged using a power outlet, with the main battery requiring approximately 2 hours and the remote controller battery about 1.5 hours.
  • Robot Preparation: Before starting, the robot must be placed on level ground with its abdominal support pad flat. The body should not be tilted, and the robot's calves should be fully stowed to prevent the thighs and calves from being pressed by the body, which could hinder booting.
  • Powering On: The robot and remote controller are powered on, and the Unitree App is launched to establish connection and control.
  • Control Modes: The robot supports remote control and Wi-Fi control via mobile devices, allowing users to switch between control modes through the App.

The remote controller's joystick and buttons facilitate various actions:

  • Body Lift/Squat: The left stick controls the robot's body to lift or squat. Pushing up lifts the body, pushing down squats it.
  • Yaw Control: The left stick also controls the robot's yaw (twisting). Pushing left twists the robot left, pushing right twists it right.
  • Pitch Control: The right stick controls the robot's pitch (leaning forward/backward). Pushing up leans the robot forward, pushing down leans it backward.
  • Roll Control: The right stick controls the robot's body roll. Pushing left rolls the body right (when facing the operator), pushing right rolls it left.
  • Jog Lift/Squat: The left button controls the robot's jog lift and squat. Pressing the up button lifts the body, pressing the down button causes it to click down. Users are advised to keep track of key presses and return the robot to a static standing state after actions to conserve battery.

Combined and special actions in "Sport mode" include:

  • Twisting and Squatting: The left stick can be used to control the robot's jaw and body twisting, allowing it to squat while twisting left or right.
  • Body Lean and Squat: Linkage of both left and right sticks controls the robot's lower jaw and body lean, enabling it to squat while leaning forward or backward.
  • Clockwise/Counter-clockwise Rotation: The right stick can be shaken clockwise or counter-clockwise to rotate the robot's body.
  • Forward Lean and Twist: A combination of left and right sticks allows the robot to lean forward and twist its body.
  • Backward Lean and Twist: Similarly, a combination of left and right sticks enables the robot to lean backward and twist its body.

"A Mode" offers additional special actions:

  • 180° Roll: Holding L2 and pressing X allows the robot to roll 180° to the right from a supine position. After rolling, it enters a high-damping state.
  • 360° Roll: Pressing L2 then Y causes the robot to roll 360° to the right.
  • Joint Locking: Holding L2 and repeatedly clicking A locks the robot's joints in a half-squatting state, allowing manual repositioning. This action is only recommended when the robot is in a static standing position.
  • Zero Torque Mode: Holding L2 and single-clicking B puts the robot into zero torque mode, which can be used for joint zero point calibration or IMU installation error calibration via the remote control.

"Sport mode" (walking) features:

  • Step/Stationary Switch: The START button toggles between stepping and stationary states.
  • IMU Drift Correction: The left button corrects IMU drift when the robot is stepping.
  • Forward/Backward Movement: The left stick controls forward and backward walking. Pushing up moves forward, pushing down moves backward.
  • In-situ Circle: The left stick controls the robot to circle in place, turning counterclockwise or clockwise.
  • Lateral Movement: The right stick controls lateral movement, moving the robot left or right.

"Sport mode" (fast-running) features:

  • Fast Running State: Holding L2 and clicking START enters the fast running state.
  • Forward/Backward Running: The left stick controls forward and backward running.
  • In-situ Trotting: The left stick controls the robot to trot in place, turning counterclockwise or clockwise.
  • Lateral Trotting: The right stick controls lateral trotting, moving the robot left or right.
  • Arc/Circle Running: The left stick controls the robot to run in an arc or circle, either forward and clockwise or retreating and counterclockwise.

"SLAM Mode" features:

  • Climbing Mode: The A button toggles the climbing mode (terrain following). This allows the robot to climb, with a rated forward climbing angle of less than or equal to 22°.

The UnitreeRobotics APP provides a user-friendly interface for controlling the A1:

  • Visitor Mode: Allows basic interaction.
  • Documentation: Access to user manuals and other documents.
  • Connection: Manages Bluetooth connection with the controller or robot.
  • Vision: Accesses the multi-eye depth camera, displaying robot perspective (image mode) or object distance (depth mode). It also supports body recognition and character tracking.
  • Simulator: Allows users to learn handle keys and functions through simulation when the robot is not connected.
  • SLAM: Enables map construction and autonomous navigation. The robot updates the map in real-time using radar data. Users can select a point on the map, and the robot will autonomously navigate to that destination, avoiding obstacles.

Maintenance Features

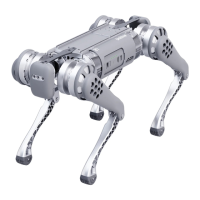
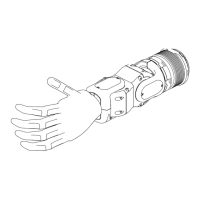
The A1's joints are designed for quick disassembly, making maintenance straightforward. This design choice contributes to the robot's overall service life.

Important Usage Notes:

  • Environmental Considerations: Due to the absence of a visual perception system, the robot should be operated in open, flat environments. Users should avoid steps above 5cm, slopes greater than 25°, and obstacles that could cause falls. When operating on undulating terrain, the walking speed should be reduced.
  • Ground Surface: The robot requires sufficient friction for walking. It should not be used on slippery surfaces like ice or soft grounds like thick sponge/turf floors. On smoother floors (glass, tiles), careful and compliant control is necessary to prevent slipping.
  • Leg Height Adjustment: Increasing leg height raises landing speed, increases contact force, and can lead to louder step sounds, increased impact on the reducer, and reduced reducer life. It is recommended to keep the leg height at 4-5cm under normal circumstances.
  • Lidar Configuration: Certain actions, like the 180° and 360° rolls, are not recommended after configuring lidar, as they may damage the lidar or the robot.
  • SLAM Mode Obstacles: Before setting a target point in SLAM mode, clear any obstacles around the robot to ensure successful navigation.
  • Robot Posture: Wait for the robot's posture to appear on the mobile screen before setting a target point; otherwise, commands may not be received.
  • Dynamic Obstacles: In areas with many people, ensure a passable area when operating in SLAM mode.
  • Troubleshooting: If unexpected situations occur, use the stop button on the App or the restart button on the phone screen to resume operation.

The manual also lists actions not recommended in "Sport" and "SLAM" modes, such as controlling body lift/squat, forward/backward creeping, lateral creeping, and turning while creeping, as these actions are likely to cause falls or reduce battery life.

Unitree A1 Specifications

General IconGeneral
Weight12 kg
Max Speed3.3 m/s
Payload Capacity5 kg
Degrees of Freedom12
Charging Time2 hours
IP RatingIP54
SensorsDepth camera, Ultrasonic sensors, IMU
Control MethodWireless remote control
Dimensions500 mm x 300 mm x 400 mm

Related product manuals