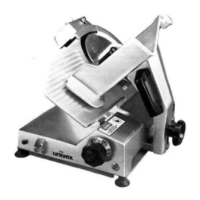
SHARPENING INSTRUCTIONS
This slicer is equipped with a knife having a concave or hollowed surface for superior slicing
quality. Of course, any knife, however superior, must be sharpened regularly and properly in
order to produce not only the highest quality slices, but also to allow it to maintain its
productivity. The knife sharpener (Figure 1 [4]) on this machine is a top mounted built-in
design simplicity and ease of use. It even has an automatic aligning feature.
Warning:
The following sharpening procedure will provide high quality sharpening results
and should also be followed for safety considerations:
1.
Warning:
Keep away from the knife edge.
2.
Completely close the slice adjustment (beyond "0") so that the knife edge is not
exposed.
3.
The knife cutting area should be clean and free from food, especially grease
Grease will ruin the ability of a grinding stone to sharpen an edge. The stone
simply will not cut. If cleaning is necessary, follow the procedure outlined on
Page 6. Remember to unplug the electrical supply cord.
4.
Loosen sharpener lock pin (Figure 6 [27])
which bears against sharpener post,
then lift sharpener assembly (Figure 1 [4]) and rotate it 1/2 turn (180°). Then
seat it down over the knife.
5.
Tighten sharpener lock pin (Figure 6 [27]). As the lock pin is tightened, it bears
on the sharpener post and automatically aligns the grinding and deburring
stones to the precise orientations which are preset at our factory.
6.
Turn slicer ON. Depress the sharpener button
on the right side of the sharpener
assembly and hold in, which will start the grinding wheel rotating. Run until the
beveled cutting surface cleans up. This can take from 30 seconds to several
minutes depending on how dull the blade was allowed to become. Release
7.
Turn slicer OFF and check for the formation of a very slight burr on the side of
knife opposite the bevel which indicates complete grinding of the bevel. This
slight burr can be detected either visually or by picking with a
paper.
8.
Turn slicer ON. Lightly press deburring (honing) button on the left side of the
sharpener assembly and hold for 1 to 2
seconds while you turn OFF the slicer.
Blade should now be completely sharpened and honed.
Caution:
It is important for best slicing results not to deburr the knife too long
or the keen edge will be destroyed due to the formation of an
undesirable second bevel on the opposite side. This condition tends
to be the primary cause of unsatisfactory slicing results.
9.
Turn slicer OFF. Loosen lock pin, (Figure 6 [27]) then lift and return sharpener
to its storage position. Tighten lock pin.
10.
Clean slicer and knife according to the cleaning procedure on Page 6
thoroughly remove grinding debris.
Page 5