Installation_________________________________________________________________________
Vaisala _________________________________________________________________________ 20
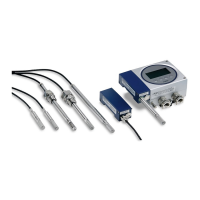
FIGURE 3-5 Probe dimensions: standard 178 mm and optional
400 mm
CAUTION
Take care not to damage the probe body. A damaged body makes the
probe head less tight and may prevent it from going through the clasp
nut.
Tightening the clasp nut
1. Adjust the probe to a suitable depth according to the type of
installation.
2. Tighten the clasp nut first manually.
3. Mark the fitting screw and the clasp nut.
4. Tighten the nut a further 50 - 60° (ca.1/6" turn) with a fork spanner.
If you have a suitable torque spanner, tighten the nut to 45±5 Nm
(33±4 ft-lbs).
1. clasp nut, 24 mm hex nut
2. fitting screw, 27 mm hex head
A: probe 178 mm:
adjustment range 120 mm;
A: probe 400 mm:
adjustment range 340 mm
 Loading...