3.2 Network Setup
The Upgradeable IMD has a default IP address for initial setup and access. Once you have assigned an IP
address, the default IP address is no longer active.
To restore the default IP address and reset all user-account information:
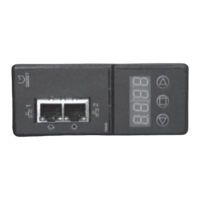
If the user-assigned address or passwords are lost or forgotten, press and hold the network-reset button
located below the Ethernet port for 15 seconds. Holding the center button of the LED display for 10
seconds also resets the network and user account information.
To erase all user settings and restore the unit back to its factory-default state:
1. Disconnect power from the rPDU.
2. Press and hold the network-reset button while powering up the rPDU.
The Network page, located under the System Tab, allows you to assign the network properties manually,
or use DHCP to connect to your network. Access to the unit requires the IP address to be known. Use of a
static IP or a reserved DHCP is recommended. The default address is displayed on the front of the unit.
• IPAddress: 192.168.123.123
• Subnet Mask: 255.255.255.0
• Gateway: 192.168.123.1
To access the unit for the first time, you must temporarily change your computer's network settings to
match the 192.168.123. xxx subnet. To set up the unit, connect it to your computer's Ethernet port, then
follow the appropriate instructions for your computer's operating system.
To setup the network for a Window operating system:
1. Access the network settings for your operating system.
• Using Windows 2000, XP or Server 2003, click Start - Settings - Network Connections.
• Using Windows 7 or Server 2008, click Start - Control Panel - Adjust your Computer's
Settings - View Network Status and Tasks - Change Adapter Settings or click Start -
Settings - Control Panel - Network and Sharing Center - Change Adapter Settings.
• Using Windows 8 or Server 2012, move the mouse to the bottom or top right corner, click
Settings - Control Panel - Large or Small Icons - Network and Sharing Center - Change
Adapter Settings.
• Using Windows 10, click Start - Network and Internet - Change Adapter Settings.
2. Locate the entry under LAN, High-Speed Internet or Local Area Connection which
corresponds to the network card (NIC). Double-click on the network adaptor's entry in the
Network Connections list.
NOTE: Most computers will have a single Ethernet NIC installed, but a WiFi or 3G adaptor also shows as
a NIC in this list. Be sure to choose the correct entry.
3. Click Properties to open the Local Properties window.
3 Setup
21
 Loading...