<Toc> <3. Operations>
3-5
IM 05D01B02-41E
3.3 Performing/Canceling Auto-tuning
Auto-tuning should be carried out after setting a target setpoint (SP). Make sure the con-
troller is in automatic operation mode (AUTO) and in running state (RUN) before carrying
out auto-tuning. See “3.8 Switching between AUTO and MAN,” to change to AUTO and
“3.7 Switching between Run and Stop,” to change to Run.
NOTE
When on-off control is being used, auto-tuning cannot be carried out. Moreover, do not
perform auto-tuning when controlling any of the following processes.
• Control processes with quick response such as flow control or pressure control
• Processes where even temporary output on/off results in inconvenience
• Processes where a large output change at control element results in inconvenience
• Processes where variations in PV may exceed an allowable range, adversely affect-
ing product quality
1.
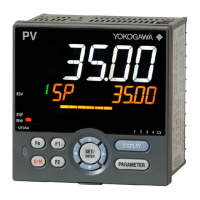
Bring the operating display into view (display appears at power on).
AL
A/M
PV
REM1
CAS
REM2
MAN1
MAN2
STP
2
4
1
3
PV2
AL
DISP
SET/ENT
SP :1.
-10 0 +10
100.0°C
DV
MAN1 lamp
OFF.
Displays PV.
Displays
target setpoint-1
“1.SP”.
In steps 2 and later, illustrations of the LCD are cited to explain the procedure.
1st Edition : May 31,2000-00
2.
Press the
SET/ENT
key for more than 3 seconds
to call up the main menu “MODE”.
mode parameter
main menu
MODE
A/M
DISP
SET/ENT
3.
Press the key once to display the main
menu “LP1”.
loop 1 parameter
main menu
LP1
A/M
DISP
SET/ENT
4.
Press the
SET/ENT
key once to display the
submenu “PAR”.
parameter
sub menu
PAR
A/M
DISP
SET/ENT
5.
Press the
SET/ENT
key once again to display
the parameter “AT”.
MENU:LP1/PAR #1
auto tuning switch
AT = OFF
A/M
DISP
SET/ENT

 Loading...