74
Evaporator Coil (6-25 and 30 ton)
Removal
Evacuate refrigerant from the systems.
Remove the expansion valve bulbs from the
suction lines. Disconnect the suction and
liquid line copper connections to the
evaporator coil.
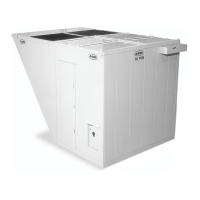
Figure 45 - Evaporator Coil Access
Remove the screws attaching the filter rack to
the evaporator coil blank-off panels at the
door opening and along the top of the coil.
Remove the screws attaching the filter rack to
the back wall. Angle filter rack away from
coil so it fits through the door opening. It may
be necessary to remove economizer damper
assembly.
Remove screws attaching access side, back,
and top blank-off panels to the evaporator
coil and the unit.
Angle the coil so that it fits through the door
opening.
Remove the evaporator coil.
Reinstallation
Install the coil in the unit drain pan. There
should be about a 1/4” gap between the
upstream side of the coil and the back of the
drain pan.
Secure the coil to the back wall of the unit
with the blank-off panel. Attach the top and
access side blank-off panels to the coil.
Attach the filter rack to the back, top, and
access side coil blank-off panels upstream of
the coil. Reinstall economizer damper
assembly if necessary.
Connect the suction and liquid copper
connections to the evaporator coil. Reinstall
the expansion valve bulbs on the suction
lines.
Evacuate the refrigerant systems. Weigh in
the nameplate refrigerant charge.
See Adjusting Refrigerant Charge section to
check for proper sub-cooling and superheat
of the refrigerant systems.
Condenser Fans (6-25 and 30 ton)
Condenser fans and motors can be removed
and reinstalled as individual assemblies.