ABEM Terraloc Pro 2
16
• Change number of channels if needed
• Enter what type of measurement is to be performed.
• Enter the required record length
• Press <ENT> to select NEXT
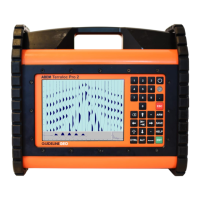
Figure 8 Wizard Mode second dialog
• Enter geophone spacing
• Change direction of cables if needed
• Enter Trigger position if needed
• Enter Trigger position increment if needed
• Enter Energy source type if needed
• Press <ENT> to select OK
• The instrument will use recommended settings for selected measurement
• Press <ARM>. This arms the instrument and makes it ready to trigger and
record a trace. The status bar (at the bottom of the screen) displays the message
“<<<ARMED>>>”
• Press <CTRL> + <ARM> to force the instrument to trig. The message
"<<< TRIGGERED >>>" is displayed in the status bar, shortly followed by
“Transferring data…”, “Data in memory” and then “<<<ARMED>>>”.
• The recorded data is displayed in the three frames at the center of the screen. To
change view options, press <9>