- 20 -
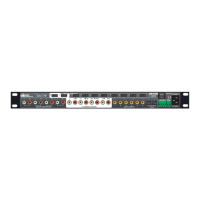
Example A/V Input Linking • Six Source Installation
Using the example source configuration as discussed in previous pages, we will program the
audio and video links for the system as layed out on the next page.
Step 1 Repeatedly press the INPUT SELECT button until the display reads "LASER AC3 1".
Step 2 Repeatedly press the SETUP MODE button until the display reads either "OPTICAL/V#", "DIGI-
TAL#/V#", or "ANALOG#/V#". The "#" refers to either Digital Audio Input number, Analog Audio
Input number, and the Composite Video Input number. It should already read "DIGITAL 1/V1".
Step 3 Press the VOL UP or VOL DN buttons to advance through the SSD-66 (5.1)'s available audio and
video links until the display reads "DIGITAL1/V1".
Step 4 Press the INPUT SELECT button to lock in this A/V Link and exit the Setup Mode.
Step 5 Press the INPUT SELECT button again to advance to the SSD-66 (5.1) to the next Input Label,
"LASER PCM 2".
Step 6 Press the SETUP MODE button and the SSD-66 (5.1) should automatically come back up with an
AV Link. If the display does not read as described in Step 2, repeatedly press the SETUP MODE
button until an AV Link does appear.
Step 7 Press the VOL UP or VOL DN buttons to advance through the SSD-66 (5.1)'s available audio and
video links until the display reads "OPTICAL/V1".
Step 8 Press the INPUT SELECT button twice, once to exit the Setup Mode and once to advance the
display to read "TV/CABLE 3".
Step 9 Again, press the SETUP MODE buton and the display sould read an A/V Link.
Step 10 Use the VOL UP or VOL DN buttons until the display reads "ANALOG2/V2"
Step 11 Repeatedly press the INPUT SELECT button until the display reads "VCR 4".
Step 12 Again, press the SETUP MODE buton and the display sould read an A/V Link.
Step 13 Use the VOL UP or VOL DN buttons until the display reads "ANALOG3/V3"
Step 14 Repeatedly press the INPUT SELECT button until the display reads "SATELLITE 5".
Step 15 Again, press the SETUP MODE buton and the display sould read an A/V Link.
Step 16 Use the VOL UP or VOL DN buttons until the display reads "ANALOG4/V4"
Step 11 Repeatedly press the INPUT SELECT button until the display reads "CD PLAYER 6".
Step 12 Again, press the SETUP MODE buton and the display sould read an A/V Link.
Step 13 Use the VOL UP or VOL DN buttons until the display reads "DIGITAL2/V#". The "#" can be any
video number. You may wish to select a video link which you might watch while listening to CD.
Step 11 Repeatedly press the INPUT SELECT button until the display reads "TUNER 7".
Step 12 Again, press the SETUP MODE buton and the display sould read an A/V Link.
Step 13 Use the VOL UP or VOL DN buttons until the display reads "ANALOG1/V#". The "#" can be any
video number. You may wish to select a video link which you might watch while listening to radio.